

Introduction: How to Use Dropbox on Windows

Interested in using the cloud-saving service Dropbox on your windows computer? Get started by following these steps!
(Note: we primarily used Windows 8 when building these steps, so you may experience this process differently if you are using another version of Windows)
Step 1: Signing Up for Dropbox on Windows

1) Go to www.dropbox.com
2) Enter your first name on the right side of the webpage.
3) Enter your last name
4) Enter your email address
5) Create and enter a password.
6) Check box that says “I agree to Dropbox Terms”.
7) Click “Sign up.”
Step 2: Downloading and Installing Dropbox

1) Click “Download Dropbox” on the left side of the webpage.
2) Click “Run” on the pop-up on the bottom of your screen (image above).
Step 3: Downloading and Installing Dropbox (cont.)

A new window may appear asking if you want to allow changes to this computer. Click “Yes”.
• This allows your computer to accept Dropbox and download the installer.
Step 4: Downloading and Installing Dropbox (cont.)

Click “Install” on the next window.
• Your computer will now begin the installation process.
Step 5: Downloading and Installing Dropbox (cont.)

On the next screen that appears, click the option that says, “I already have a Dropbox account”.You will use the account information you created in Step 1 of this instructable, so make sure you have that ready.
Step 6: Downloading and Installing Dropbox (cont.)

Select the option “2GB” on the next window that emerges. If you desire more space for your Dropbox account, you can opt to pay for 100-200 GB of additional space. You can apply this upgrade to your account at any time, though these instructions will not cover that process.
Step 7: Downloading and Installing Dropbox (cont.)

The next screen will ask you to “Choose setup type”. As the installer recommends, choose "Typical".
Step 8: Downloading and Installing Dropbox (cont.)

The following window helps you connect your account with your smartphone. You can either set that up on this screen now, or, if you have an iPhone, you can go take a look at our iPhone Dropbox instructable some other time.
When you are done, click on the option "Next" in the bottom right area of the window.
Step 9: How to Use Dropbox on the Windows Desktop

First, locate the Dropbox icon within the bottom right section of your taskbar.
Step 10: How to Use Dropbox on the Windows Desktop (cont.)

1) Right click the Dropbox icon.
2) Click on the option “Open Dropbox Folder".
Note: the picture used in this step depicts a Dropbox account with 6.5GB of space. Your account by default should only have 2GB. This is normal. If you wish to expand your space, see Step 6, or a follow this link to the official Dropbox FAQ that explains how to obtain more space (some of which is free!): https://www.dropbox.com/help/15/en
Step 11: How to Use Dropbox on the Windows Desktop (cont.)

See the new window that appears. This is your Dropbox folder. Dropbox automatically provides one or more default folders for you (the image above may not resemble your default folder exactly). But move on to the next section to learn how to create and manage your own folders.
Step 12: How to Create a Folder in Dropbox on Windows
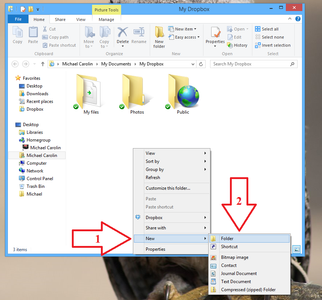

1) Right-click within your Dropbox folder and select the option "New".
2) Then select “Folder”. An untitled folder will appear.
3) Rename the untitled folder that appears if you desire.
Step 13: How to Delete a Folder Within Your Dropbox Folder

1) Right click the folder you wish to delete.
2) Select the option “delete”.
Warning: Deleting a folder inside your Dropbox folder will remove the folder and all of its contents from your online Dropbox account! You will be unable to access it from any computer or device afterwards. However, so long as you have not permanently deleted the folder from your trash bin, you can return it to your Dropbox folder and it will re-upload to the cloud. See steps 15- for how to drag files and folders to your Dropbox and simultaneously upload them to the cloud.
Step 14: How to Upload Files and Folders to Your Dropbox Folder


1) Open up your Dropbox folder.
2) Drag any file or folder––either from your desktop or another folder––and drop it within your opened Dropbox folder.
• If you want to send the file to a specific folder within your Dropbox folder, simply drag and drop the file inside that specific folder.
Step 15: How to Confirm That Dropbox Has Saved Your Uploaded Files to the Cloud


1) To confirm that Dropbox is in the process of saving your uploaded file to the cloud, check to see if the Dropbox icon on the taskbar animates with a swirl right after you drag a file into your Dropbox folder (see the second image that displays the blue Dropbox icon to see this swirl animation) .
2) To confirm that all files in your Dropbox folder have finished uploading to the cloud, click on the Dropbox icon and check to see that it says, “All files up to date”.
Step 16: How to Adjust Your Dropbox Preferences/Settings

1) Click on the Dropbox icon on the taskbar.
2) Select the option “Preferences...”
Step 17: How to Adjust Your Dropbox Preferences/Settings (cont.)

In the preferences window that appears, change the settings to whatever you like (optional).
For example, you can choose whether or not you want the Dropbox application to automatically start when you start up your computer.
Step 18: Finish
You're done!
Check out our other Dropbox instructables to learn how to share a Dropbox folder with a friend and how to use Dropbox on a Mac or iPhone.


