

Introduction: How to Build a ROV (Submarine)


A while back I was looking around on the internet and saw someone's home built ROV. I thought to myself that I could never build that. 3 weeks later, I had built a fully functional ROV. An ROV is a Remotely Operated Underwater Vehicle, and I have built mine to explore an old town under my lake. The ROV costs roughly about $150, depending on what materials you want. I still have to work out some bugs on the tether and I still have to finish the camera setup. It has taken Longer than I expected to finish the camera stuff. Check out the most recent video of it here: http://www.youtube.com/watch?v=xRWh7HqtBPA . Sadly, I didn't document the process until later in the project.
Step 1: Starting the Project


To begin your project, you have to sketch out an idea. I had a pretty simple design. Also, you will want to get your pvc as your maine material. Here is what you will want to have for the project:
Tools:
Hot glue gun
Dremel
Drill
X-acto knife
Hammer, screw driver...ect.
Saw
Solder gun
Materials:
Hot glue sticks (100 pack is best)
contact cement
pvc cement
16 feet of 3/4 inch PVC
8 three way elbow connectors
4 T connectors
Webcam, Gopro, or any small camera
PVC tube for camera (I don't have the dimensions)
Duct Tape roll
Hardware mesh screen
3 three volt motors
3 propellers
Balsa wood
3 DPDT switches
Floats (Pool noodles work best)
300 feet of 14 gauge wire (Doorbell wire works best)
Sheet of Plexiglass
3 "D" battery holders that hold 2 "D" batteries in series
6 "D" batteries
A lot of time and patience!!!
Step 2: Building the Frame

This is probably the most important step of all. You have to glue every part together several times to make sure that they don't come a part when it is under water. To start, you will want to take your saw and cut 14 sections of 12 inch sections. Then you will want to cut 4 three inch sections. Then start building the front and make your way back. (Use picture for reference). One thing that is not in the picture is the middle bar for the up and down motor. That was added later. It is a 12 inch long section hot glued onto the top of it in the middle. Also, take your drill and drill a couple of holes for water to flow out of the PVC.
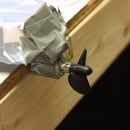
Step 3: Adding the Motors


Next, add the motors to it. I used two mini super cub rc airplane motors for forward propulsion and 1 radio shack motor for up and down movement. All of the motors are 3 volt motors. First, measure out the middle of each of the 12 inch sections on the back of it. Then, take your Dremel and cut out small 1 and 1/2 long sections in some PVC. Then, shape out a curved part that will attach to the frame. Use hot glue to attach them to the frame, then hot glue the horizontal motors to them. (Do this to the other motor on the other side) Then use your Dremel to cut out a small section on the top vertical motor bar for the motor to fit into. Then, drill a hole into the end of the pipe. feed the motor into the Dremel hole, then feed the wire through the pipe and out the wire hole. (Don't seal the hole because you will want water to be able to come out and in. Hot glue the motor in, then attach all of the propellers to the motors. Make sure that the motors can run freely without something binding with the shaft.
Step 4: Building the Camera Housing


Out of all of the ROV, this part has been the hardest part. Mostly because I kept on changing my idea for it until I settled on using a webcam for live viewing and a GoPro to record. I still have not finished the plexiglass part of it due to the fact of my hobby store didn't have it in stock, and all the other stores are very expensive. To begin, you will want to design a round camera housing that can fit your camera and the lights. Once you have that part assembled, you have to water proof it several times. The best way to have the compartment water proof and accessible all the time is to have one end be a Screw on cap and the other end the plexiglass. (Tip: don't put the plexiglass on until you have finished the inside and put the mount in and the camera and the lights. Next, make a mount for your camera. I made mine out of balsa wood and drilled in a bolt for a tripod mount. Then I hot glued it onto the housing's inside. Then, add the lights. I bought a $3 LED flash light with 27 LED'S in it, removed the case for it, added extra wire and i hot glued it right to the front of the housing. Then I put a makeshift battery pack on the back of the housing. Next, drill a hole on the top of the housing for cables. feed all of your cables through, then add some silicon around it so that it won't leak. Finally, take your plexiglass and measure out the size of your circle, cut it out, and then use silicon to glue it to the out side of the housing.
Step 5: Wiring the Electronics


This is a more complicated part. To begin, you have to create a controller. I made mine out of balsa wood and I put duct tape around it so that it would feel much better when you are holding it. You will want to measure out a square of balsa wood that will fit in your hand, then drill holes big enough to house the three switches. Next, glue them into place, then start wiring. When you are wiring, make sure that you solder each wire correctly. Once you have completed that, start connecting the motor wire to the tether wires. Each tether wires should at least be 75 feet long, but 100 feet is best. Finally, wire the battery boxes to the DPDT switches and add the batteries. Make sure that all of the motors run the right way you want them to.
Step 6: Finishing Things Up


To add your camera housing to the frame, you will want to first add the mesh wire screening to the bottom of the frame. (This will allow a place for the camera housing to go and it will allow water to pass through it.) Next, attach you camera housing to the screen. You can glue it, Duct Tape it, zip tie it, but it has to stay onto the mesh screen! Then, add your floats. To do this, you will want to put it in a pool. Once it has become neutrally buoyant, then you can run some tests. Also, add a piece of pool noodle ever foot or so on the tether.


Participated in the
Toy Contest

Participated in the
Battery Powered Contest

Participated in the
Remote Control Contest

Participated in the
Epilog Challenge V


