

Introduction: How to Drastically Speed Up Yout PC, and Maintain That Speed for the Life of the System.


This is a tutorial I made on how to clean up, tweak, and optimize you PC to make it run faster than when you first bought it and to help keep it that way. I will post pictures as soon as I get a chance to, unfortunatly as of right now I do not have the time.
Step 1: Download You Drivers!
Just to start off I am going to assume that it is common knowledge that you know you should keep your laptop/desktop clean and free of dust and dirt.
Ok, here we go kids lol.
Step 1:
Hopefully you already know this info, if not find out exactly what you have in your system because we are going to need that information to download all of the latest and greatest drivers for it. If by chance you are having trouble finding out exactly what it is that is in your system go to www.lavalys.com:8081/everestultimate530.exe and download this nice little app called everest. It will give you all of the information that you neded. Once you have all of the drivers downloaded put them on some form of removable media like a cd or flash drive. We will need them again in a few.
Step 2: Backup Anything You Want to Keep!
Step 2:
If there is anything you would like to keep such as files, documents, pictures, etc... then you are going to want to back them up. You can use a variety of tools from disks and flash drives to free online storage such as www.dropbox.com/downloading to achieve this task. When you are done it will be time for step 3.
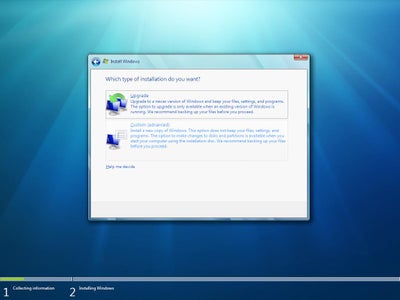
Step 3: Reinstall Windows!
Step 3:
Get your Windows installation disk and boot your pc from it. If you dont know how then google it. All you have to do is follow the prompts that you get and fill in the blank areas as they come up and reinstalling the OS should be a breeze. Once it is completed it is on to step 4.
Step 4: Install Your Drivers!
Step 4:
Ok, before we begin I want to make something clear, we are going to be reinstalling your systems drivers and I have noticed that the majority of people after they install new drivers, or upgrade drivers when they are asked to reboot they will check reboot later or whatever option they have. Don't do this. I know it is a pain in the ass and time consuming but it is much better to have everything go right the first time than to mess something up or in a wort case scenario corrupt a windows file and have to go back to step 1 again. So once your drivers are all installed it will be time for us to install the applications that you will need to make your system run like a champ.
Step 5: Get Your Anti Virus and Cleaning Tools!
Step 5:
Ok, now that all of the drivers are installed I am going to assume that you have internet access. Im just going to make a quick list here in 1 step of all the apps we need.
Ccleaner - System Cleaning Tool
www.ccleaner.com/download/downloading
Microsoft Security Essentials - Anti Virus
www.microsoft.com/Security_Essentials/
Defraggler - Alternative to the windows defrag
www.piriform.com/defraggler/download/standard
Threat Fire - Anti spyware/maleware app
dw.com.com/redir
Revo Uninstaller - Alternative to add/remove programs and MUCH better as well.
c0464521.cdn.cloudfiles.rackspacecloud.com/revosetup.exe
After you have downloaded them and installed them make sure to run ccleaner, and do a quick defrag as well. You can leave all of them at their default setting as well. Next step... tweaking.
Step 6: Tweak Time!
Step 6:
Time to tweak your system for optimal performance. Here is a link to Winrar, I have both 32 bit and 64 bit on my dropbox which are all in the links provided at the bottom of the page. Whichever you need, download and install it, then download and extract all of the files I have compressed in the archive named Windows Tools.rar.
Now that you have all the files extracted install ChromeSetup.exe, which is your new browser Google Chrome. Also you will want to run dxwebsetup.exe witch will update and install the latest direct x runtime for you video. Next run Half Open Limit Fix.exe That will help boost your networks performance. You should set it to a number around 150. Once that is done install your codecs so you can watch movies on windows media player as well as many other things, Your codecs are K-Lite Codec Pack.exe. Next run install_flash_player.exe for your web browser. If there is anything else in there you want to install you may.
OK! Now it is time for you to open the folder labeled Wndows Context Menu Registry Tweaks.
All of these are optional and just increase productivity by adding quick links to apps and settings via the right click menu. Personally I use Change Sound, Folder Options, Programs and Features, Registry Editor, Run, Task Manager, change hover time, My Computer Context Menu, Take Ownership, Window Switcher, Windows 7 Registry Tweaks, and Windows Vista Desktop Context Menu.
All you have to do is double click them and they will be entered into your registry and when you right click on the desktop, and on My Computer you will notice them.
Winrar 32-bit
dl.dropbox.com/u/3641923/Windows%20Tools/wrar-x86-391.exe
Winrar 64-bit
dl.dropbox.com/u/3641923/Windows%20Tools/winrar-x64-390.exe
Windows Tools
dl.dropbox.com/u/3641923/Windows%20Tools/Windows%20Tools.rar
Step 7: Adjust Settings
Step 7:
Adjust settings. Everyone has their own preferences as to what they like so I will post here what my setting is like. Feel free to copy it if you wish.
Right Click My Computer>Properties>Advanced System Settings>
Under this are a few tabs. Starting with Remote, click the tab and turn off remote assistance.
Click System Protection and ten Configure and turn of system restore.
Click Advanced and the under Performance click Settings.
Click Adjust for best performance, and then we will click what we want to have on.
This is a basic setup for XP, Vista, and 7 so if you don't have a tab here don't worry about it.
Enable Aero Peek, Enable Desktop Composition, Enable Transparent Glass, Show Translucent Selection Rectangle, Smooth edges of screen fonts, smooth scroll list boxes, use drop shadows for icon labels on the desktop, use visual styles on windows and buttons.
Next go to My Computer and double click it. Find your primary drive which should be labeled (C:) and right click it, then go to properties. Click the Hardware Tab and find which drive is your C drive and click it, then click properties. In the next box that pops up click the policies tab and make sure that Enable write caching is selected and Turn off write cache buffer is selected as well and then click ok.
Now back to the first window we were at where you clicked the Hardware tab. Click General, and in the bottom left there is a check next to Allow files on this drive to be indexed blah blah blah... Uncheck it and click Apply.Click ok at the next window that pops up asking if you want to apply to the subfolders and files as well. If you get a popup asking for administrator permission click continue. You also will get a popup saying an error occured. Thats ok, it's normal. Click the option Ignore All. Those files are protected system files and cant be changed so it is fine.
Next go to Start>Control Panel and Folder Options in XP, in Vista and 7 go to Appearance and Personalization>Folder Options. Click View, and in XP there is a check next to automatically search for networked blah blah. Uncheck it. Now for everyone uncheck Hide extensions for known file types, Show pop-up descriptions, Show encrypted or compressed NTFS files in color. Then click Apply, and OK.
This next step is for those of you with wireless only.
Now go back into control panel and go to network and internet, or network options. Then network and sharing center. On the left click change adapter settings, and then right click your wireless connection and go to properties. Under the name of your adapter it says configure, click that.
Now, click the Advanced tab and if you see something that says Frame Burst, or Throughput Enhancement make sure that it is turned on. Under Wireless mode make sure it is on a,b,g which should be number 6 on the list. Under transmit power put it on highest and then click ok.
Time for the final steps of our journey finally.
Step 8: Love MSCONFIG and SERVICES.MSC
Now, if you havent already click on the taskbar and go to properties. Then click the Start Menu tab. Next click Customize and scroll down until you see where is says Run Command and put a check next to it and click ok. Now click the start menu and click Run. In the box that pops up type msconfig and hit enter. Now on this window click where it says selective startup. Thats the one you want. Next go to the Tools tab on vista and 7 and click scroll down until you see Disable UAC in Vista, or Change UAC Settings in 7, and click it and click launch. Move the slider down until UAC is turned off.
You might have to do the same thing for the Action Center setting is 7 as well and turn off UAC notifications or it will keep bugging you about it.
Next click the Startup tab and make sure nothing is running at startup that we dont want. If you dont know what it is that is there do a google search on the name and find out if you want it to remain on or not. Next click the Boot tab and where it says timeout put the number 3 in there, and then click advanced options and if you have a multi core processor click Number of processors and select the highest number you can. Then click next to where it says Maximum memory and it will show all of the memory you have in your system. Then click ok.
Now back at the main window where it says general, boot, services, etc... click where it says Make all boot settings permanent and finally Apply and OK. Now we need to go back to Start>Run, and type in services.msc and click enter.
Now go to the bottom of this page and download, then add these service tweaks to the registry and while you have the services open look through them and if you use a tablet pc and an graphic pen turn that service back on, etc...
Windows 7
dl.dropbox.com/u/3641923/Windows%20Tools/Windows%207%20Services%20Tweaked.reg
Windows Vista and XP
dl.dropbox.com/u/3641923/Windows%20Tools/Vista%20Services%20Tweaked.reg
Step 9: Clean Up, and Organize!

Now you just have to copy your backed up things back to the PC and then run Ccleaner, and then run Defraggler. Once that is done reboot and run ccleaner and defraggler once more and you are done, and it should stay nice and zippy for you too. Just run ccleaner once a day, and defraggler once a week.
I will post pictures once I get a chance.


