Introduction: How to Make a Backpack


Tired of never finding the perfect backpack for you? This Instructable will show you how you can design and sew your very own custom backpack! It covers a broad range of sewing topics. Everything from drawing your design, creating a prototype and editing a pattern. To adding foam support structures and using darts to create 3D dimensions in fabric.
Be warned this is an advanced sewing Instructable! Read through the entire Instructable to get an idea of what you're getting yourself into before you buy materials!
If you'd like to get some practice in before trying this Instructable check out my sewing collection and try some of the great Instructables in there.
Feel free to make this backpack your own by editing the design to suit your backpack needs. If you feel so inclined make an Instructable about your unique creation!
Please note that I used an industrial walking foot sewing machine to make my backpack. It is possible to sew a backpack with a regular consumer sewing machine, you will just have to choose your fabrics appropriately.
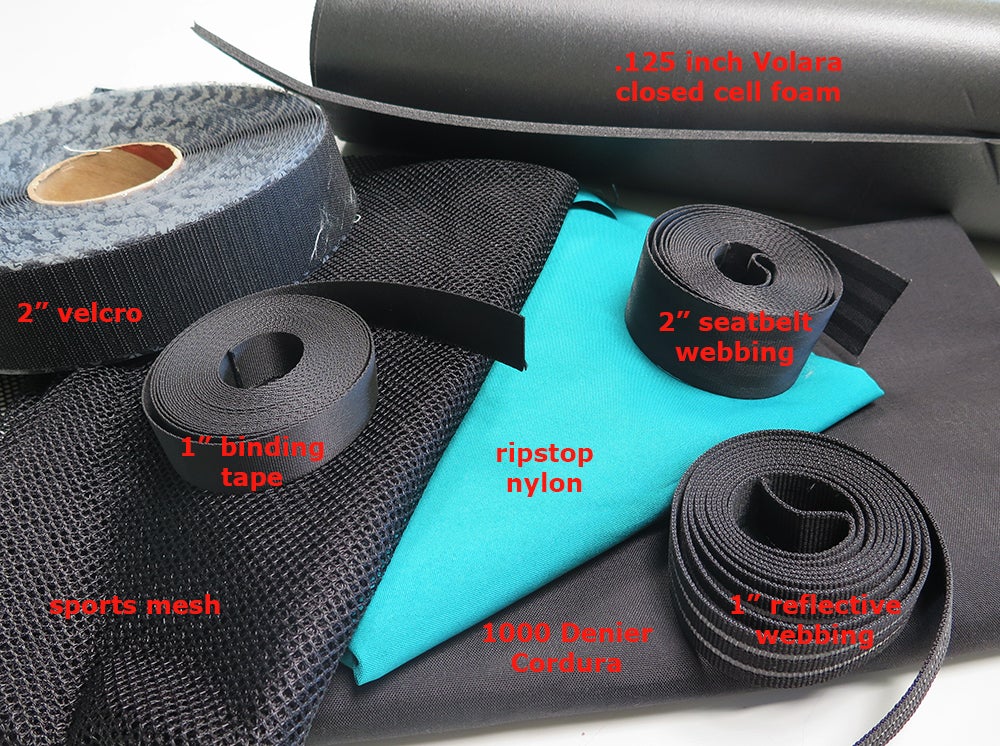
For my backpack I used:
- 1000 Denier Cordura fabric (2yards)
- ripstop nylon fabric (2 yards)
- nylon webbing 1"(with reflector strips) (4 yards)
- 2" seatbelt webbing (1 yard)
- 1" webbing binding tape, a sports mesh fabric (.5 yards)
- 1/8th inch closed cell Volara foam (.5 yards)
- 1" aluminum cam buckles (x2)
- 2" quick release buckle (x1)
- 1.25" D-rings (x2)
- 2" velcro (5")
- 12" zipper (x1)
If you're interested in the materials I used check out these links:
cordura, ripstop, 1" webbing, 2" seatbelt webbing, binding tape, sports mesh fabric, foam, cam buckle, D-Ring, 2" velcro, zipper, 2" buckle
Alternative (lighter) fabric options for consumer machines:
Cordura (outer fabric) - You can swap out for a mid weight denim, canvas, lighter upholstery fabrics, light faux suede or leather, non stretch velvet, mid weight packcloth nylon, etc.
Ripstop Nylon (lining) - You should be fine using this or a similarly weighted fabric. Try to keep the lining light so you not unnecessarily weight down your bag. (if you don't want to line your bag you can skip this completely)
1" binding tape webbing - A good lighter weight alternative is 1" gosgrain ribbon (there are lots of awesome color options!)
Sports Mesh (aesthetic for straps) - You should be fine using this but it isn't necessary, I used it for aesthetic reasons
1/8th Inch closed cell Volara foam (padding and structure) - You're going to want to use some sort of foam to give your bag structure and comfort. If you can't find any foam available locally check online. I got mine from foamorder.com don't buy anything over 1/8th inch as your machine likely won't be able to handle it. (my industrial machine struggled with 2 layers of 1/8th inch foam) You might also consider using a thin yoga mat or foam sleeping pad available at most outdoors stores.
Hardware - All of the hardware can remain the same as long as you do not alter the webbing widths as they do not need to be sewn through. If you do alter the webbing widths pick hardware that is compatible with the new sizes.
Step 1: Creating Your Design
This is the fun part, designing your backpack! Think about everything you use your backpack for. What do you like about other backpacks? (It's ok to base your backpack off something you've already seen and modify it) What don't you like about other backpacks? (if you hate using zippers don't design one into your bag!) Do you have a long torso? Do you like a small backpack for essentials or a big backpack to fit everything plus the kitchen sink?
I like to keep my bag simple but give a specific place for objects I carry everyday. It might be a good idea to empty out your current backpack and examine what you carry and how you might like to accommodate those items.
I designed my bag to include an internal laptop pocket to hold my laptop and sketchbook which I have on my at all times.
I like to have a small zippered pocket for smaller items that I need easily accessible, like my cellphone and wallet. So I made sure I would have a secure pocket located on the inside of the top of my bag. (easy for me to get to without having to dig through my bag but safe from thieves!)
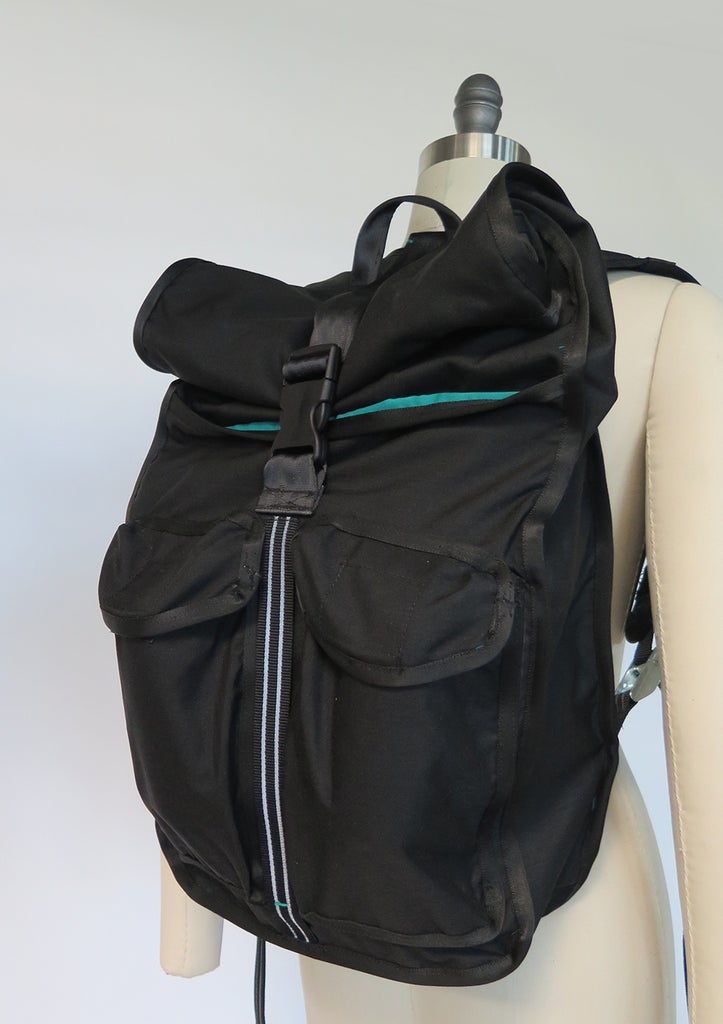
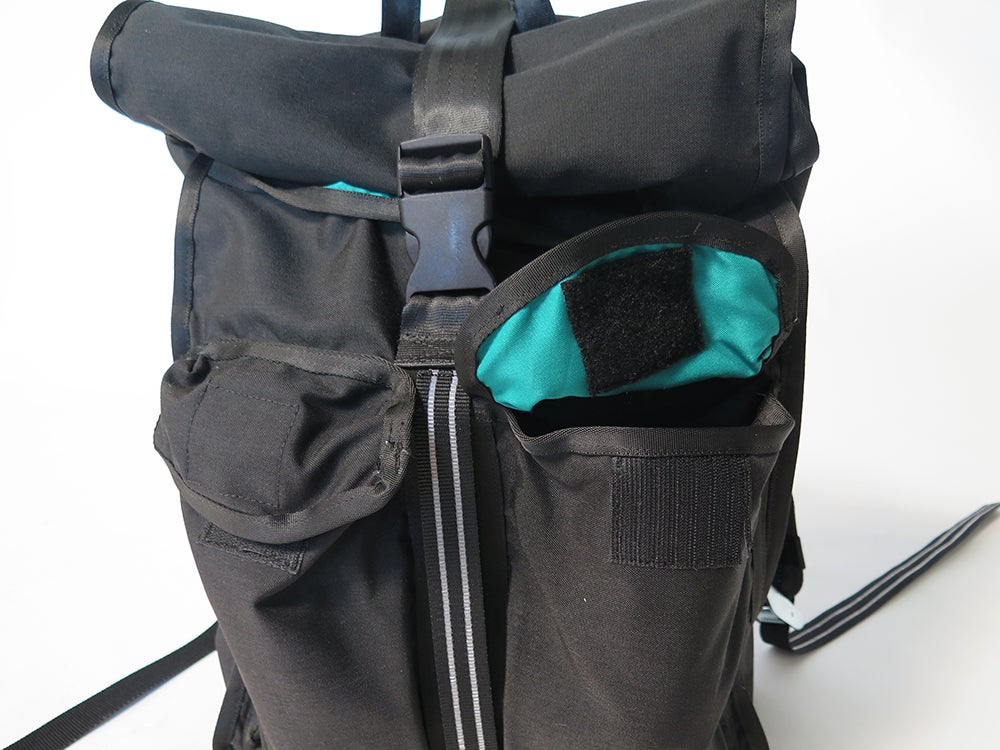
I always carry a water bottle but with my old bag I could only store it inside my bag. While hiking through Arches national park I had to keep stopping to take off my bag open it up to get to my water. To fix this, I designed two front pouches big enough to fit my favorite water bottle and other quick access items that don't need to be as secure as my phone and wallet.
I commute to work by bike so I decided to include reflective webbing in my backpack for increased visibility on the road.
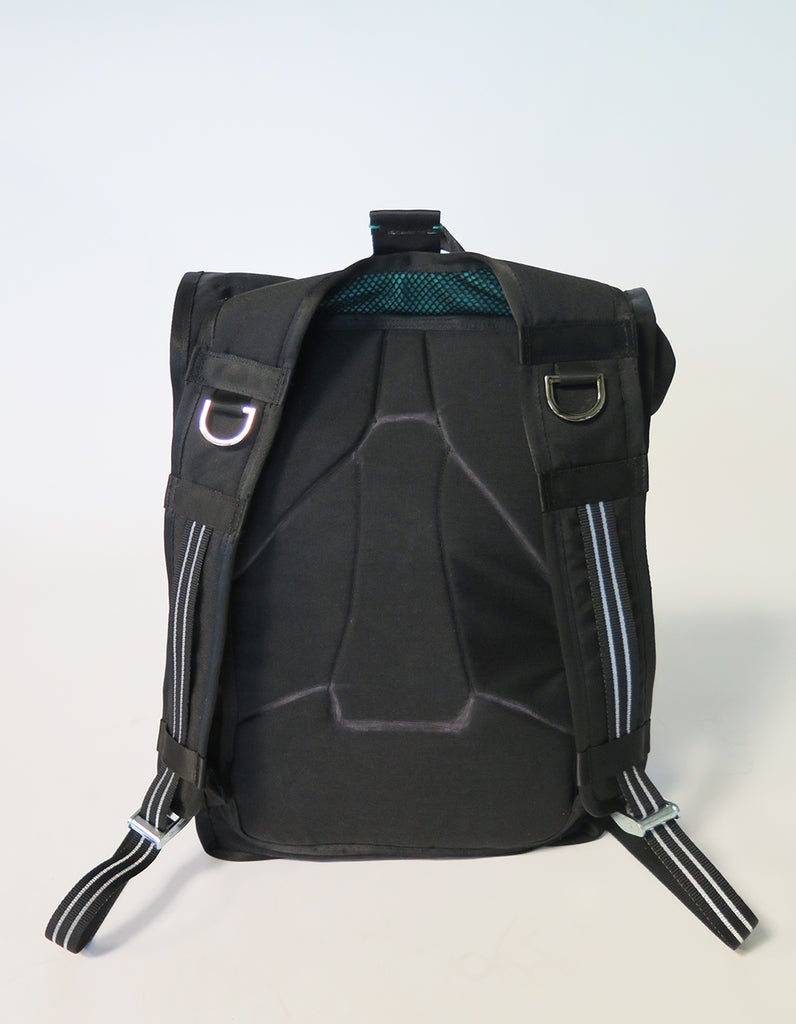
I liked the strap design of my old backpack so I kept the design mostly the same.
If you like to carry your pet cactus around why not include a cactus holding pocket!
Now that you've spent some time thinking about your ideal backpack it's time to draw it. It doesn't have to be perfect, you don't need to be an artist. This drawing is just for you! It's meant to help you understand your design, work out any potential problems before you start sewing, and facilitate the transition into pattern making.
You might have all sorts of plans about including enough pockets to hold 17 cats and shoulder mounted lasers. (I know I did) Drawing will help you realize if you can fit all these components and how they'll go together.
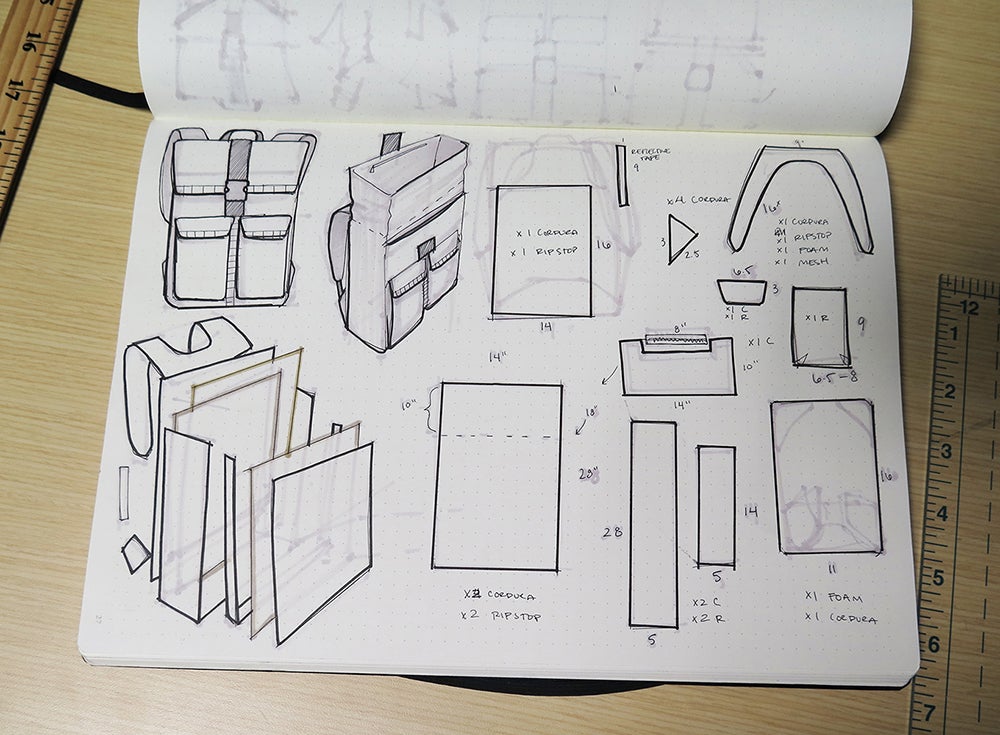
First I draw my design in orthographic views (front, back, side, top, bottom) this helps get the basic placement of things down without getting distracted by trying to draw in perspective.
Once I have the basic design down I draw it in different states in perspective to reveal any components hidden inside. What does it look like when the top is open? Is it a roll top bag? Are there internal pockets? Again remember it doesn't have to be perfect this is just for your own understanding. (I drew pages and pages before I got my design finalized and there's still changes I would make!)
Consider also using different colors or shading to reference material changes I noted reflective material by hatching with vertical lines.
Now start thinking about how your bag will be constructed. This is the first step to pattern creation. It might be a little confusing to visualize if you aren't familiar thinking spatially just take your time and try documenting as you go.
I like to think of it as an exploded view. What would it look like if all the pieces were suspended in space. I start with the back and pull it apart in layers drawing as I go. You might try thinking of it as something familiar like constructing a sandwich. There are layers of pieces that go together in a specific order. What are the "buns" of your backpack? What goes after each bun? You wouldn't want to put your mayonnaise outside of the bun just like you wouldn't want to put your fabric lining outside your bag. Making a Backpack is just like making a fancy sandwich that you get to wear at the end!
Next lay these parts out into what they might look like as flat fabric pieces. How many do you need of each? What fabric will they be cut out of? What are their dimensions? (if you're not sure how big you want them you can take a backpack with dimensions that you like and measure off of that. Or feel free to use the measurements I used. (keep in mind I am 5'2") (I also altered the dimensions in the drawing above for my final bag see farther steps for accurate dimensions)
I find the most critical dimension is the length of the bag. Nothing is more awkward than having a bag that is too long and hangs past your back or too short and can't hold everything you want! If you do alter the length dimensions of my bag design consider also adjusting the width to match so you keep the proportions comfortable.
Since I was basing my straps off a backpack another bag I made sure they would fit the width of my new design. If you're recycling any patterns or dimensions from other bags be sure to keep these things in mind!
Step 2: Creating a Pattern
Now that you've got your design and figured out how it will go together it's time to translate your drawings into a paper pattern.
First gather pattern making supplies, I like to use:
- large roll of paper with grid
- scissors/rotary cutter
- several markers and pencils of different colors
- triangle
- large ruler
- ruled cutting mat
- my sketches

Now start enlarging the flat view drawings you made for each part into patterns.
Your bag will only be as good as your pattern so spend the time making a great pattern and save yourself the frustration of mismatching edges and seams later.
Here are some tips to make your pattern accurate.
 To keep your patterns and markings clear and get crisp edges and corners
 For making curved edges the easy way!
 To make sure your centered curves are symmetrical

Some helpful information to always include in your patterns. It can be easy to confuse pattern pieces when they're just blank pieces of paper all roughly the same size. Marking your pattern will also save you the frustration of accidentally mistaking a pattern for scrap paper and throwing it out (I've done that too many times!)
I've attached my pattern at the top of this step if you want to use my design or some components of it. It's not very printer friendly but the shapes are all fairly simple for you to recreate on paper. Just follow the dimensions provided.
Attachments

Step 3: Prototyping + Editing a Pattern
This next step, prototyping, is optional but recommended especially if you have altered my design or chosen to create your own design. If you're creating a carbon copy of my design prototyping isn't absolutely necessary.
Prototyping may seem excessive in both time and materials but it's very useful. A good design can go through many iterations and prototypes before it is finalized. While most people outside of the professional world don't have time or resources to prototype that many times, I would recommend at least testing out your design once in scrap fabrics before moving onto final materials.
A Prototype has several useful functions:
- Order of construction (what needs to be sewn together first, this is very important!)
- Design reality (will the drawing you made actually work in fabric?)
- Functionality and aesthetics (do you like your design? is it the right size?)
- Testing (allows you to test your design in the real world and make changes)
What materials should you use to prototype?
The most important thing to simulate with prototyping materials is how the fabric will behave structurally. Colors and textures don't matter. You should consider a fabrics weight and drape characteristics.
For example, if you want your final outer fabric to be a brocade upholstery fabric you would want to prototype it in a cheaper lightweight canvas.
For my prototyping fabrics I used scraps I found in the materials closet at Pier 9.
- Cordura - Canvas
- binding tape - improvised by cutting 1" strips of waxed canvas
- ripstop lining - satin
- webbing - more waxed canvas
- hardware - I left the hardware out because it wouldn't affect my final design or construction
The prototype might look a little silly but it served it's purpose. Here's some of the changes I was able to realize after making it.

Remember to take lots of notes while making a prototype. I find it useful to document what order I did steps, important pointers to remember or things to fix on the final version.

Draw out any changes you want to make and document how that might effect each individual part. I like to redraw all the pattern parts I need to change, record their new dimensions and any other alterations. Be sure to mark off as you make each alteration so you don't "double edit" a component. I marked each part with a blue dot after I altered the pattern.

Mark your new measurements in a different color to avoid confusion.

Remember to make changes to other pattern marks to reflect the new dimensions.
Step 4: Cutting Fabric
You have a design, you have a pattern, you've bought your materials (prototyping or final), now it's time to start making.
Spread out your fabric on a large flat surface wrong side up. Make sure it isn't double layered.
Lay your pattern pieces out on the fabric to find the most efficient use of materials and trace around the edges with fabric chalk or something similar.
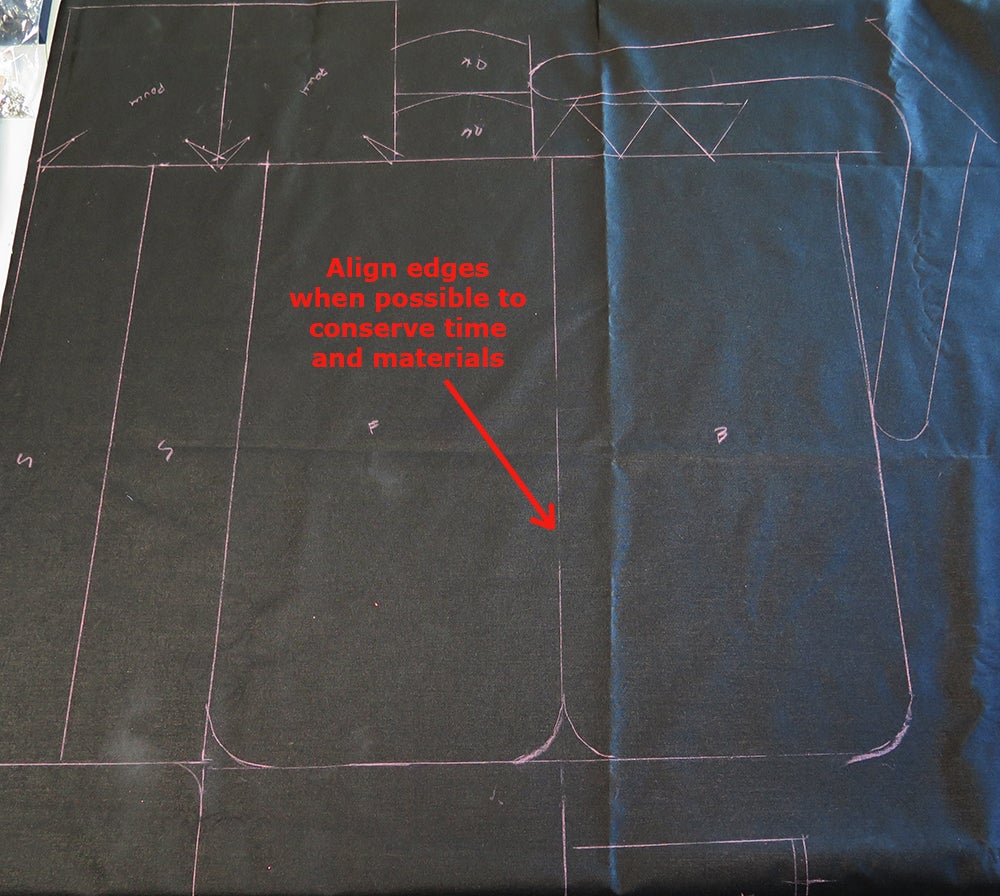 If you're comfortable with cutting fabric you can line straight edges up end to end to conserve time cutting and marking as well as materials. However if you don't cut exactly along the line you'll mess up one of the pieces on either side.

Using a straight edge when cutting with a rotary cutter can help avoid this situation. However a straight edge won't help you when cutting your fabric with scissors.
Cut out all the pieces necessary pieces. For me this meant cutting out of my cordura, ripstop, mesh and foam.
After your foam is cut out, if you haven't considered it already, it's time to design your back pad details.

Here's what mine look like.
Step 5: Sewing Pockets
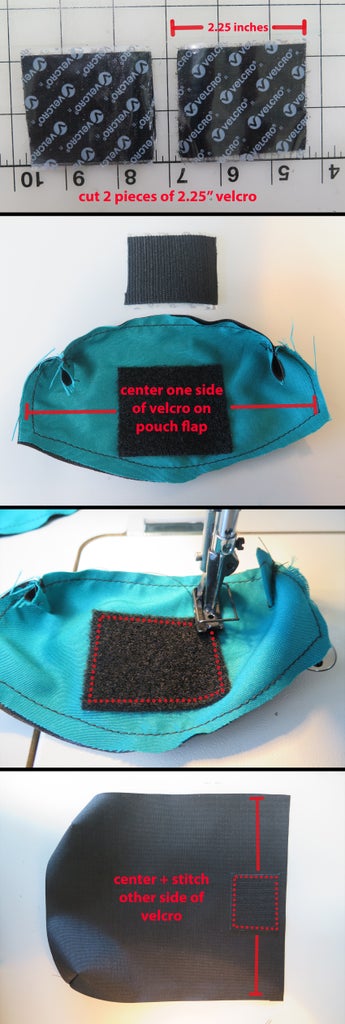
I started sewing my backpack by preparing the front pouches. This included using a basting stitch (a basting stitch is just a loose stitch used to tack pieces of fabric together it is not structural so you don't have to knot the ends) to hold together the lining and outer fabric, adding darts to give the pouches dimension, adding binding tape to finish the edges and increase durability, and attaching velcro for closures.
If you did not include pouches in your design you may skip this step.
Take both lower main pouch pieces and follow the instructions below.

These instructions are for the pouch flap

Adding velcro


Step 6: Preparing the Side + Bottom Pieces
Follow these steps to prepare the side and bottom pieces.


Step 7: Sewing the Straps
Follow these steps to make the straps


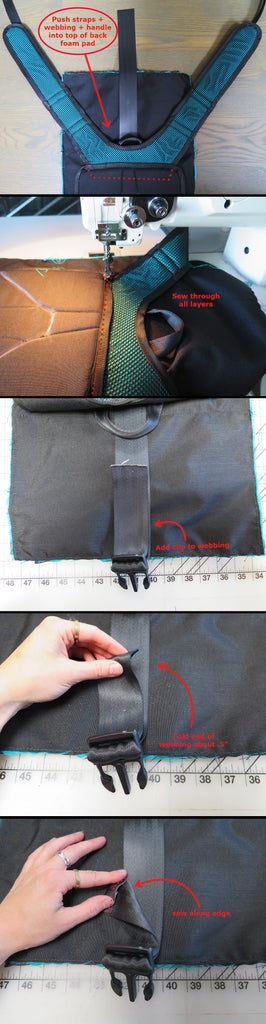
Step 8: Creating the Back Padding
How to make the back pad!
Note that I used two layers of 1/8th inch foam to give extra dimension. You don't have to do this! and probably shouldn't if you aren't using an industrial machine.

The chalk lines can be wiped off later.
Step 9: Making the Top Handle
Making the top handle out of 2" seatbelt webbing

Step 10: Making the Lower Strap Attachments
Making the lower strap attachment (small triangle of fabric that sticks out of the bottom of the back of a backpack)

Step 11: Preparing the Internal Laptop Pocket
Assembling the internal laptop pocket

Step 12: Preparing the External Front Pocket
Preparing the outer front pocket. I lined mine to create extra contrast.

Step 13: Attaching the Back Pieces
In this step you will be preparing the main front and back body pieces as well as sewing all pieces that will be attached to the main back fabric. (one of the 27" x 14" rectangles) order is very important in this step so follow along.

This next part might get tricky because you're sewing through so many thick layers of material. If your sewing machine gets stuck try slowly hand cranking it thorough and changing to a heavier needle. Don't force your machine though!
Step 14: Attaching the Front Pouches
This step covers attaching the front pouches and lower clip to the front pocket fabric.

Attaching the lower clip

Step 15: Adding the Zipper Pocket
Adding a zipper and installing the inside pocket


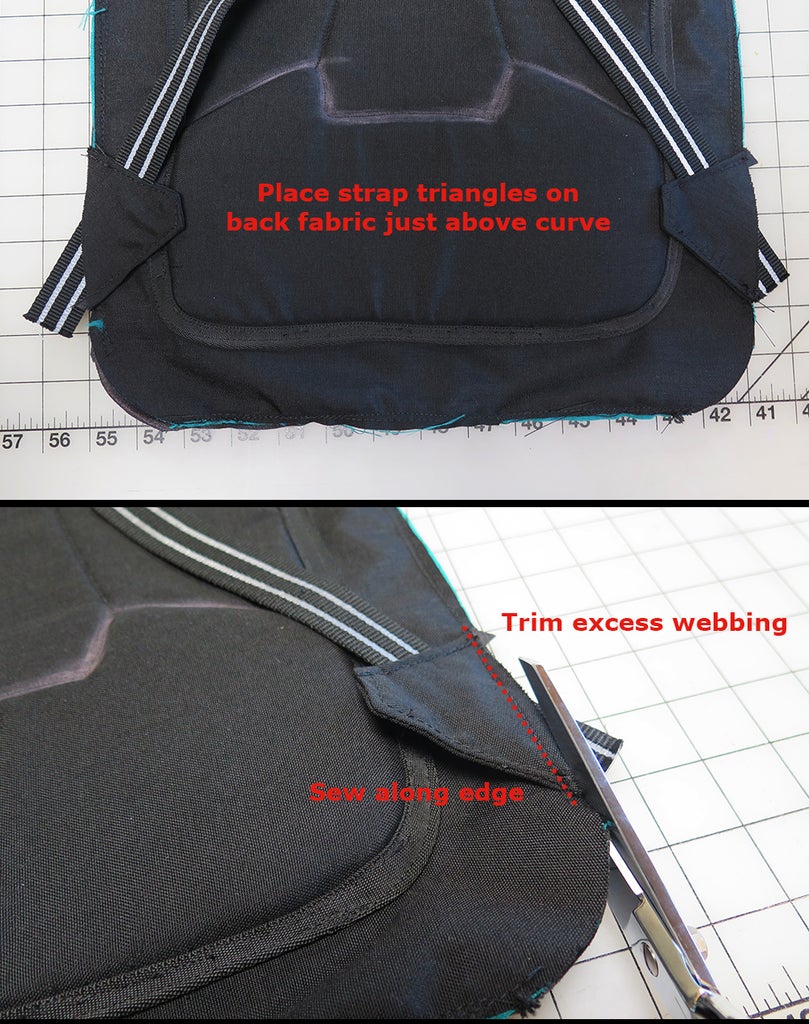
Step 16: Attaching the Lower Strap Pieces
Attaching the lower strap triangles
Step 17: Basting Together the Front + Back + Sides + Bottom Pieces
Basting the main body of the bag together. It's starting to look like a backpack, you're almost there!

Step 18: Fixing Uneven Top Edges
Like me, You probably ended up with some uneven top edges despite following the instructions perfectly. Here's how you can quickly fix them.

Step 19: Binding the Outer Raw Edges
The final finishing touches, adding binding tape to the outside edges.
Start with the sides and bottom then move to the top.

Step 20: Attaching Strap Cam Adjusters
This is the final step. Attach the strap cam adjusters to the strap webbing.

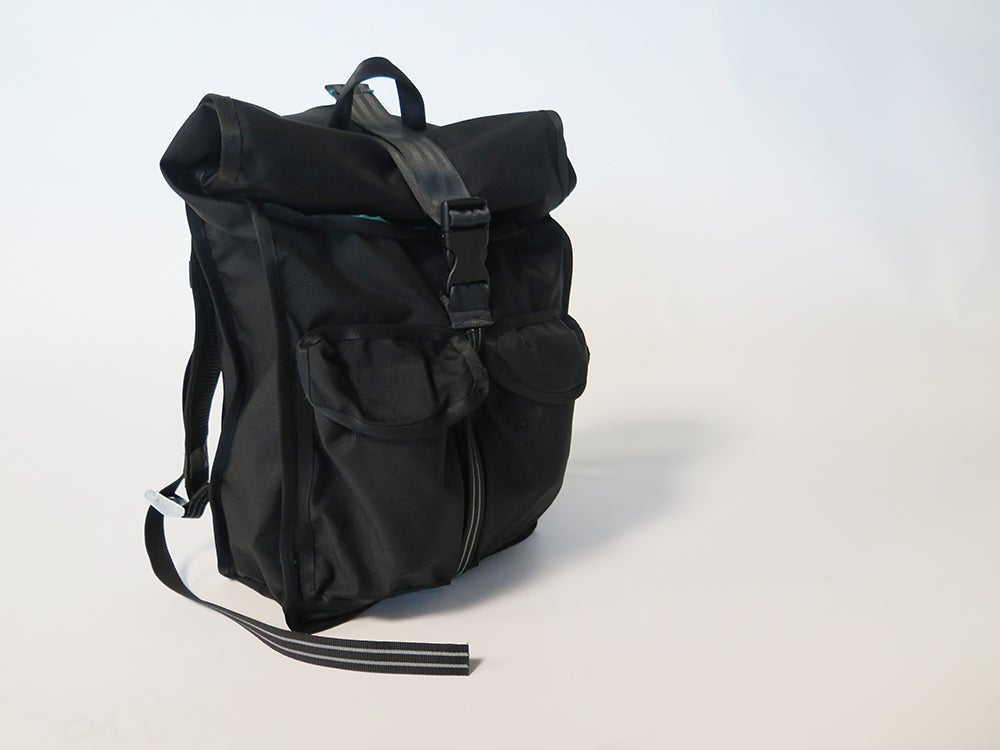
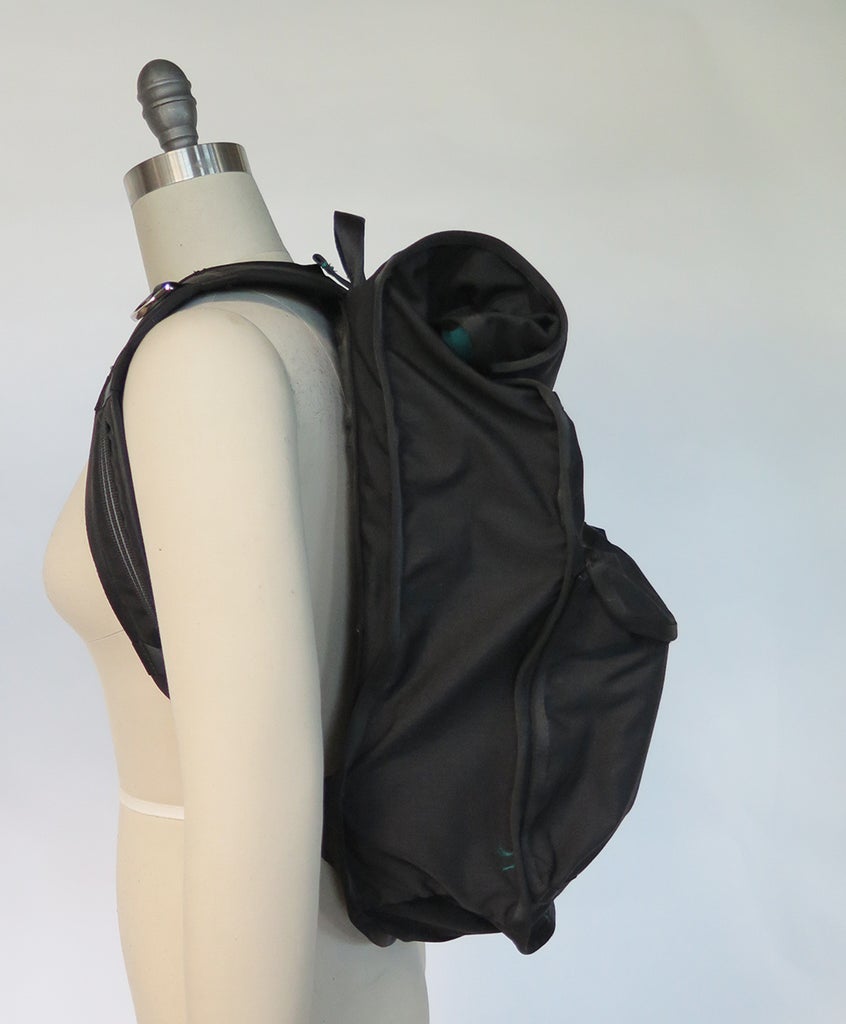
Step 21: Finished!
You've just designed and sewn your own backpack from scratch!
That's awesome!
Test it out and see how it works. You might even find things you'd like to change or wish you'd done differently. I have a bunch of new features I'd like to include if I make a version 2!