

Introduction: How to Make a Car-d-drive


This instructable will show you how to make a hard drive inside of a model car. I find it more aesthetically pleasing to have a model car on your desk rather than a plastic hard drive. When reading engadget one day, I came across this: http://www.engadget.com/2010/11/24/flash-rods-delorean-hard-drive-250-500-jigabytes/. It is essentially a model car with a 500 gig hard drive in it. It looked pretty cool, but it costed $250 and considering that 500 gb hard drives go for ~$50 these days, the price seemed a bit steep. So since I had a 500 gb portable drive and a model car lying around, I queued the music and set to work. This instructable is entered in the usb contest, so PLEASE VOTE!
Step 1: Materials

1 smallish portable hard drive however many geebies you want (Look in the pics for the one I used) ~ $50
1 1/18 scale maisto/bburago/mattel model car (I used a maisto one that they sell at costco for $7) but you can find a decent one for around $20 that will look good on your desk.
1 phillips screw driver
1 hammer/scissors/pen/knife/spoon/fork/phone/soda/ipod/thing that you can break plastic with
30 minutes
Step 2: Gutting the Car


Use the screwdriver to open the car into 2 pieces; the metal part and the part with the wheels. take everything you can out of the car and off of the body. Take the doors off and rip the door linings off. Break the seats etc. off. After this is done, the car should resemble the car in the pictures. Put the doors back on, and proceed to the next step.
Step 3: Taking the Hard Drive Out of Its Casing


Now, take your hard drive and with your scissors etc. pry open the plastic casing gently and pull the hard drive out. DO NOT TAKE THE INTERNAL METAL CASING OFF OF THE DRIVE! Also, be careful to not put too much pressure on the drive. After the drive is taken out, plug it into a computer to make sure it works. If it doesn't, then you are screwed. If it does, move on to the next step.
Step 4: Putting the Hard Drive Into the Car


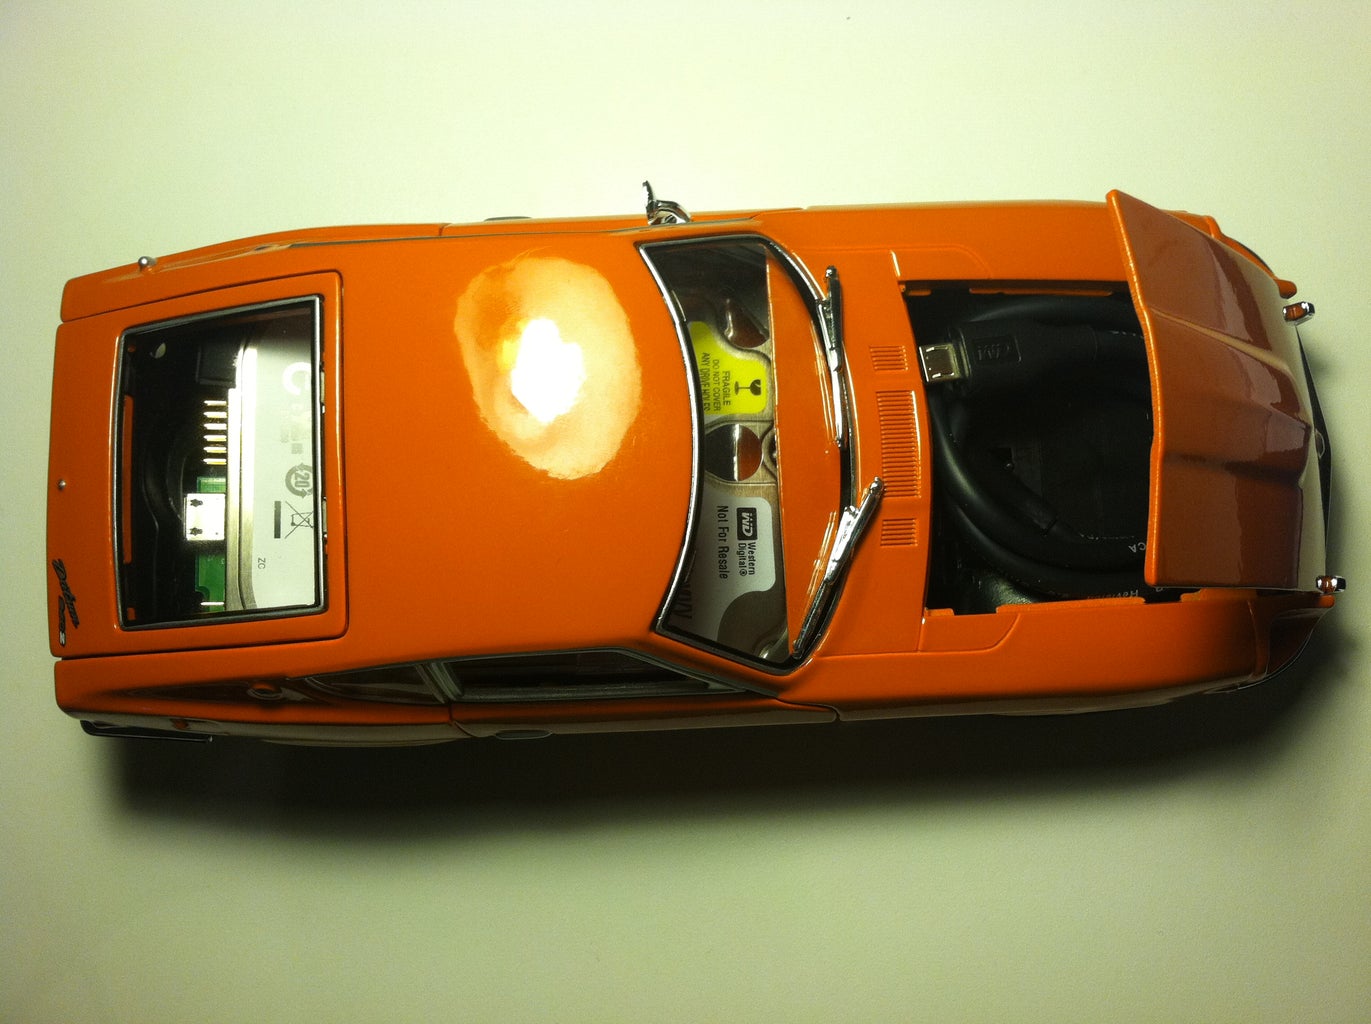
Now, with your naked hard drive, take the metal part of the car and put it upside down on a table. Then, take your hard drive sticker side down with the usb port facing the back of the car, and put it into the metal tub. Try to put the drive at an angle slanting down from the back, so that the port is accessible. Remember to keep the rubber bumpers on the drive as seen in the pics below. If you have the slightest bit of doubt, look at the pics.
Step 5: Screwing the Car Back Together


Now take the bottom of the car (the plastic part) and place it facing down, on top of the metal shell that has the drive in it. Screw in the wheels if necessary. However, even though there are 5 places where you can screw the bottom in, only screw in a screw into the middle hole. This will prevent unnecessary pressure from being put onto the drive while holding the car together.
Step 6: Congratulations! You Have Now Made a Car-d-drive!


Flip the car over. Now, due to the unique positioning of the hard drive, when you open the rear hatch you have access to the usb port! Also, I discovered that the front engine bay is a perfect place to store the usb cable for the drive. Have fun with your newly encased hard drive! Below are some more pics from the finished product. Thanks for reading!


