

Introduction: How to Make a Coffee Roaster


I've been roasting coffee at home for years using a homemade roasting drum on my gas grill using a rotisserie to spin it. Unfortunately the last drum I built started rusting and was badly in need of replacement. I built the previous roaster at home using a pair of mesh pencil cups, a hasp, hinge, and some aluminum angle that I bought at a home improvement store. I built this at techshop so I could make more of the pieces myself.
Here's the parts you'll need if you want to make your own:
2 large mesh pencil cups
~12"x6" 16 gauge (0.050" thick) aluminum sheet
3" of 3/32" stainless steel filler rod (or any other thin & strong metal rod)
~6"x1"x3/8" aluminum bar stock
a few nuts and bolts
some rivets
Alternatively, you could do the smart thing and buy a hinge and hasp and skip most of the work. Either way, here's what I did:
Step 1: Prep Your Material


You'll need a three inch long hinge, an inch and a half long hasp, and a two inch lever for the hasp. Cut the three lengths from your aluminum bar stock (I used a horizontal bandsaw - a cold saw would work just as well). Then square each piece using a large end mill.
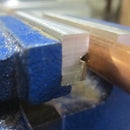
Step 2: Machine the Hinge


Mount the 3 inch length of aluminum in a vise, then cut a 1/4" deep 3/8" wide slot across the middle (or middle-ish like I did). Flip the piece over and cut away enough material so that you're left with a 1/8" thick thing that looks vaguely like a hinge.
Turn the piece vertically, remount it off the edge of the vise, and drill a 3/32" hole as shown in the third picture.
Flip the hinge back to the way it was, drill a pair of 1/16" holes 1/3rd of the way in from each edge, 1/2 way across the narrow hump in the material. Using a 1/16" end mill, cut a slot through the material from one hole through the shoulder then back to the hole, down to the second hole, and out to the shoulder again. This should end up looking like the fifth photo. After you've got that cut, turn the piece to one side, cut away the material holding the two sides of the hinge together, flip it over, repeat.
You should now have two pieces and be completely fed up with my inability to describe how to make something using a vertical mill.
Step 3: Assemble the Hinge


Cut a piece of filler rod just a little longer than the width of the hinge, assemble the hinge, then use an arbor press to wedge the pin in place.
Step 4: Make a Hasp


Take the longer of the two pieces of aluminum and machine it down to 1/2" wide. Once it's 1/2"x2"x3/8", cut a 3/8" wide groove 1/4" deep down the length of the piece. Flip it over and cut an overlapping groove half of the length of the piece. Take the other piece of aluminum and cut a 1/2" wide groove 1/4" deep across the length of it. Drill a hole through both so you can attach the pieces together at the end, and a hole in the smaller piece towards where the middle.
Cut a 3/8"x2" strip of metal to use as the catch. Clap it in a vise and smack it with a hammer until it looks the way you want it to (picture 3).
Cut another two pieces of filler rod, one the width of the inside of the hasp, the other the width of the outside. Use the arbor press to assemble the hasp.
If you're less of an idiot than I am, start building your roaster at the next step.
Step 5: Make Some Agitating Fins


Cut your sheet of aluminum into eight strips, each 6"x1.5" (or whatever the depth of your pencil cups are by 1.5"). The pencil cups I used get narrower at the very bottom so I cut a small piece out of each strip using a corner notcher. Using a sheet metal brake, bend each piece at a 90 degree angle, half an inch from the edge. After bending all of the strips I used a hammer and a scrap of wood to convince them to actually stay at 90 degrees.
Step 6: Attach the Hinge and Hasp to One Side


Make some shims the same size as each side of the hinge and the size of the hasp. Drill appropriate sized holes through the hinge, hasp, and shims. Poke a hole for each bolt through the pencil cup. Bolt it together.
Step 7: Attach the Fins


Drill three holes through each of the fins. I used a 1/8" bit since I was using 1/8" rivets to assemble it. Use an awl to enlarge the mesh where each hole in the fin lines up. Stick a rivet in the hole, and use a rivet gun to secure it. Repeat.
There has to be a less offensive way to lay out the fins - my lack of planning left me with this unfortunate looking design.
Step 8: Poke a Hole for the Rotisserie Spike, Roast Some Coffee


Drill a hole in the end of the drum, about an inch from the edge. Stick your rotisserie spike through the hole and whack the bottom of the drum with a mallet to square off the hole. Repeat for the other side. Put the empty drum in your grill with it set on high, and leave it there for half an hour or longer to burn off any glue/paint/whatever might be burnable.
Load the drum with a pound and a half of green coffee, put it back on the rotisserie for about 15 minutes with the grill on high until the coffee is roasted. Dump the roasted coffee into some sort of bean cooling contraption or a colander. Cool the beans. Wait 24 hours, grind, brew.


