

Introduction: How to Make a Die for a Pasta Extruder


I've had a really cool hand crank pasta extruder for a few years but there are limited options for brass or copper pasta dies that fit. After making my espresso tamper out of a chunk of copper I thought I'd move on to a marginally more complicated project. Here's the way I made a new pasta die. I made it at techshop with a fair amount of advice from their fantastic staff.
In retrospect I should have either started with a more straight forward shape or taken the Tormach class and used a CNC mill to cut the curved profiles. I'll almost certainly make stupider mistakes on my next project.
Let's get started!
Step 1: Shape the Outside


Toss a big chunk of metal (in this case copper) in a lathe and turn it down to the size that fits the extruder. My machine uses 59mm for the outer diameter, 49mm for the inner.
Step 2: Flatten and Drill the Top


The way my extruder works, the dies have a large hole on the inside that tapers in towards the outside and they have a fairly thin profile of the final shape on the outside.
After taking the piece of metal out of the lathe, I cut it on a horizontal band saw, then loaded it into a three jaw chuck on a rotary table on a vertical mill.
A couple of light passes with a fly cutter gave me a flat surface. After that, I used a center drill to start the three holes that eventually would be used to shape the pasta. After the center drill, I drilled a 1/16" pilot hole all the way through the die and then a 3/8" hole three quarters of the way through the die.
Step 3: Seek Help!

Having finished (or so I thought) the top side of the die I removed it from the chuck, flipped it over, and spent a while cluelessly looking at it. The idea here is to cut a groove the shape of an S through the bottom of the die so that it lines up with the 3/8" holes I drilled on the other side. After mumbling to myself for a while I took my piece of copper out to the front desk to consult the guys with beards. It's not all that hard to tell which of these two was more helpful :)
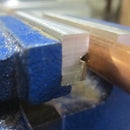
Step 4: Do Something Complicated


Here's where I made another mistake. What we came up with as a way to cut the curves was to recenter the die in the chuck, offset so that the center of each arc would be in the center of the chuck. The pilot hole I drilled earlier gave me reference for where the center of the S would be but I'm left to my own stupidity to figure out where the center of each arc would be. A few pieces of aluminum from the scrap bin stuck in the chuck as shims and I'm back in business cutting stuff (this time with a 1/16" endmill). Maybe I should have measured instead of eyeballing it. The first S ended up smaller than the other two, and I cut a shallow groove the wrong size before re-centering the piece and cutting through. Such is life.
Step 5: Back to Drilling...


After cutting the profile for the pasta I needed to drill a larger hole on the top of the die since the S shape ended up being bigger than 3/8". No big deal since a 1/2" bit was big enough to make it work. After everything looked ok I used a pick to get rid of a couple of burrs and then sanded all the rough edges.
Step 6: Test It Out!


Hey look, it sort of looks like the others. Even better, it fits the machine!
Step 7: Make Lunch!


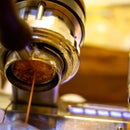
Make some pasta dough (about 100 grams of 00 flour for each large egg), let it rest for half an hour at room temperature, then load it into the extruder. Even though I removed all the burrs, sanded the surface smooth, and washed the die, I discarded the first handful of dough that I ran through the machine. Eating metal shavings isn't high on my list of things to do today.
Cut the pasta around 1.5"-2" long, toss with flour, boil for maybe 7 minutes until it's done. While the pasta is cooking toss some leftover sauteed mushrooms (in this case yellowfoot chanterelles we foraged for last week) in a pan with some butter, add some freshly grated parm, drain the pasta, toss it in the pan with the mushrooms, adjust the seasoning, and serve with a little oregano and piment d'espelette on top.


