

Introduction: How to Make a Leather Passport Cover (with Laser Cutter)


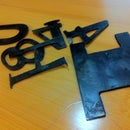

When you are a seasoned traveler (like my partner), your passport takes a lot of wear and tear. Luckily, you can prevent the deterioration of your passport (a.k.a "your ticket HOME") in a few short steps!
This project requires the use of a laser cutter which I accessed at TechShop.
Step 1: Things You Will Need...
Before we begin, you should gather a few important materials:
1. passport
2. leather remnants-- (about one square foot)
3. needle
4. heavy weight thread
5. thread snips or scissors
6. computer equipped with Adobe Illustrator (I used this @ TechShop)
7. laser cutter (I used this @ TechShop)
8. a flashdrive
Step 2: Make Measurements and Create File

Fold open your passport and measure the length and width of it in this position--write these dimensions down.
I measured roughly 7" across and 5" tall.
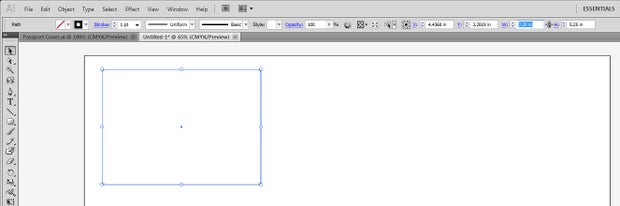
Open up a new file in Adobe Illustrator, I chose the file size to be 18" x 24" because that is the bed size of TechShop's Epilog Helix laser cutters. It also helps visualize where and roughly what size the cut will be by putting it in context with the bed.
Draw a rectangle with rounded edges (it is one of the basic shapes in the dropdown menu if you click and hold (or right click) on the shape tool. While the shape is still selected, specify the dimensions in the toolbar at the top of the screen. THIS IS IMPORTANT: Add an extra .25" to each dimension to give yourself enough room to stitch the leather to a nice snug fit.
Draw two more rectangles. These will be the inside flaps that hold the covers of your passport. The dimensions should be 5.25" (same height as the first rectangle) and 2" wide. This should be wide enough to secure the covers and provide a space for contact information. These flaps can be laid out anywhere on the file--especially if your leather remnant is an odd shape, but for now let's place them in this orientation (see below) for convenience while constructing the rest of the template. You can move them around to fit your remnant after you've created the hole pattern.
Now we need to make holes for the thread. Threading it by hand will be much easier, consistent, and attractive this way.
DISCLAIMER: I'm sure there are more elegant ways to achieve a consistent hole pattern, but for the purposes of a quick and dirty prototype, I drew them as follows...
First, draw a circle with a width of 0.02" anywhere on the page (it helps to be far away enough from the previously drawn rectangles that they are not accidentally selected during this procedure). Select the circle and Transform>move. Type in a distance of 0.15" @ 0 degrees and then press the "COPY" button instead of "OK"
Now, with the new circle still selected, type Ctrl+D to Transform Again. This should add another circle .15" to the right. Repeat this command until you have a line of circles that is about 7.25" long. The intention being that you now have a string of holes long enough to span the top of the large rectangle.
Before moving the holes into position, turn the rulers on if you haven't already, Ctrl+R. We are going to create some guides to help place the holes correctly. Click on the top ruler and drag a guide down at 1". You can specify the exact position of your new guide by typing the value in the Y direction at the top.
Create a new guide. This time click the ruler on the left and drag a vertical guide at 1". Type 1" for the X value.
Now select all three rectangles and place them so that the left and top sides of the larger rectangle line up with the new guides.
Create guides for and locate the two side panels as well so that we can easily make offset guides for holes later. I've also copied and pasted a few lines of holes to rotate and move around for the next step. 
Now that we know exactly where the outlines are, we can create guides for the holes. Create two new guides (one horizontal and one vertical) that are offset .1" from the ones you just drew.
Select an entire row of holes and drag to place centered on the .1" offset guides for the larger rectangle. Copy, paste, and rotate in order to achieve holes all the way around this first shape. Delete any holes that are unnecessary. Your spacing will be slightly off in the corners, but it will not be noticeable in the end. The result should look like this:
In order to get holes that match up on the inside flaps, click and drag a selection box around the area where the left flap will be placed (remembering that the flap is 2"). You may have caught a few things that you don't want to copy when drawing this selection box. You can always remove items from your selection by pressing shift and clicking the unwanted items to deselect. Items such as guides and the larger rectangle will need to be deselected so that when you do perform a copy, you are only getting the hole pattern. Paste the pattern and drag it to line up with offset guides on one of the smaller rectangles (flaps). Since one flap goes on each side, do the same thing for the other small rectangle, but this time be sure to select the pattern on the right side of the large rectangle instead of the left, because that is where it will eventually be attached.
You should end up with something that ends up like this:
Now that you have a template, don't forget to change all of the lineweights to 0.001" so that they will be interpreted as cut lines by the laser cutter.
Step 3: Cut!
[This instructable will not cover how to USE the laser cutter, as there are many other resources available on this subject already.]
I always like to run a few test cuts and etches to make sure my settings are dialed in before I send my file. These typically consist of one cut and one raster, like this:
I run the same test a few times until I am satisfied with the cut quality. After doing this, be sure to write down your settings so that if you plan to recreate the cut, you have a better approximation of where to start.
Now you're ready for the real thing!
Step 4: Sew

Now that you have the three laser cut pieces, position the larger piece so that the nicer looking side is face down on the table. This will be the outside of the passport holder. Line up the two smaller flaps on the right and left, being sure the nicer looking side of the fabric is facing up, towards you. Using heavy weight thread and a hand needle, carefully stitch the pieces together, pulling each loop snug, but not tight enough to bunch up the edge. I chose to make my stitches diagonal but you can play around with different styles to find out what is attractive to you. Having pre-cut holes makes this process quite forgiving.
Tie a knot to finish off the stitch.
Step 5: Use It!

Now that it's all put together, you can safely house your passport inside! Just slide the blue covers into the flaps!


