

Introduction: How to Make a Plant Hanger Out of Rope


I'll be showing you how to make a plant hanger out of rope. A quick search on etsy for rope plant hangers yields several macrame plant hangers, which generally focus on hitches and square knots. In this instructable, I'll be showing you how to tie one that is made up of braids and decorative knots such as the Matthew Walker knot and Turk's head knots. Each braid and knot that I'll be tying could be an instructable itself, so I won't be focusing on the specifics of tying each knot. Instead, I'll be taking you through how they are all pieced together.
Step 1: Materials


Rope - I'll be using 1/8" cotton rope. You'll need 120 feet for this plant hanger. I buy it by the spool (1200 feet) at knot and rope supply: http://bit.ly/14wi43K
Electrical tape - I'll use this to whip the ends of the rope so they don't unravel as we tie. Electrical tape is flexible and meshes well with the rope.
Thimble - This is a 5/16" thimble. You should be able to pick one of these up at any local hardware store.
1.5" diameter wooden ball - I'll be using this at the very end as the core for the final knot. You can get them at any local craft store. The one I have has a flat bottom, but any ball will do.
Step 2: Cut the Rope


We'll need 6 strands of 20 feet. I lay out all 120 feet, 20 feet at a time, just going back and forth 6 times. Then I put a couple inches of tape at the 20 foot lengths and cut the rope in the middle of the tape.
Step 3: Braid the Loop


First, use two half hitches to attach the rope to a hook. Then begin braiding. We have 6 strands, so we'll be doing a 6-strand round braid. Here's a good video that explains how to do a 6-strand round braid: http://www.youtube.com/watch?v=186mcycMcA4
The braid needs to go all the way around your thimble, so to see if you've braided enough just loop it around the thimble. When you're done braiding, cinch the ends. You can use electrical tape if you like. In this example, I've tied constrictor knots using some extra cord I had laying around. Put the braid around the thimble and cinch it as well.
Step 4: Tie a 12-strand Matthew Walker Knot


Now that we have our 6-strands around our thimble, they come together as 12 strands. To bring them all together, we'll be tying a 12-strand Matthew Walker knot. Here's a tutorial that explains how to tie a 6-strand Matthew Walker: http://www.frayedknotarts.com/tutorials/MWK-6strand-Wilson/MWK-6-Wilson.html
Also, here's an instructable I put together that describes how to tie a 3-strand Matthew Walker knot: https://www.instructables.com/id/How-to-create-a-simple-rope-dog-toy/
The 12-strand Matthew Walker is very similar, it's just trickier to keep everything in order. While tying it, I recommend keeping the knot much looser than in the tutorial above. It makes it easier to get the knot completely tied and then you tighten everything down.
Once it's loosely tied, you can remove the cinches that are preventing the braid from coming undone. Leave the cinch around the thimble until you've tightened the Matthew Walker knot. With 12 strands, the trickiest part of the Matthew Walker knot is tightening it up evenly. Take your time and tighten each strand slowly and evenly until everything is really tight. Once it's tight you can take off the cinch around the thimble.
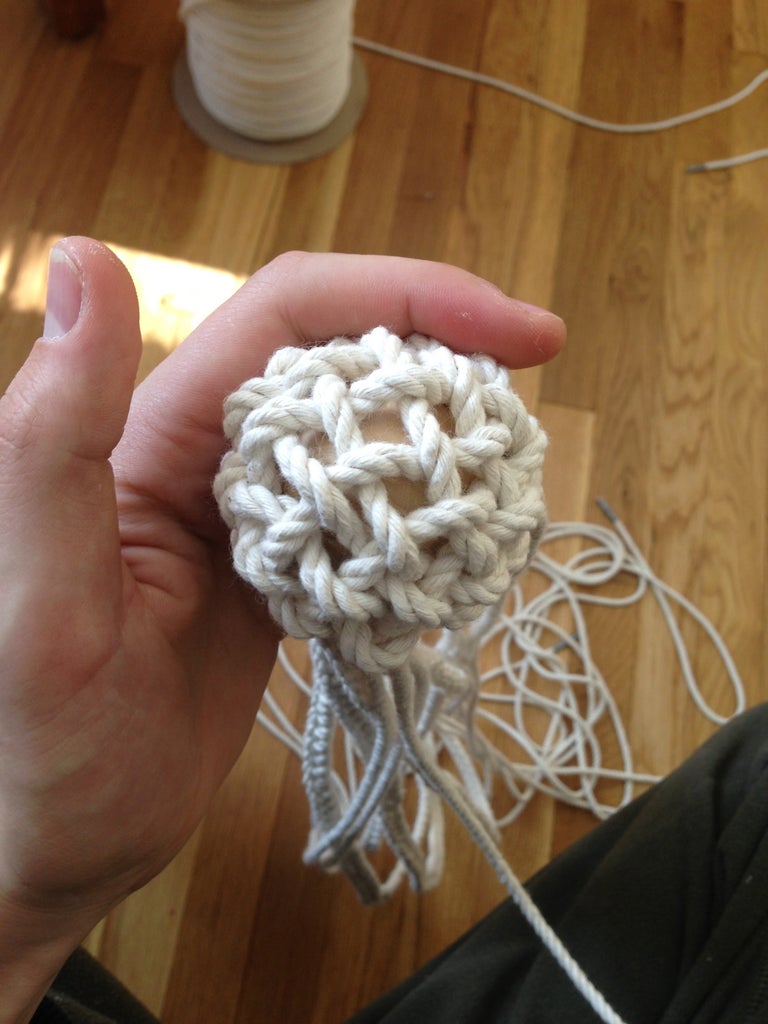
Step 5: Crowning

The next step is to do a lot of crowning. You'll often see crowning done in lanyards with 4 strands. It's a similar proces with 12. Each strand just goes over the next strand (I actually go over the next two strands, as it makes it a bit easier to get it really tight). Here's a video that demonstrates how to do it with 4 strands: http://www.animatedknots.com/crownsinnet/
You can do it as much or as little as you want. The important piece is to do enough so that we have a core for our next knot, which will be a 4 part 12 bight Turk's head.
Step 6: 4 Part 12 Bight Turk's Head


I used a tool that I wrote to get the instructions for tying this knot:
http://freakinsweetapps.com/knots/knotgrid/advanced.html
It generated the image of the knot grid. You can see that each strand goes down to form a bight and then back up and goes under the 3rd strand down for it. You'll then start weaving over and under strands that you've previously laid down. Just try to follow the image. My program also generated the instructions below, which may be useful for some (though it only labels bights so you still have to know that you're going to the 3rd strand down from the one you started on). After you finish the knot, double up the knot by following it around again and then tighten everything up.
Strand 1
From . . to A2
From A2 . . . to
Strand 2
From . O to A3
From A3 . . . to
Strand 3
From U O to A4
From A4 . . . to
Strand 4
From U O to A5
From A5 . . . to
Strand 5
From U O to A6
From A6 . . . to
Strand 6
From U O to A7
From A7 . . . to
Strand 7
From U O to A8
From A8 . . . to
Strand 8
From U O to A9
From A9 . . . to
Strand 9
From U O to A10
From A10 . . . to
Strand 10
From U O to A11
From A11 . . U to
Strand 11
From U O to A12
From A12 . O U to
Strand 12
From U O to A1
From A1 U O U to
Step 7: More Braiding


Hook the thimble onto the hook that you used for braiding. We're going to be making four 3-strand braids. You'll want to braid until it's as long as you want your plant hanger to hang.
Step 8: Bring All Braids Together


Now take all four braids and bring them together around a pencil and cinch them. The pencil isn't totally necessary, but I do it to help make sure I don't cross the braids. Once they're together, tie another Matthew Walker knot. Then remove the cinches.
Step 9: Cover the Ball


This knot is #967 in the Ashley Book of Knots (a must have for any serious knot tyer). Just set the ball on the Matthew Walker knot that you just finished, then tie this knot. Once it's tied, continue to do a few extra overs and unders until the ball is evenly covered. It will still be loose and have gaps, but just make sure everything is even. Then you can double everything up, then tighten it down. Then you can trim the ends and poke them down into the knot so you can't see them.
Step 10: All Done!


Now you can put a pot in and hang it up!

Participated in the
Epilog Challenge V

Participated in the
Craft Contest


