

Introduction: How to Solve Sudoku Puzzles (beginner and Advanced)

In this guide I will explain all of the tricks I have found to reduce the possibilities in a sudoku puzzle and ultimately solve it. Each step in this instructable will be of a different trick so if you come across any you already know of then feel free to skip ahead to the later ones.
**For beginners** let's get to know the puzzle itself, a sudoku puzzle is a grid of 9 small squares horizontally by 9 small squares vertically. where after every 3 there is a thicker line and throughout the puzzle various numbers are placed. The object of the puzzle is to figure out the places where you have to place the numbers 1-9 in order to have every single row, column, and block filled up with a 1, 2, 3, 4, 5, 6, 7, 8, and a 9. Most sudoku puzzles are made so that there is only one final solution after sifting through all the options and filling in all the blocks. **For beginners**
The last thing for this introduction will be my order of doing things:
1. I use 4 terms regularly, a block is the 3x3 area of squares separated by the thicker lines, a row is the horizontal line of numbers, a column is the vertical line of numbers, and a cell is any individual square on the board.
2. each trick will be given *'s for how annoying I think they are to find and use, but they will be ordered by similarity (ie. the pairs/triples/quads will be together but it may be more conducive to move onto the later tricks before thinking in quads.)
3. on each trick I will first explain what to do, then show how it works in the example image, and finally the logic behind why it works.
4. I like to enjoy myself while solving them, so the steps may seem a bit inefficient as i voice my own standards.
Step 1: Visualization*
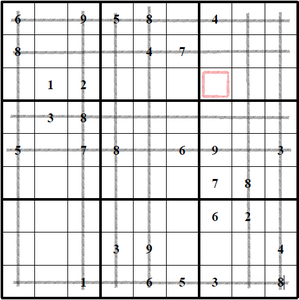
Look for single cells within the blocks that do not intersect any horizontal or vertical lines that could be drawn from one of the numbers on the board, then place that number when you find them. An easier way to think of this is find all of the 1's on the board, draw mental lines vertically and horizontally off all of them, then see if you can find any blocks where all but one cell is either crossing these lines or filled by other large numbers. When you do, you would know that you can fill in that cell with a 1; this can be done with any number.
In my example given I drew the lines off of every 8 on the board and in the upper right block there is a single cell that does not cross any of them, so that block has to be an 8. Take care to not fill in the middle 2 blocks however, they both already have an 8 and the puzzle would be wrong at that point.
The logic behind this move is that in order for every row, column, and block to have the numbers 1-9, absolutely no row, column, or block can hold the same number twice, so by visualizing lines off of every single instance of a number, you effectively show yourself all the places a number can't go.
Step 2: Candidate Lines*

Sometimes while visualizing for places to put numbers you come across blocks where 2 or 3 cells in a line could possibly be that number but none of the others in the block. This is a useful piece if information because the line formed by those cells also cannot hold the number in question. I often mark in the number in smaller writing in cells like these as a note to myself that there is a candidate line
In the example there are only 2 spaces for a 1 in the bottom right block and the line formed cuts off more possibilities letting you figure out that the red square is the only cell in the middle right block that can have a 1.
The logic behind this is that when the candidates are in a row but nowhere else in the block, it doesn't matter which of the 2 or 3 it is, on that one line the slot will be filled and no others in any other block on that same line can share the number.
Step 3: (Optional) Counting*****
To fill in more possibilities you could look through each cell and count all the numbers in the same block, column, and row, but I personally find this to be too much work with too little gain and cannot be bothered to show it.
Step 4: Repetition!
the previous steps don't end once you've done every number, a large majority of puzzles are easy enough that they can be solved with just the first two steps, you just have to keep going back through the cycles as more and more numbers get filled in until you finally can't find any more.
Step 5: Pencil Marks*
After having gone through visualization and not solving the whole puzzle it is time to start really marking up the puzzle. The amount of candidates for each remaining space is not something a normal person would be able to keep track of so we use pencil marks - write in the possibilities of each cell so we can find out what could go in each cell and use that to determine the one true answer for each.
The best way to take notes is to write on the puzzle with something erasable, like a pencil and writing each number in specific spot in the cell which remains consistent throughout the board (kind of like the numpad on your keyboard). Personally, I write all the possibilities for 1, then 2, then 3, etc then move on to the next tricks. Take care to not miss a cell or else you could end up making the puzzle harder for yourself.
Step 6: Omission*

Not one I have ever put into practice, but the logic is sound. Whenever you have a row or column where a specific number appears within a single block only, then that number can be removed from the other 2 rows or columns making up that same block.
In the example, there is a pair of spaces where a 5 could be on the middle left block in the third row, marked in blue, so all the candidates marked in red can be erased
The logic being that if the number can only be found in that row/column within a single block, then the number has to be one of the 3 cells that are shared between the line and block and can't be any of the others in the block. it's kind of like a reverse engineered candidate lines.
Step 7: Naked Singles

These would not occur if you did the optional counting trick, but if you went straight into doing pencil marks on a fresh puzzle then you will find some of these, simply put, they are cells with only one possibility, in this case, a 9.
Step 8: Hidden Singles*

Find a row, column, or block where a number appears in only 1 of it's cells. That one cell becomes the number there was only one of.
In the example above, the 4 is the hidden single which would actually uncover the 8 as another hidden single, uncovering the 6 as yet another.
The logic being that it is the only possibility for that specific number within the line or block, so it has to be that number to satisfy the "have numbers 1-9 in every column, row, and block".
**For beginners** If you are only starting out with sudoku puzzles then this is really as far as you need to go, the tricks listed later than this are all a more advanced level and don't actually show up in a lot of puzzles. **For beginners**
Step 9: Naked Doubles*

Naked doubles are a pair of cells in a block, column, or row that have the same 2 numbers and no others after pencil marks. all other cells in the same block/column/row as the naked double can have the numbers of the double erased from their candidate list.
in the example above the 4 and 6 make a naked double forcing the other cells in the top right block to lose their 4 and 6. Also because of the placement, if there were any 4's or 6's in the top left block aside from this double, then they would be erased as well.
The logic being, whatever one of the cells is, the other cell has to be the other, so on the same row, column, or block no other cell could share that value.
Step 10: Hidden Doubles**
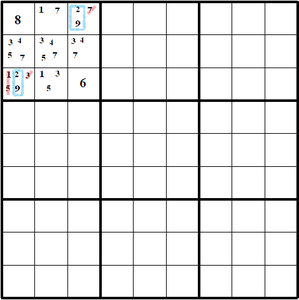
in a row, column, or block there exists only 2 cells with a pair of numbers and none of the others have them. All the other numbers but the doubles can be erased from the 2 cells
In the example above, the 2 and 9 are exclusive to the corner cells and so the other numbers in the cells got erased.
The logic being that since those 2 cells were the only ones with those 2 numbers, neither of them could have been any other number so they were erased.
Note: as with all hidden numbers, they can only be found if the block/column/row has already eliminated their candidates save for the numbers in question, so there is no point in thinking about doing naked doubles after hidden doubles.
Step 11: Naked Triples**

A group of 3 cells with 3 different numbers which force each other to be the other of the 3 if any of their possibilities are chosen. Just like with the doubles erases all other of any of the 3 numbers from the rest of the cells not included.
In the example above, 5, 6 and 9 monopolize those 3 spaces so all the others in the same row have to remove those 3 numbers.
The logic being the same as the naked pairs.
Step 12: Hidden Triples****

Within a block, row, or column 3 cells with 3 exclusive numbers between them and none of the other cells. Erases all other numbers but the triples themselves from the 3 cells.
In the example above the 4, 8, and 9 were exclusive to the 3 cells so all the other numbers were removed.
Logic being same as Hidden doubles.
Step 13: Naked Quads*****

Same deal as Naked triples, only its between 4 cells and numbers. Not especially useful as it requires half the cells in a row/column/block to share 4 numbers so the amount erased may not be worthwhile.
Step 14: Hidden Quads*******

You know the drill... 4 numbers exclusive to 4 cells in a block, column, or row. Removes all numbers but the 4 from the 4 cells.
Step 15: X-Wing**

An X-wing occurs when within 2 rows or columns there are only 2 instances of a number and they share the same column or row forming a rectangle. Erase all other instances of that number in line with any of the four numbers making the rectangle. **if an X-wing occurs within 2 blocks instead of 4 then you can remove all of that number from within other spaces in the block as well as in line with the main rectangle.
In the example above, there is an X-wing formed with 4's and all the ones in line with them get erased.
The logic being, in both rows, there are only two possibilities that can be a 4, and since they form a perfect rectangle, if you choose one on the first line, then you would have to choose the one to the diagonal of it to satisfy that line, and same deal if you chose the other to start. No matter which one you start with, all cells in line with the 4 main corners of the rectangle would be proven to not possibly be the same number.
Step 16: Unique Rectangle*

The unique rectangle occurs when there is a rectangle made entirely of pairs where one of them happens to have an extra number along with the pair. That extra number is the value of the cell.
The logic being, sudokus are usually made with only one possible solution and if the rectangle of pairs occurs without an extra number, then the opposing corners would share the same value, and so would the other pair of corners. OR the numbers could be switched around and still create a working solution.
Step 17: Swordfish*****

The swordfish occurs when there are 3 lines, either vertically or horizontally, which have 2 or 3 cells each of one number, which also has all of the cells within exactly 3 lines perpendicular to the first ones. Erase any of the number in question in line with the numbers making up the swordfish.
in the example above there is a swordfish made up of 3's and erases all of the 3's on the similar horizontal lines
The logic being the same as the X-wing, there are only 3 possible rows for the number in question to be in either horizontally or vertically and since the perpendicular of it was also limited to 3 lines, each row and column has to have that number at least once so any cells in line with them can be erased.
Step 18: XY-Wing**

XY-wing is like naked triples but only 1 of the cells is related to both and the other 2 are exclusive of each other. erase any of the number the exclusive blocks share that they both intersect.
In the example above, there is an XY-wing of the numbers 1, 2 and 7, and since the exclusive blocks share a 1, all other 1's in the same block as the 1 and 2, and the same row as the 1 and 7 get erased.
The logic being, if you choose the 1 in one side of the XY-wing, then any 1's in line with it would be erased, but if you chose the 7, then it would force the middle block to be a 2, then forcing the other side of the wing to be a 1. Those are the only 2 possibilities so you know that any cells intersecting the both of them can not be a 1.
Step 19: Forced Chaining******


Forced chaining is more of a guessing game than an actual trick, when a board is down to mostly doubles it allows you to force chains, pick a value in one square then follow it through, then pick the other and follow it through. If any cells result in the same value in both chains, then that cell gets that value.
In the examples above i show both chains starting from the 1 and 2 cell and ending on the 5 and 7 cell, but on both chains that cell becomes a 5 so that one cell can be filled in.
The logic being, there are only two possibilities in the starting cell, and if both lead to the same result in another, then that other cell has no choice but to be that number.
Step 20: XY-Chain****

XY-chain is a combination of forcing chains and XY-wing, you start a chain and stop when you come across another cell in a different row, column, AND block that gets forced into the second option you had in the first cell. Letting you erase that number from any cells that the two ends of the chain intersect.
In the example above, it starts at the 2 and 3 cell, ending on the 3 and 9 cell, thus erasing the 3's that were in the same block as the end and the same column as the start.
The logic is the same as forcing chains and Xy-wing, the first could be the number in question or another one, and by chaining that into another cell forced to have the number in question, you can be sure that any cells intersecting both can not be the number.
Step 21: Nishio***********

This trick is probably the last one you'd want to do on a sudoku, it involves forcing chains to look for contradictions. while it does open a lot of possibilities, it also takes a great deal of concentration, you can force chains right up to nearly solving the board until you find a contradiction, or even not find one at all and have to undo all of the chains to get right back to where you started
In the example above, I start on the 1 and 2 cell and the chains force the 5 and 6 in the bottom right block both out thus creating a contradiction as that cell would no longer have any possibilities. As a result of finding a contradiction, we can know that the first chain can not be the number we started with and would have to be the other, possibly even forcing another chain all on its own. However, I will stress again that great care must be taken with this trick to avoid messing up your puzzle completely; all it takes is a single mistake to make a sudoku impossible.
The logic being, if the one choice you made results in a contradiction, then you know that that one choice is wrong, but also, if the one choice makes no contradiction then you still have to undo all of the chain and try another because just because it doesn't contradict itself doesn't mean it is the solution.
Step 22: Finish
congratulations! at this point you should be armed to solve most any sudoku puzzle you may come across.
Thank you for taking the time to read through my guide.


