

Introduction: How to Troubleshoot Your Home Network


Due to a recent demand for help with home networks, I have decided to write this instructable on how to troubleshoot your home network. If you are not already familiar with the basics of how your network works, I suggest reading my previous instructable "How your home network works".
I will be providing instructions for Windows XP and Windows 7. If you are using Vista, it is very similar to Windows 7, so follow those instructions. If you are using Windows 8, you're on your own.
Step 1: Ultimate Basics

It may not seem like an important step, but before you go any farther, you need to check your cable connections and reboot everything(your computer, router, modem, switches, etc). Unplug everything and plug it back in, don't just sight check it. I can't tell you how many times I have gone to troubleshoot a network and they just have something unplugged, or didn't bother to reboot their router. (This is especially common with my parents...)
Step 2: Taking a Step Back

The first thing you should do when troubleshooting your network is to take a step back and think about the facts you already know about the problem you are having. Is your computer able to connect to other networks, and just not this one network? If so, it probably proves that there are not any hardware issues present on your computer (unless you are trying to connect to a 5GHz network with a 2.4GHz network adapter... we'll cover that later). Are other computers able to connect to this network? If so, then there might be a problem in your settings on the problem computer. Are you connected to the network, but just not able to access the internet? There might be a DNS problem. Is your service unreliable? It could be a lot of things, but interference and DNS problems are the most common in home networks.
Step 3: Diagnosing IP Addressing Problems
One of the first steps in troubleshooting a network connection problem is figuring out if you have a valid IP address, and if it was configured automatically or manually.
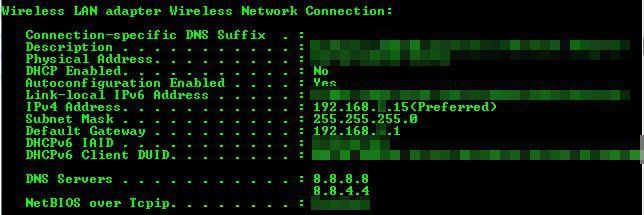
To see all of the information about your network adapter, go to command prompt and type ipconfig /all, and press enter.
First look at the option that says DHCP Enabled. If it says no, it means that at some point a static IP address was configured, which may not be the correct IP address for this network. To set your ip addressing to automatic, see step 6.
If your network is DHCP Enabled, then look at your IPv4 Address, Subnet Mask and Default Gateway. If you have another computer on the same network that works properly, run an ipconfig command, and see if the subnet mask and default gateway are the same on both computers. The IPv4 address should be on the same subnet (see below).
Now we need to check and make sure you are on the correct subnet. I will not be explaining subnetting in this instructable, only the basics used in home networking. Assuming that your subnet mask is 255.255.255.0, the first three octets (the first three numbers separated by a decimal point... called octets because each is a binary byte which is 8 bits) on the IPv4 address and default gateway should be the same. The last octet should not be the same. Also, if you have another computer that works on the same network, check to make sure the first three octets are the same on that computer. If your address is configured automatically, and it is on the correct subnet, then your IP addressing is correct.
Step 4: Diagnosing Hardware Issues

If your computer will not connect to the network at all, and it doesn't connect to other networks, it's a good chance that you have a hardware problem. You can try checking the drivers to make sure there are no issues or updates, but if it isn't a driver issue, I strongly suggest just buying a new wireless NIC. They are cheap enough that it isn't worth fooling around with. You can get one on Amazon for $0.01. (Plus 4.99 shipping)
Another thing to consider with hardware is that not all wireless networks are on the same frequencies. WiFi A networks are 5 GHz, WiFi B networks are 2.4 GHz, WiFi G networks are 2.4 GHz, and WiFi N uses both 2.4 and 5 GHz bands. What this means is that if you have a 2.4 GHz wireless NIC (which is the most common), it will not work on an A network. If your router is an A router, then you need to get a wireless NIC that supports 2.4 and 5 GHz networks.
If your computer connects to other wireless networks, and you have verified that you have the correct frequencies, then more than likely it is not a hardware issue.
Step 5: Diagnosing DNS Server Problems

Many times when your internet has intermittent issues, but you are still connected to the network, or if you are connected to the network, but not to the internet, you have a DNS server problem.
Many times your router will have a built in DNS server, however; the built in DNS server can be spotty at best. I generally recommend that if you keep your current DNS server, that you also add Google's DNS servers to your list. (See step 8)
Step 6: Fixing IP Addressing Issues

If you determined that you might have an IP addressing issue, this step is for you.
Obtaining an address automatically:
If you are not receiving your IP address via DHCP, here is how to set your computer to use DHCP:
In Windows 7:
Right click the wireless icon on your system tray, click "Open Network and Sharing Center". On the top right of the screen, click "Change adapter settings". Right click your wireless network adapter, and click "Properties". Find "Internet Protocol Version 4 (TCP/IPv4)", click it, and then click "Properties." Then click "Obtain and IP address automatically". If you want to obtain your DNS servers automatically, you can change those as well. Please note that if you use OpenDNS or another web filter that requires you to use their DNS servers, this could shut off the filtering, or in some cases impact your ability to access the internet. For more information on DNS settings, see step 7.
In Windows XP:
Click "Start", and go to Control Panel. Double click Network Connections. Find your network adapter and right click it, click properties, go to "Internet Protocol (TCP/IP)" and click "Properties". Then click "Obtain and IP address automatically". If you want to obtain your DNS servers automatically, you can change those as well. Please note that if you use OpenDNS or another web filter that requires you to use their DNS servers, this could shut off the filtering, or in some cases impact your ability to access the internet. For more information on DNS settings, see step 7.
Setting a static address:
If you are unable to obtain and IP address via DHCP, you may need to set it manually. If there are other computers on your network, be sure and check their IP addresses to make sure you will not have an addressing conflict. If they have addresses below 100, I suggest using addresses higher than 100 and visa-versa.
In Windows 7:
Right click the wireless icon on your system tray, click "Open Network and Sharing Center". On the top right of the screen, click "Change adapter settings". Right click your wireless network adapter, and click "Properties". Find "Internet Protocol Version 4 (TCP/IPv4)", click it, and then click "Properties." Then click "Use the following IP address:", and input your chosen IP address (the last number should be between 1 and 254, and not your default gateway.) 95% of default home network settings use 255.255.255.0 as their subnet mask. Enter your router's IP address as your default gateway. (Obtain this from a working computer if possible.) If you are unsure of what to use for your DNS server addresses, use 8.8.8.8 for the preferred and 8.8.4.4 for the alternate.
In Windows XP:
Click "Start", and go to Control Panel. Double click Network Connections. Find your network adapter and right click it, click properties, go to "Internet Protocol (TCP/IP)" and click "Properties". Then click "Use the following IP address:", and input your chosen IP address (the last number should be between 1 and 254, and not your default gateway.) 95% of default home network settings use 255.255.255.0 as their subnet mask. Enter your router's IP address as your default gateway. (Obtain this from a working computer if possible.) If you are unsure of what to use for your DNS server addresses, use 8.8.8.8 for the preferred and 8.8.4.4 for the alternate.
Step 7: Updating a Driver

If you suspect a hardware issue, then you might want to update your driver if possible. If there is a problem at the hardware level, then this will not fix the problem, but if the hardware is working and can not communicate with your computer, there may be a driver issue.
Here's how to update your driver. There are a few different methods, I suggest trying them in this order:
1. Through Device Manager.
2. Off the manufacture's website.
3. Automated driver updater (Slim Drivers).
Updating your driver through Device Manager in Windows 7:
Press the "Windows Key" and "Pause/Break" together (if your pause and break key are separated, use the pause). In the upper right, you should see a link to Device Manager. Once in Device Manager, find your wireless NIC. Start by looking in Network Adapters, if you do not see it there, look under "Other devices". If you see any sort of yellow exclamation point or red "X", then you know that there is an issue with your network adapter... probably a driver issue. Right click it and select "Update Driver Software". If it finds an update, try to connect to the network.
Updating your driver through Device Manager in Windows XP:
Press the "Windows Key" and "Pause/Break" together (if your pause and break key are separated, use the pause). Go to the "Hardware" tab, select "Device Manager". Once in Device Manager, find your wireless NIC. Start by looking in Network Adapters, if you do not see it there, look under "Other devices". If you see any sort of yellow exclamation point or red "X", then you know that there is an issue with your network adapter... probably a driver issue. Right click it and select "Update Driver". If it finds an update, try to connect to the network.
Updating your driver by finding it on your manufacture's website (Windows 7 and XP):
If device manager can't find an update for your driver automatically, try "Googling" your NIC's Manufacture and Model to try and find a driver download for it. I strongly recommend trying as hard as you can to find it from the manufacture before resorting to an automated program (Slim Drivers). If you are able to find an update from the manufacture, install it, then try to connect to the network.
Using Slim Drivers (Windows 7 and XP):
Download and install Slim Drivers from here: http://www.driverupdate.net/downloads/SlimDrivers-setup.exe Once you have it installed, be sure and backup your drivers before changing anything. (Option on the top of Slim Drivers). Then run a scan and see if it finds the drivers for you. Only install the driver for your wireless NIC, ignore as many updates as possible. If you are able to find an update from slim drivers, install it, then try to connect to the network.
Step 8: Fixing DNS Server Issues

If you have determined that you may have DNS server issues (and it never hurts to change your DNS servers to Google anyway in my opinion), I suggest using Google's DNS servers.
Please note that if you use OpenDNS or another web filter that requires you to use their DNS servers, changing or adding DNS servers could shut off the filtering, or in some cases impact your ability to access the internet.
To change the DNS servers in Windows 7:
Right click the wireless network icon in your task tray, and click "Open Network and Sharing Center". Click "Change adapter settings". Find your network connection, right click, and select "Properties". Then click "Internet Protocol Version 4 (TCP/IPv4)", and click "Properties". Change the radio button on the bottom from "Obtain DNS server address automatically" to "Use the following DNS server addresses". Then use 8.8.8.8 for the preferred DNS server, and 8.8.4.4 for the alternate DNS server.
If you want to use Google's DNS servers in addition to the ones you already use, type ipconfig /all in command prompt, then go back to the TCP/IPv4 properties, and click "Advanced". Go to the DNS tab, and add the ones you are already using first, then add 8.8.8.8 and 8.8.4.4. You will now have better chances of finding the correct IP address.
Step 9: Conclusion

I hope that this has helped you troubleshoot your home network issues. Please note that this is not meant to be an extensive guide to troubleshooting networks, this only covers the basics. If you are still having troubles, please comment below with as much detail as possible, and I will try and help you. If necessary, I can try and help direct you to a network professional in your area (at least in the US) that can help you with advanced problems. (And just for the record, Geek Squad is not considered professional!)

Participated in the
Hurricane Lasers Contest

Participated in the
Fix & Improve It Contest


