

Introduction: How to Use a CNC Router at Techshop to Build a Simple 6 Board Chest Out of a 2* 4 Foot Quarter Sheet of Half Inch Thick Birch Plywood. I Did It at Techshop! Did I Say Techshop!


How to use a CNC Router to build a simple 6 board chest out of a 2* 4 foot quarter sheet of ½ inch Birch plywood. I did it at Techshop!
This is my first Instructable so please feel free to leave any constructive criticism in the comments, thanks!
What is Techshop? follow this link!
http://www.techshop.ws/index.html
These chests are useful as small toy boxes or other storage, they are the perfect size to sit upon, and plenty strong. I use them for storage when camping at medieval events in a History reenactment lite group i am in called the SCA. These boxes are good for almost all periods of historical reenactment because their simplicity kept them in use for a very long time. Because you can sit on them they make excellent feast boxes
Because they are nailed and glues they are plenty strong to use to sit on as well.
You may use these plans and modify them for any non commercial use. you can't use them to make products for sale without my prior written approval.
What you need:
Membership at TechShop or access to equivalent tools, and basic knowledge of how to use them.
Cnc Router(Shop Bot)
Nail Gun with Plastic nails (or other holding device for CNC Router)
Nail Gun with Regular nails (for assembly)
Wood Glue
400 Grit sand paper (and some way to use it, I used a Random Orbital Sander)
Pre stain wood conditioner(photo)
Wood stain (photo)
Spar Varnish (photo)
1 or more 2’ by 4” sheets of .5” (1/2”) Birch plywood.
Razor Knife for cutting off the tabs on the wood after cutting
Why do you keep specifying Birch Plywood?
I specify birch plywood because the added veneers make a nominal half inch thick sheet, actually a half inch thick, unlike other Plywood. The Illustrator file I Provided is designed to work with any material exactly a half inch thick, experiment as you desire.
If the quarter sheet you pick is significantly smaller than nominal (2'*4') you might have issues, I believe the pattern has 1/8" of slack along the edges farthest away from 0,0 on the router.
If you don't have a router you can look at the plans and copy the dimensions and cut one out by hand. I made quite a few of boxes similar to these using a saw and a router instead of the CNC tools at Techshop.
My goal in this is to make these boxes available easily and cheaply to lots of folks.
A quarter sheet of .5in birch plywood costs me about $14, the hardware can cost as much or little as you want, you can skip the latch, and just nail small pieces of scrap leather on for hinges, use scrap rope for the handles, use stain you have around and this box could only cost you for lumber... buying hinges and claps will easily double the cost, but it looks so much nicer.
Step 1: Step 1: CAD and CAM


Step 1: CAD and CAM
This Instructable assumes you already know how to do basic CAD and CAM, at Techshop if you passed the SBU class, you are probably good to go. This is the second project I did on the shop bot at Techshop.
First download the Illustrator file with this link:
https://docs.google.com/open?id=0B8Bg9eVVQhaYUERVbWFTdEN1TGM
Get in V-Carve or other CAM software and load this file
I'm going to assume that you know how to use V-Carve, and just explain what you'll be doing in V-carve, not how.
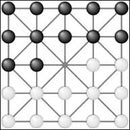
All of the pictures show what the illustrator file will look like:
Set up 3 passes in V-Carve using a .25" bit for cutting wood.
Pass 1: Drilling pass
Select all the ¼” holes, drill them .125” (1/8”) deep.
These will mark where you put nails for hold downs, and where you put nails for assembly. You will pause after this pass is complete and add plastic nails for hold down if you don’t’ have a better system.
Pass 2: Pocket Pass:
Pick the 2 large holes in each of the side pieces, Pocket them out to a depth of .5” (1/2”)
These will be where you put in your Rope Handles.
Pass 3: Profile Pass:
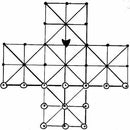
Pick all the rest of the geometry, which should be the outlines of the boxes. Cut this Full Depth .5” (1/2”). Be sure to add plenty of tabs, including tabs of both sides of the material where the router cuts away all wood between the two pieces. See the2nd image below for an example of how I added the tabs. You'll notice that I added WAY too many tabs compared to what is recommended. This is because I kept having issue with pieces shifting as they got cut out, due to how little waste wood I have in the design. I used the default 3d tables V-carve recommended
Note the 2nd picture below with an example of how I laid out my tabs to prevent movement of the piece. it's a lot more than normal because I kept having issues with it slipping.
Now save/export the passes for your CNC Router to create the CNC g-code file.
Step 2: Step 2 CNC Router Cutting


Step 2 CNC router Cutting
1st: Zero your Z axis on your router with the top of the waste board. I used a z zero plate on our Shopbot router
Now place your wood on the shop bot with the edges of the board lined up as exactly as you can get it with the edges of the waste board that correspond to 0,0. Then Zero your X & Y axies on the router with the edges of the board.
For my shop bot I choose use Zero using Prox Switches under the Cuts command to zero it exactly on the 0,0 point of the waste board . Note you need to be extremely precise about this as the pattern has almost no waste around the edges to allow for error in this step. Thre is basicaly 1/8+ extra space on the smallest quarter sheet of plywood I've bought so far
2nd: Load pass 3 of the G-code file and run an Air pass, to make sure everything is lined up and oriented correctly
3rd:
Load the G-code file, select pass 1 the drilling pass, and run it, it will peck straight down and make a bunch of marks on the wood. Pause after this is done, and use the areas marked by the dots outside of the profiles to be cut to add plastic nails to hold the sheet of plywood in place. if you look at the Picture from the previous step I have put red round rects around the places where you should put in plastic nails to hold down the wood (unless you have a better way). I basically put 1 nail at each short end of the round rects
Now that your work is firmly held down, run the rest of the passes to cut out all your paths.
Note that I used a compression cut bit especially for ½ inch plywood, if you don’t use one of these there will be a lot more clean up than I show, you’ll have to figure that out on your own. Basically cut it with a knife and or sand it off. I paid about $30 for my compression bit but it took a bit of googleing to find it.
Here is the one I used and it worked well.
http://www.woodcraft.com/PRODUCT/2008014/6655/WHITESIDE-UD2100-UPDOWN-CUT-SPIRAL-ROUTER-BIT-14-D-X-1-CL-14-SH-212-OL.ASPX?refcode=10INGOPB&gclid=CJitjLPyz7MCFU6mPAodVkkAkw
Step 3: Step 3: Clean Up


Step 3: Clean up
Pull all your wood and nails up carefully breaking off at the tabs so that the surface veneer of the wood does not peel off. Clean up the CNC router as normal. If you are having trouble with this you can cut most of the tabswith a flat chisel before breaking them off.
Next go get a Razor Knife and use it to cut off the remainder of the tabs. For me I found this works best, but it violates several rules of Knife safety, so you figure out a way that works for you and is safer.
Grab a piece of wood with tabs on it, use one hand to hold it against your belly with the flat part of the tab down (pics 1 & 2 show me pointing to a tab). Then hold the knife flat against the edge of the wood and with the blade cutting up and at an angle and cut off the tabs( this angle makes the veneer get pressed into the wood so it’s damaged less, see pic 3). It often takes a couple passes to get it completely removed and the edge smooth;
See the pics of the process below
Step 4: Step 3.5 the Parts You Should Have After Clean Up


2 front/back pieces,
2 side pieces
One top (in this pic it has been laser engraved)
One bottom
For a total of 6 boards, which is why this is called the 6 board chest.
Please note that the fronts and the sides are designed to fit together... In the last image here you see me test fitting to verify that things got cut to the correct size the top of both pieces should line up evenly.
Also please note that the outsides of each piece have all the small dots drilled into them
Step 5: Step 4: Laser Engraving.
I assume you are already competent on the laser, so just a brief description and no pics of the process yet.
at Techshop goto the Trotech laser, open the file:
https://docs.google.com/open?id=0B8Bg9eVVQhaYWFczcndxMmNGV0E
This is an illustrator file to aid in aligning you art to be burned on the chest lid.
The art board is the size of the lid so you just align the wood in the upper left corner of the laser at 0,0, follow the steps and anything centered on the screen is centered on your lid.
Load the file in illustrator on the machines that are dedicated to the Trotech Laser systems.
Hit <ctrl><a> to select all the vectors to be drawn, notice that there is a white rectangle the size of the art board, be sure this is selected, the rectangle will make the art centered automatically on the lid, if you put the lid in the upper left of the laser with the long side across the top. Hit Print and follow the standard instructions for etching into a piece of birch plywood (100%, speed 80) I slowed the speed down to about 30 to get a deeper etch, but on a couple boards I burned through into voids in the inner layers of the wood, so this is your call.
In the image you can see the 2 pieces that are similar the lid and the bottom of the box. the bottom of the box is 1 inch smaller in each direction, so pick the bigger one and burn the pattern you want using the illustrator layout file as shown here.
Don't worry about the smoky blurry marks the laser makes around the art you burned, you will sand these away in a later step.
You can also burn on the front and back by making a template like I did for the top to help you align the art.
Step 6: Step 5: Construction


Step 5: Construction
Grab one front or back piece and one side piece. Practice aligning the half lap joints in the wood together to form 1 corner of the box.
Next put put glue on the front pice you've been practicing with.
If you look at the first pic, you see where the glue will need to be placed.
Put wood glue thinly on the inner 2/3rds of the faces that are going to touch. Don’t have wood glue on the outer 1/3 so that if any leaks it’s more likely to leak to the inside, as
If glue leaks on the outside you’ll have to sand all of it off if you intend to stain the box( or use stain-able wood glue,I have bought it but not tried it out dunno how well it will work..
In the 2nd pic you can see where I have put the glue before Assembly of that corner.
Get someone to help you hold the joint together
In the 3rd pic I have glued and assembled the pieces and they are being held together with a Corner clamp to make nailing it easier.
You can get these at most hardware stores, the ones at Harbor Freight are about 6 bucks each, while you don't need more than one for this project, I suggest picking them up in pairs.
Put 1 nail into each of the small dots drilled into the joints. 4 nails per joint, 2 in each piece of wood, the dots show you exactly where. I'm holding the Nail Gun perpendicular to the wood because the nails I use tend to bend left and right. If you have to risk having a nail poke through the wood, try to tip it so it blows out on the inside where you can cut it off with a Dremel and nobody will notice.
as a general rule I try to put the nails in the holes close to the outside ends of the dot, and tip them just slightly inward, to get the best nail, plus if one does shoot out it'll be on the inside there you can cut it down and grind it smooth with a Dremel.
You can see this in positioning of the nail gun pic 4. If you don't have a nail gun, put in 1" long finishing nails or brad with a hammer to hold everything together while the glue drys.
In pic 5 you can see the dots from the drilling pass that mark where the nails go, try to get the nails all the way inside the dot.
Repeat until you have all 4 piece of wood forming a rectangular tube. It’s going to be a little wobbley, don’t’ worry about that it’ll be fixed when the bottom goes in.
Pic 6 is the 4 sides assembled together, and you can see the rectangular tube I described.(sorry its out of focus but you get the idea)
Apply wood glue in a very thin coat, to the bottom of the inside of the rectangular tube made by the 4 sides.
See pic 7.
Lay the box on its side and insert the bottom piece of the box from the bottom and slide it up and in. This will help to prevent wood glue leaking on the out side.
See pic 8 (sorry this is reversed from the other pics, taken from the other side of the box)
Have a helper help you to hold the bottom exactly flush with the outside of the box and put the nails in one corner at a time. Then put in the center nail for strength.
See pic 9 for the dots for nailing in the bottom.
Let dry.
Pics 10 is the box constructed and Pic 11 is the box with the lid sitting on it.
Now sand all the wood thoroughly with 400 grit sandpaper remove all glue drip and smoke residue from lasering.
Step 7: Step 6: Staining & Sealing
Step 6: Staining & sealing
Sand everything again and be careful all glue residue is sanded away. Also sand away any residue from the laser engraving so the art looks nice and crisp.(Yes I mentioned sanding it twice, it's that important)
Apply a coat of wood pre treatment.I used the minwax brand(see Pic 2).
This seals the wood pores, so that when staining plywood and veneers there are fewer dark splotches in the wood where the end grain soaks up more stain than the rest. The end product will look a lot nicer if you don’t’ skip this step. Just coat everything lightly but evenly.
Let dry per instructions on the can
Then apply a coat of Stain, spreading it even all over the box. I used the Minwax gel stain(see pic 3)
Use a q-tip to get the stain down in the dots where the nails went, and down into the engraving/.
Gel Stain is basically a translucent paint. if the stain hits glue spots and leaves white spots, you need to either sand away till the glue is gone and re stain that area and blend it together , or dapple gel stain over the glue spot to blend it away.
You can use the same technique to dapple on the ends of the plywood to disguise the later so it looks less like plywood and more like a period chest.
I went back with a Q-tip on some of them to put extra thick coats on the ends the plywood to hide the laminations.
You use Gel stain let dry for 48 hours(or according to the instructions if you use a different stain), then get Spar Varnish, I used Minwax in the spray can(pic 4).
Spar Varnish differs from regular varnish in that is it designed to be used outdoors.
It’s UV resistant, and slightly more flexible so it does not crack as easily, I use the Chests in the SCA outdoors as furniture, so this is the best finish for me.
I apply lots of thin coats, getting the entire surface wet, then let dry, I apply several coats per the instructions. I make sure to put extra heavy coats on the bottom of the legs, the top of the box where the lid will rub, and the top of the lid where I’m going to be setting stuff to give these areas extra protection
Step 8: Step 7: Final Assembly.


Step 7: Final Assembly.
Now add hinges to the back and a hasp on the front and you’re all done with the basic assembly just small details left after that....
The tricky part is picking the hinges and the hasp. As the lid is only ½” thick, you either need a hings that fits in that small an area, or one you can put a 90 degree bend in a vice and screw both into the edge and into the lid. A hasp is both Optional and easy, just pick one you can screw into the top of the lid and screw the loop down on the front of the box.
pics 1-4 are closeups of the hardware i pickup at teh hardware store to use on this project.
The next two steps I add are screwing a small chain to the inside of the box to limit the lid to only open to slightly past 90 degrees,
Pic 5 & 6 are of someone else doing the same thing as I don't have any chain right now. just be sure to use a screw shorter than your wood is thick... if you screw the of the chain inside the lid a little (say 1") this will keep the chain from getting caught as often when you close the box.
Then I get a twist on and off wedding led tea light and stick it to the lid with double sided foam mounting tape, this makes sure that when I'm digging in the chest for stuff in my tent at night I always have a light to see inside the box. If you use these camping like I do this is amazingly handy.
Pics 7 & 8 Show the tea light
The tea lights I'm using now:
http://www.amazon.com/Submersible-Battery-LED-Lights~WHITE~wedding~tea-Light/dp/B000VUNXEY
Last but not least you get a piece of rope for each handle, insert it in both the holes in the side and tie an over hand knot on the inside of the box to hold it in place... This makes carrying the boxes much more comfortable.
Pic 9 is of someone else doing the same thing because I don't have any rope handy to add handles today.
I got the by the foot section of the home depot closest to me, and buy the rope that looks like this except is black. I get the biggest diameter that will fit through my holes in the side. It totally non period rope, but it's black so few notice and it's WAY more comforable than the more period Sisal rope like is used in the picture, your call)
In a future Instructable I hope to teach you how to make your own Hinges and Hasps using the water jet and basic hand tools, for that full on custom appeal.
Again, I used tools at Techshop to do the vast majority of the work though the final assembly I did at home so it was
easy to leave things in place for each of the drying steps. (Glue, stain, Spar Varnish)
I made it at TechShop!


