

Introduction: I Love You Sign Using an Arduino


Here is a short clip of it working. Naturally when putting it all back together I busted a lead off of the "E"!
As always ensure you read the entire tutorial to understand all aspects.
Step 1: Cutting and Preparing the Plexiglass


How to cut plexiglass? You have two good ways to cut plexi 1) Table Saw and 2) plexi cutter tool
Option 1) I use a fine tooth blade on a table saw cutting as I would with wood. This is the easiest on large cuts and offers great accuracy in my opinion.
Option 2) Using a plastic scoring tool and breaking of the piece which I suggest that if you haven't done it before to look up how. In order to do it you use a straight edge and the scoring tool and score the plexiglass from edge to edge and then break it by hand. Like I said do a search on how to properly do this. (its not hard to do though)
- Once you are satisfied with the size you can lightly sand the edges of the plexiglass with a grit of 220-320 sandpaper
- Then clean the plexiglass with a soft cloth LIGHTLY and water. Stay away from soap unless you know it won't harm the plexiglass.
- Now we are going to make the edges of the plexiglass smooth again using heat. This part you want to be careful with and I HIGHLY encourage you perfect this with a scrap piece. Simply put use some heat such as a mini butane torch (if the plexiglass is thin a butane lighter may work) and lightly go back and forth over the edges until they are clear.
By making the edges smooth/clear we transfer the LED's light better through the plexiglass.
Step 2: Carving the Plexiglass


I used a dremel and a carving bit to slowly carve away the plexi to form my letters.
- Open a document program such as Microsoft Word and select the text you want. You may have to do this a couple times to get the right size. Keep in mind the fancier the text the harder it is to carve.
- Place the plexi on top of the paper and use masking tape on the corners to hold the plexi in place over the text. You can measure to ensure its centered where you want it.
- I lightly traced the OUTSIDE of the letter before carving the center. I used LIGHT pressure because I didn't want it to get away from me and I don't want the plexi to melt.
The idea here is to carve about halfway through the plexiglass. If you can get the carving completely even then great! If not it still looks great for a handmade piece.
Don't be to picky on this part. When you step back and look at the carving you can't see the imperfections in the work.
REMEMBER TO GO SLOW!!!!!!!!!!!
Step 3: Cutting the Project Box Lid


- Place your plexi on the lid and trace it. in pencil.
- Using the dremel and a cutting wheel to cut out the groove along the lines you traced. Remember you can always take away but can't add to, so go slow!
- You will probably melt some plastic in this process but that is OK as it is easily scraped of with a razor or knife.
Be sure to test fit your plexi often!
Step 4: Make the LED Holder


I used a thin piece of plexiglass for this holder. It can be done with thicker but be sure to account for it mounting under the lid.
In order to shine the LED's under each letter I used a rudimentary but effective method of simply mounting the LED's to a plastic strip and gluing it under the plexiglass sign so the LED's shine directly under the plexi.
I placed the drawing/picture of the LED holding strip below. In this case a picture speaks a thousand words.
The notch's are cut so the LED holder won't interfere with the plexiglass sign.
The bend lines are determined by the width of your lid.
To determine where I needed to drill my holes for the LED's I set the LED holder on top of my "I LOVE YOU" plexiglass sign and marked the center of each letter.
The size drill you need for the LED holes is on the holder package which I purchased at Radioshack. I then installed the holders which required no glue.
**USE A SMALL PILOT HOLE DRILL BIT FIRST TO AVOID CRACKING**
**DO NOT GLUE THE LED HOLDER IN YET**
Step 5: Mounting the Plexiglass in the Lid


At this point you should have test fit the plexiglass into the Lid and ensured it fits like you want. All I did at this point is insert the plexiglass in the grove and then placed lexan silicone sealant on all sides of the lexan/lid.
Put the silicone on as you would caulk a tub or sink.
I didn't feel it was necessary to mess with glue on this part and figured the silicone would hold enough for a decoration. So far so good!
Set the sign/lid assembly to dry overnight.
Once its cured you can super glue the LED holder in place on the bottom of the lid.
Step 6: The Arduino Code

The code can be modified for your particular use and pin locations as needed. If you need to add letters for different purpose just put them in the code as needed too.
CODE BELOW:
/*
* BLINKING LED SIGN
*
* Code designed by: Lance Gundersen
* EMAIL: gundersen.lance@gmail.com
* Code to blink eight LED's under a plexiglass sign. You can add or modify per the project needs.
* See projecte build on instructables.com at
*/
int ledI = 13;
int ledL = 12;
int ledO = 11;
int ledV = 10;
int ledE = 9;
int ledY = 8;
int ledo = 7;
int ledU = 6;
void setup() {
pinMode(ledI, OUTPUT); // LED for I
pinMode(ledL, OUTPUT); // LED for L
pinMode(ledO, OUTPUT); // LED for O
pinMode(ledV, OUTPUT); // LED for V
pinMode(ledE, OUTPUT); // LED for E
pinMode(ledY, OUTPUT); // LED for Y
pinMode(ledo, OUTPUT); // LED for O is actually a zero
pinMode(ledU, OUTPUT); // LED for U
}
// the loop routine runs over and over again forever:
void loop() {
delay(1000); // wait for a second
digitalWrite(ledI, HIGH); // turn the LED on (HIGH is the voltage level)
delay(500); // wait for a half second
digitalWrite(ledI, LOW); // turn the LED off by making the voltage LOW
delay(500); // wait for a half second
digitalWrite(ledL, HIGH); // turn the LED on (HIGH is the voltage level)
delay(500); // wait for a half second
digitalWrite(ledL, LOW); // turn the LED off by making the voltage LOW
delay(500); // wait for a half second
digitalWrite(ledO, HIGH); // turn the LED on (HIGH is the voltage level)
delay(500); // wait for a half second
digitalWrite(ledO, LOW); // turn the LED off by making the voltage LOW
delay(500); // wait for a half second
digitalWrite(ledV, HIGH); // turn the LED on (HIGH is the voltage level)
delay(500); // wait for a half second
digitalWrite(ledV, LOW); // turn the LED off by making the voltage LOW
delay(500); // wait for a half second
digitalWrite(ledE, HIGH); // turn the LED on (HIGH is the voltage level)
delay(500); // wait for a half second
digitalWrite(ledE, LOW); // turn the LED off by making the voltage LOW
delay(500); // wait for a half second
digitalWrite(ledY, HIGH); // turn the LED on (HIGH is the voltage level)
delay(500); // wait for a half second
digitalWrite(ledY, LOW); // turn the LED off by making the voltage LOW
delay(500); // wait for a half second
digitalWrite(ledo, HIGH); // turn the LED on (HIGH is the voltage level)
delay(500); // wait for a half second
digitalWrite(ledo, LOW); // turn the LED off by making the voltage LOW
delay(500); // wait for a half second
digitalWrite(ledU, HIGH); // turn the LED on (HIGH is the voltage level)
delay(500); // wait for a half second
digitalWrite(ledU, LOW); // turn the LED off by making the voltage LOW
delay(500); // wait for a half second
digitalWrite(ledI, HIGH); // turn the LED on (HIGH is the voltage level)
delay(500); // wait for a half second
digitalWrite(ledL, HIGH); // turn the LED on (HIGH is the voltage level)
delay(500); // wait for a half second
digitalWrite(ledO, HIGH); // turn the LED on (HIGH is the voltage level)
delay(500); // wait for a half second
digitalWrite(ledV, HIGH); // turn the LED on (HIGH is the voltage level)
delay(500); // wait for a half second
digitalWrite(ledE, HIGH); // turn the LED on (HIGH is the voltage level)
delay(500); // wait for a half second
digitalWrite(ledY, HIGH); // turn the LED on (HIGH is the voltage level)
delay(500); // wait for a half second
digitalWrite(ledo, HIGH); // turn the LED on (HIGH is the voltage level)
delay(500); // wait for a half second
digitalWrite(ledU, HIGH); // turn the LED on (HIGH is the voltage level)
delay(2000); // wait for a two seconds
digitalWrite(ledI, LOW); // turn the LED off by making the voltage LOW
delay(500); // wait for a half second
digitalWrite(ledL, LOW); // turn the LED off by making the voltage LOW
delay(500); // wait for a half second
digitalWrite(ledO, LOW); // turn the LED off by making the voltage LOW
delay(500); // wait for a half second
digitalWrite(ledV, LOW); // turn the LED off by making the voltage LOW
delay(500); // wait for a half second
digitalWrite(ledE, LOW); // turn the LED off by making the voltage LOW
delay(500); // wait for a half second
digitalWrite(ledY, LOW); // turn the LED off by making the voltage LOW
delay(500); // wait for a half second
digitalWrite(ledo, LOW); // turn the LED off by making the voltage LOW
delay(500); // wait for a half second
digitalWrite(ledU, LOW); // turn the LED off by making the voltage LOW
delay(1000); // wait for a second
}
Step 7: Configuring the Hardware


If you choose to go standalone I encourage you to keep a few things in mind:
- The pin out of the Arduino and the atMega chip itself is NOT the same. i.e. pin 13 on the chip and Arduino are not the same.
- You must have a 5v voltage regulator.
- Be patient
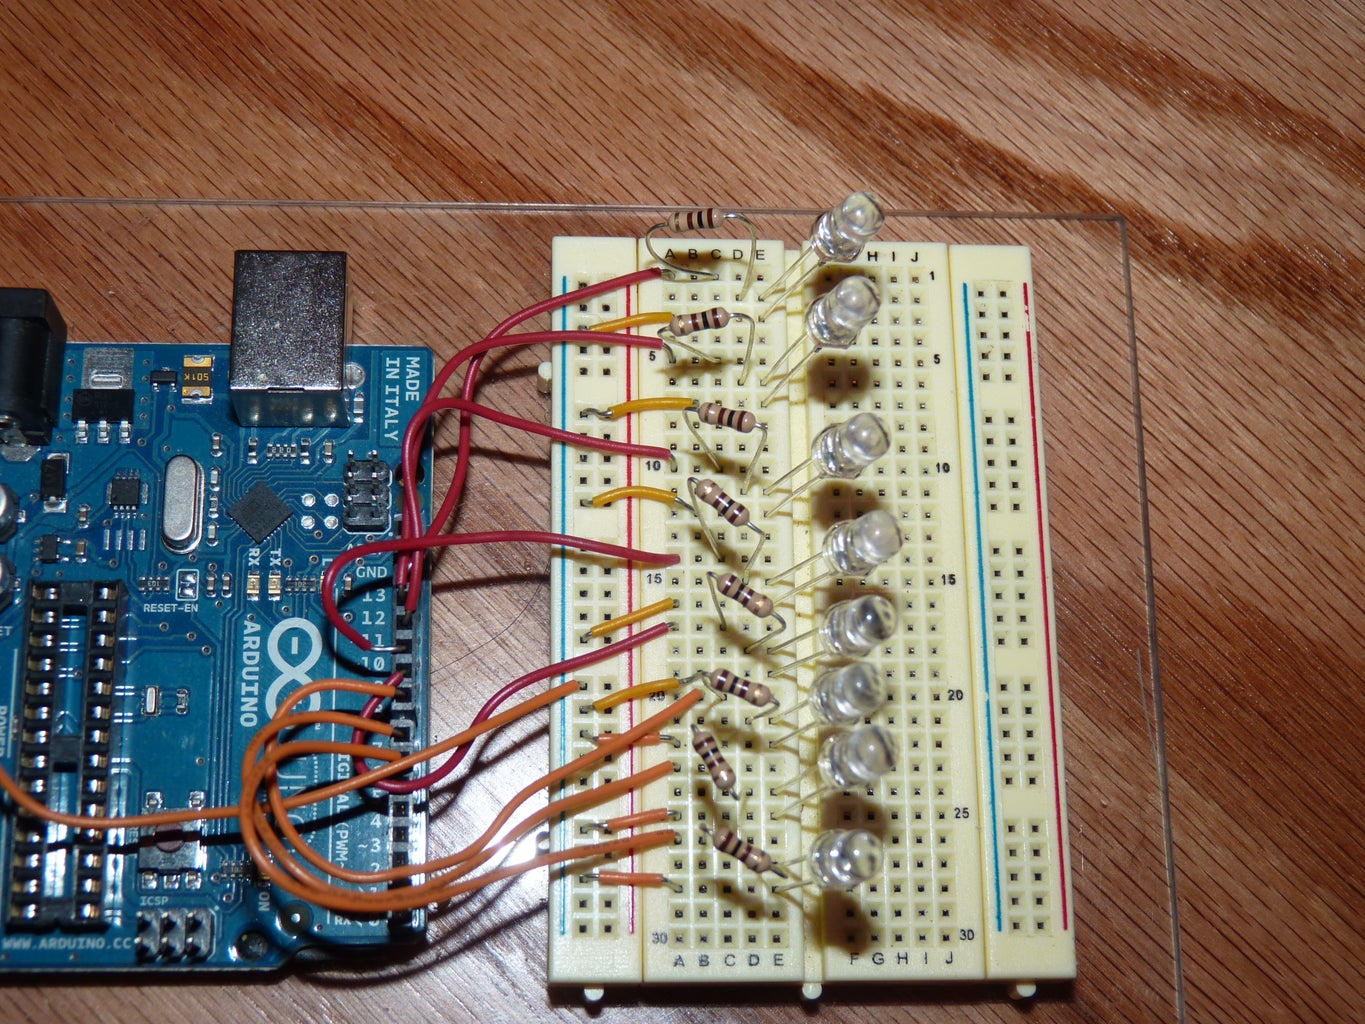
NOTE: If this is your first time using LED's and the Arduino please familiarize yourself with the LED picture I included.
In order to prevent damage to the LED you will need to use a resistor on the Anode side of the LED for this I used a standard 220 ohm resistor.
To clarify you will wire each led from PIN # -> resistor -> Anode then Cathode -> Common Ground
Ensure everything is to a common ground.
Once its all done put each LED into its perspective LED hole in the LED holder without glue.
Wire in a switch or just disconnect your power source.
Connect power
Secure the lid with the project box screws.

Participated in the
UP! Contest

Participated in the
Valentine's Day Contest


