

Introduction: Smart Garden - Click and Grow


What if you could grow your own plants, flowers, fruit or vegetables with the help of a Smartphone app that makes sure your plants get the optimal configuration of water, humidity, light and temperature and allows you monitor how to grow your plants ANYTIME EVERYWHERE.
Smart Garden - Click and Grow will take care of your plants even when you are on a vacation, miles away from home, by making sure they have enough water, light and the right temperature at all times.
By using advanced sensors that monitors the humidity, light and temperature, our smart application knows exactly when to irrigate your garden and what is the optimal amount of water needed. All the relevant information about your garden is constantly monitored and appear on your smartphone screen at all times.
You will be able to choose to let the smart application to automatically irrigate the garden depending on the conditions that prevails in the garden, or alternatively, you can choose to manually irrigate the garden whenever you decide and in the amount of water of your choice, by pushing a button in your smartphone.
Our Smart garden suits your local conditions and reduces water use and water bills by up to 60% by irrigating your plants on the perfect timing and conditions.
Advance to the future with our smart garden and start cultivating your garden easily, quickly and no less important without spending a fortune.
Step 1: Parts


For this project you will need:
Electronic Devices and Boards:
1) NodeMCU;
2) 2 (or more) channel analog multiplexer;
3) Transistor;
4) Water Pump (we used 12V Blige Pump 350GPH);
5) Power Source
Sensors:
6) Light Sensor (Light Dependent Resistor);
7) MPU-6050 sensor (or any temperature sensor);
8) Capacitive Soil Moisture Sensor ;
Physical
9) 3/4" water pipe;
10) Resistors;
11) Wires and Extensions;
12) Smartphone
13) Blynk App
Step 2: Wiring - Board and Sensors
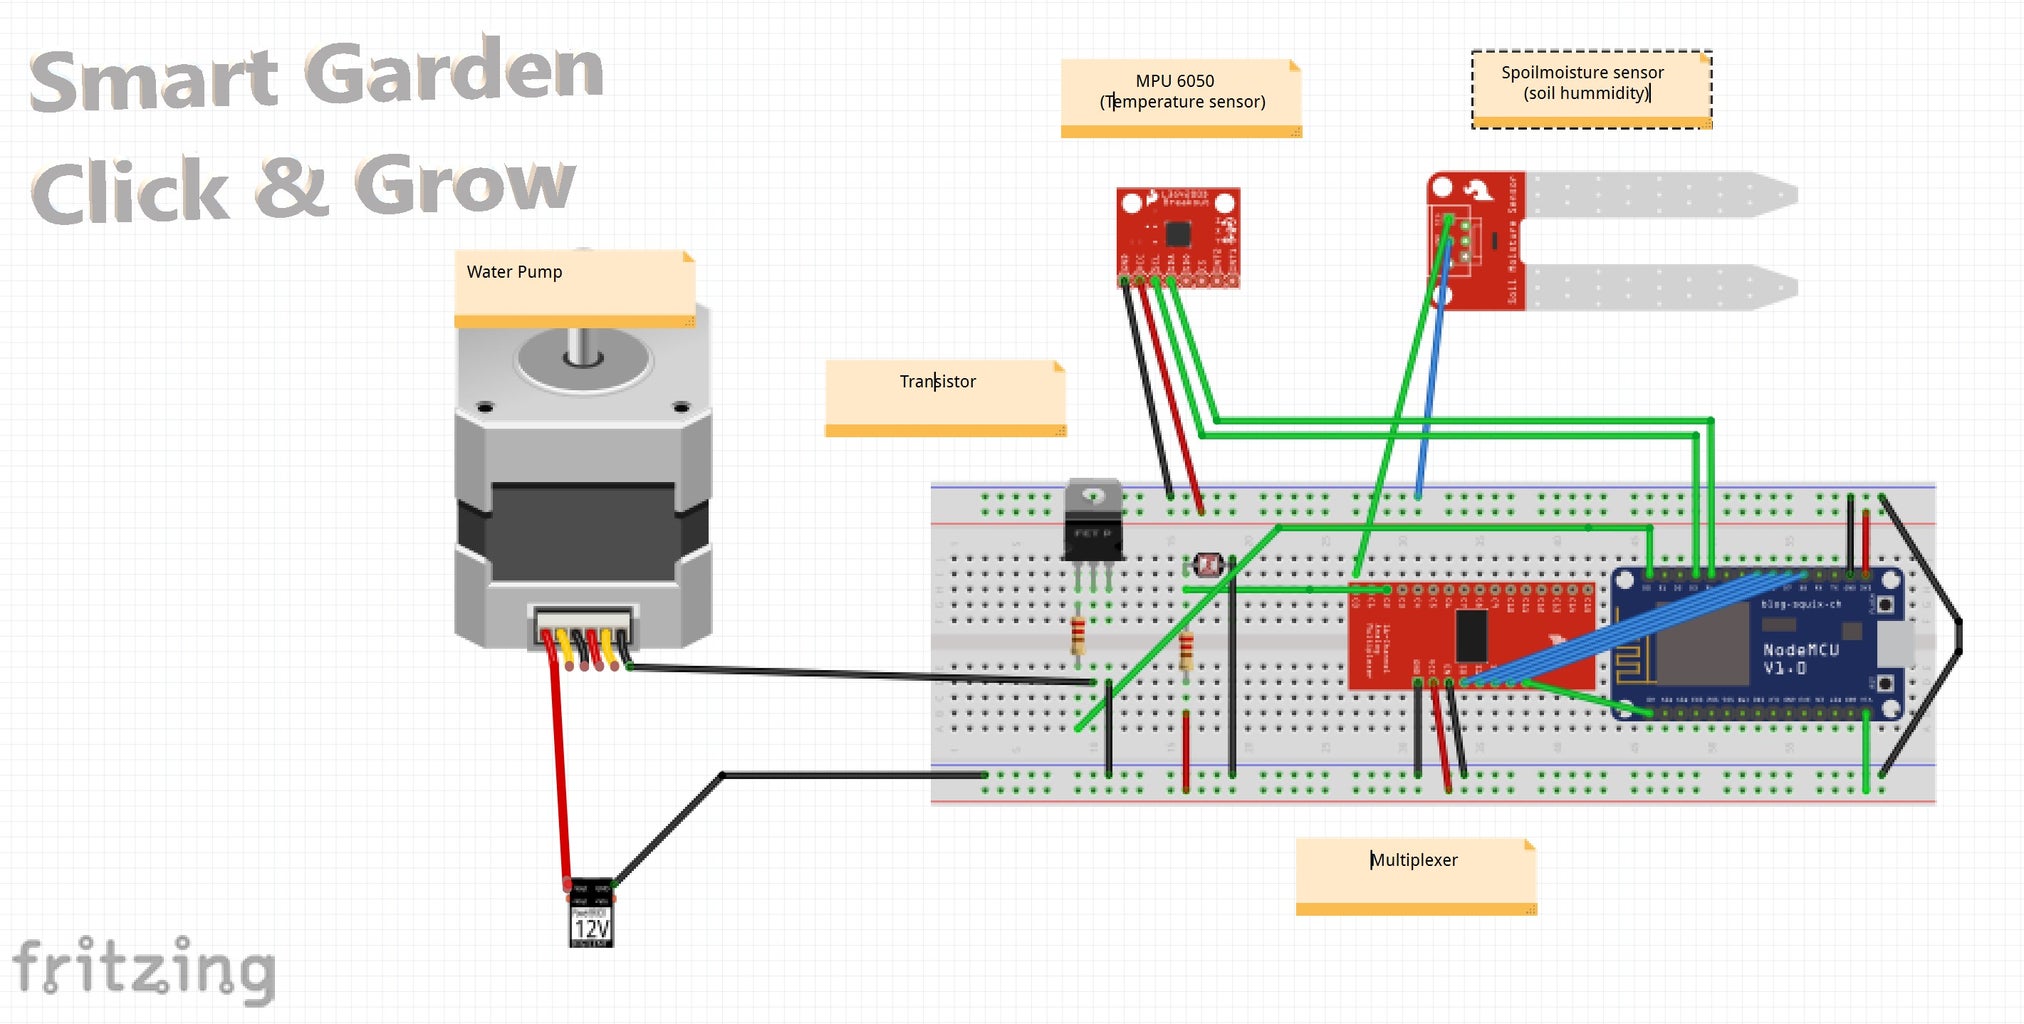
See below detailed instructions about how to connect the different components, and consult the wiring diagram posted above.
Board and MultiPlexer
Place the NodeMCU and the multiplexer on the breadboard as shown in the diagram.
Use two jumpers to connect the 5V and the GND of the NodeMCU to the '+' and '-' column of the breadBoard respectively, and connect the multiplexer to the NodeMCU as shown above.
Connecting the sensors
1) Light Sensor (Light Dependent Resistor) - You will need three jumpers and 100K resistor.
Use the 3 jumpers to connect the sensor to the 5V, GND and to the Y2 of the multiPlexer as shown above.
2) MPU-6050 sensor - You will need four jumpers to connect the sensor to the 5V, GND, and D3, D4 of the NodeMCU as shown above.
3) Capacitive Soil Moisture Sensor (CSMS) - Connect the CSMS with 3 jumpers, to the 5V, GND and Y0 of the multiplexer as shown above.
Now, connect the USB cable to the NodeMCU, and continue to the next step.
Step 3: Wiring - Transistor and Pump
See below detailed instructions about how to connect the Rely and the Water Pump, and consult the wiring pictures posted above.
Transistor
Use 3 Jumpers to connect the transistor as follows:
1. Middle leg to the '-' of the water pump;
2. Left leg to the '-' of the 12V power Supply;
3. Right leg to D0 of the MCU;
Water Pump
Connect the '+' of the 12V power supply to the '+' of the water pump.
Step 4: Connecting the System

We recommend to put the breadBoard along with all other components except the pump in a nice box.
The Should be inside bucket of water.
Take a long 3/4' pipe; Block one end of the pipe, and mount the other end to the water pump; makes some holes along the pipe, and deploy it near the plants;
put the soil sensor in the soil. Note that the warning line of the sensor should be outside the soil.
You may take a look at the picture above to see how we placed the system.
Step 5: The Code
Open the attached .ino file with the arduino editor.
Before you upload it to the NodeMCU please pay attention to the following parameters you might want to change:
1) const int AirValue = 900; You need to test this value with your soil humidity sensor.
Take the sensor out of the soil and check the value you get. You may change the value in the code in accordance.
2) const int WaterValue = 380; You need to test this value with your sensor.
Take the sensor out of the soil and put it in a glass of water. Check the value you get - You may change the value in the code in accordance.
After doing the above just upload the code the the NodeMCU.
Attachments

Step 6: IFTTT Applets


If the system decides to auto irrigate the garden it will send you an Email, so you will know that your garden was irrigated, as the soil was very dry.
We recommend you to configure the system such that it will irrigate only at nights, or when the sun level is low.
in that way you will save a significant amount of water each month!!
In Blynk app we used one webhook widget. The webhook widget was used to trigger an event on IFTTT.
IFTTT applets Date/Time -> webhooks, a virtual pin on Blynk change its value. Which triggers a function who sends you a mail when the soil is very dry and auto irrigate was operated.
Step 7: Smart Garden - BLYNK Application

Our BLYNK application contains the following features:
1) LCD - the lcd will provide you relevant information about the system. It will let you know when the system operates the water pump and irrigating the plants.
2) Soil Humidity scale - Provides you information about the humidity of the soil.
The scale shows the humidity in percentage such that zero percent represents is the average humidity level of the air, and 100 percent represents moisture of water.
We also added a verbal description of the humidity level represented by five options:
A. Very wet - when the soil is floated with water.
B. Wet - between the normal and the flooded. This situation is expected to occur for some time after we have irrigated the land.
C. Ideal - when the soil contains an ideal amount of water for the plants.
D. Dry - When the soil begins to dry. However, in most plants there is no need to irrigate yet.
E. Very dry - in this situation watering the soil as soon as possible (Note that if Auto irrigation mode is ON, the System will automatically irrigate the garden when Soil is very dry).
* Ofcourse the ideal level of soil humidity is depends on the spcefic plants you have in your garden.
* You can change the Water humudity level and air humudity level in accordance as explained above.
3) Sunny scale - Provides you information about the light level that the plants are exposed to. The ideal light level needed is depends of which type of plants you have in your garden.
4) Temp - provides you the temp in the surroundings area of your plants.
5) Auto Irrigate - when this button is ON, the system will automatically irrigate the plants when the soil humidity gets to 'Very Dry'.
6) Amount - by pressing '+' or '-' you can choose the amount of water (in liters) for irrigating the plants.
Step 8: Simulation of the System in Action
See the system working live in the attached video !! :)
Note that of you turn the Auto-Irrigation ON, the system will auto irrigate your garden as soon as the soil gets 'Very Dry'. the System can be configured to irrigate only when the sun is not too strong (for example only in late in the night) so the water will not be wasted!!!
If the system decides to auto irrigate the garden it will let you know on the lcd of the application (if it's open open on your smartphone), and it will also send you an Email!
Step 9: Enhancements and Future Plans


The main challenge
Our main challenge was to figure out which sensors we should use, where to place them to , and what end-point values we should use in order to get the best results.
As we had a lot of information to display (soil humidity, temperature, light level, soil condition etc.) We spent a lot of time in order to make our app as clear and as comfortable as we can.
In the beginning, we worked with a Rely, that made our lives very hard, we tried several relies and we figured out that the NodeMCU and the rely sometimes not very stable, as the HIGH value of the Digital pins of the NodeMCU outputs only 3 volts, when the rely works with 5V, so when we wanted to turn the pump ON, and set D1 output to HIGH, the switch didn't work as the rely expected 5V to change it's state.
As soon as we replaced the rely with the transistor, we could control the pump easily.
The limitations of the system:
Our garden is small, it was not possible to contain a large number of sensors in order to receive information from several different areas in our garden. With more sensors and a larger garden, we could learn more about the conditions prevailing in each area of the garden and use specific properties for each area of the garden, so it gets the best conditions and treatment for it's specific needs, and also adjust it for automatic irrigation.
Future Vision:
Our future thoughts arises mainly from the system's limitations. The goal is to implement the same smart garden system- just a big one in larger scales.
We believe that such a system can be adapted to any type of platform starting from private gardens, as well as Public gardens up to the agriculture industry, Like large greenhouses and agricultural fields.
For each system (depending on its size), we will use a more of sensors. For example:
1. A large number of soil humidity sensors: With large number of sensors we can know the level of humidity in any specific part of the land/soil.
2. Large number of light sensors: similar to the reason above even here we can get more than specific on different areas of the garden.
By adding these sensors, we can bring together a specific treatment for any type of plant in our garden.
Since different types of plants require a different treatment, we can adapt each area of our garden to another type of plants, and with large number of sensors we match the specific plant the exact condition it needs. This way we can grow variety of plants on smaller terrain.
Another significant advantage of a large number of sensors is the ability to identify the level of moisture in the soil and temperature, locking to know when it is necessary to water any part of the Earth and we can control the irrigation so that it will result in maximum water savings. We have to water the whole garden only if a small part of it is dry, we can only change this area.
3. Connecting the system to the main water faucet - that way we don't have to fill water in the container. The great advantage of such a connection is maximum control over irrigation and the amount of water that each region of the soil receives, with no worries about the water in the tank running out.
4. Dedicated application for the system - Writing a new application that is compatible with the system. With all our love אם Blynk application, we can't use it as the main system application. We would like to write a unique application to the system that matches the controller and sensors that we want to work with in order to give a perfect experience to the user.
Writing an application like this will give us the option to add more features, then those we can find in Blynk. For example building a user profile for the client, collecting the information about each client and advise him about the the best and most efficient properties that fits his needs.
We would like to build an algorithm that learns all the information we get from the variety of sensors and use it in order to bring the best conditions to plants.
Further then that we can create an online customer circle that is updated with recommendations and receives online help in the situation of a problem in the system.
We truly think that a project like this has a large potential to serve a wide range of customers: from private individuals who have small gardens through decorative gardens in businesses that would like to cultivate their gardens easily, while saving water and resources, and up to farmers and large companies who holds large fields and greenhouses and seeks for an effective and relatively inexpensive solution that will give them most relevant information about their produce, so will give them advantages over their rivals in terms of the quality of their produce, and the by saving expenses, both of water and of defective goods that have not been properly handled (for example got too much water).


