

Introduction: Intel® Edison Hands-on Day 1: Pushbutton


Let’s make the simplest example! Press the button to turn on the LED.
Component required
Step 1: Connection

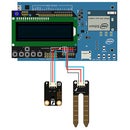
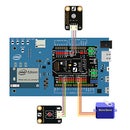
- Digital Push Button ----> Digital Pin 2
- Digital piranha LED light module ----> Digital Pin 13
Coding:
Step 2: Coding: After Uploading the Sketch, Press the Button and the LED Will Be On. If It’s Released, LED Will Be Turned Off.

//Push Button
const int buttonPin = 2;     //The Button Pin
const int ledPin =  13;      //The LED Pin

int buttonState = 0;         //To store the state of the button

void setup() {
  pinMode(ledPin, OUTPUT);    //Set the LED Pin to be output
  pinMode(buttonPin, INPUT);  //Set the button Pin to be input
}

void loop(){
  buttonState = digitalRead(buttonPin); //read the state of the button

  // If the button is pressed, the button state will be HIGH
  if (buttonState == HIGH) {
    digitalWrite(ledPin, HIGH);  // If button state is HIGH, then turn on LED
  }
  else {
    digitalWrite(ledPin, LOW);   // If button state is LOW, then turn off LED
  }
}
Step 3: Code Review
Principle(Digital Input—Digital Output)
Apparently, the pushbutton is the input device and the LED is the output device.
Two parts are necessary for Arduino code:
void setup() {
// The setup function will only run once
}
void loop() {
// Do precisely what its name suggests, and loops consecutively.
}
Two parts are necessary for Arduino code. Setup() function is for initializing variables, pin modes, using libraries, etc. The setup function will only run once. The loop() function does precisely what its name suggests, and loops consecutively. Use it to actively control the Arduino board.
From the Principle section, Pushbutton acts as input device and LED acts as output device:
pinMode(buttonPin, INPUT);
pinMode(ledPin, OUTPUT);
The format of pinMode() is like this:
pinMode(pin,mode)
This function is to configure the specified pin to behave either as an input or an output.
pin: the number of the pin whose mode you wish to set
mode: INPUT, OUTPUT, or INPUT_PULLUP.
Reads the value from a specified digital pin via digitalRead () function:
int reading = digitalRead(buttonPin);
The format of pinMode() is like this:
digitalRead(pin)
Reads the value from a specified digital pin,HIGH or LOW. If the button is pressed, HIGH will be read. If the button is released, LOW will be read.(HIGH stands for 1,LOW stands for 0)
There is only two state which digitalRead() function returns, HIGH and LOW.
The if() structure should be used in this condition.
The format of if () and if() else is like this:
(1)if(conditional){
// do something here
}
(2)if(conditional){
// do something here
}else{
// do something here
}
The if() structure, which is used in conjunction with a comparison operator, tests whether a certain condition has been reached. If the statement in parentheses is true, the statements inside the brackets are run. If not, the program skips over the code. The code (2) allows greater control than the basic if statement. The else can proceed other side of the if test.
if (buttonState == HIGH) {
... //if the button state is HIGH (button is pressed), turn on the LED
}
else {
... //Otherwise, turn off the LED
}
Inside the if() block,There exists a code to control the LED
digitalWrite(ledPin, HIGH);
The digitalWrite() function would look like this:
digitalWrite(pin,value)
The digitalWrite() function writes a HIGH or a LOW value to a digital pin.
If the pin has been configured as an OUTPUT with pinMode(), its voltage will be set to the corresponding value: 5V (or 3.3V on 3.3V boards) for HIGH, 0V (ground) for LOW.


