

Introduction: Interactive Origami Sculpture


This project began when my brother sent me a link with the accompanied message, "your next task." Intrigued, I clicked on said link and was instantly captivated.
Challenge accepted, brother.
The design was inspired by a birthday present I made a while back for a friend. It involved moving cubes made from sonobe units, and I felt sure that the concept could be carried over. As you can clearly tell, the concept did work, although my version is not nearly as streamlined and precise; the light weight of my paper blocks prevents the blocks from falling nicely into neat rows or collapsing into neat shapes. Anyhow, I finished and am quite content with the result.
See below for a video of the transformations.
Attachments

Step 1: Materials
- origami paper
- glue
Step 2: Folding Units


I used sonobe units, and they're fairly simple to make. Instructions:
- Grab a square piece of origami paper. I used 1.5" squares because I didn't have enough 3" squares so I divided each square into 4.
- Make a crease by folding it in half.
- Fold the two sides to that center crease.
- Unfold the top flap and fold the bottom left corner to the line of the bottom flap.
- Then undo the previous fold before folding the top flap back down.
- Rotate the paper 180 degrees and repeat step 4 (not 5 too).
- Then, with the bottom left corner folded up, fold the top flap down over it.
- Then fold down the top right corner (you should see the crease from step 4).
- Fold the two small triangles on the top left and the bottom right down to get a parallelogram shape.
- Flip the paper over.
- Fold the sharp corners to their respective obtuse angle corners as shown in the 14th and 15th pictures.
And that's one unit!
You'll need 240 units total. (2 layers of boxes, 4x5 boxes per layer, 6 units per box) I wanted to create an ombré effect so I used 4 shades of blue, and each shade was one row (5 boxes) in each layer of boxes. Thus, I folded 60 units of each color.
Don't be discouraged by the amount of units! It's actually a relatively small amount compared to the amount required for some other projects... (search "3D modular origami" to see what I mean -- 1080 unit swans and whatnot). It took me about 4 hours because I folded them during a track meet while waiting for my events. You get into a rhythm over time, and I was surprised about how fast it took compared to the amount of origami squares I had.
Step 3: Planning


After completing the 240 units (Congrats so far!), you'll be putting together cubes' faces and then connecting them. See the gif again for the arrangement of cubes.
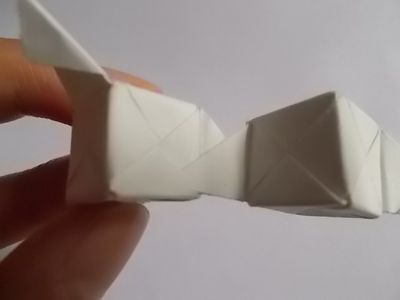
Step 4: Creating Cubes With Flaps


This sequence of pictures is just to show you how to insert flaps and ignore others that will be used in connecting cubes. I actually created this depicted cube incorrectly; one flap is missing. *sheepish shrug*
See the first picture of step 9 for the corrected cube.
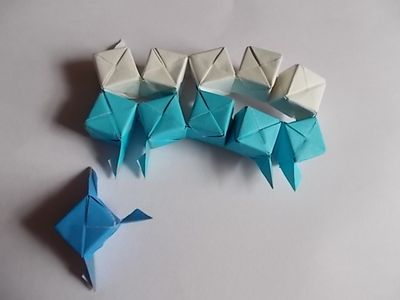
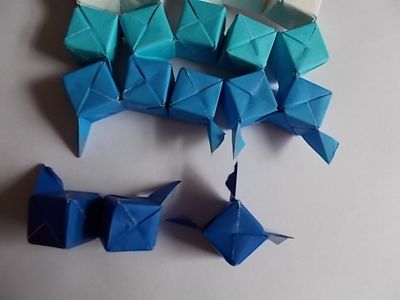
Step 5: Cube #2


The first image is the shape of the cube, complete with flaps, that comes next in the first row. MAKE SURE THE FLAP'S ORIENTATION IS CORRECT.
To connect cubes, see the images above.
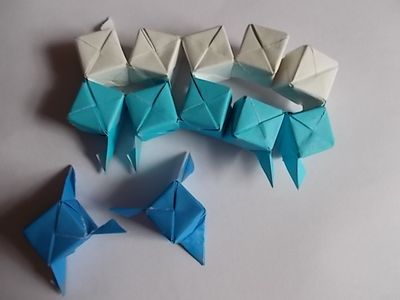
Step 6: Cube #3


See the pictures for where the flaps are for the next cube. It's the same as the previous one.
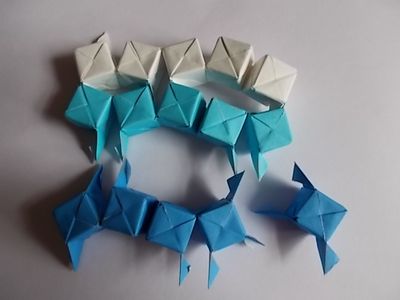
Step 7: Cube #4


See the pictures for where the flaps are for the next cube. It requires only two flaps, but I did one of the flaps incorrectly; see the fourth image for the correct flap on the right.
Step 8: Cube #5

The last cube of the row is shown above. It requires two flaps also, but the flap orientation is different from the previous one.
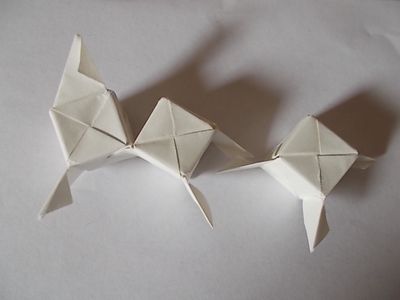
Step 9: Next Color: Cube #1 and 2


For your next color (or next row if you have different coloring plans), make the two cubes with the flap orientations as shown above. Then connect them.
Step 10: Cube #3


The next box's flap orientation is shown above. It has three flaps, and one is "flat." (see picture for what I mean)
Step 11: Cube #4


The next box has three flaps as before, and there is one "flat" flap again.
Step 12: Cube #5


Next box has three flaps, none of which are "flat."
Step 13: Connecting Rows


To connect the rows, start by applying glue on all the flaps in between the rows. Then slowly insert the flaps in the corresponding pockets, remembering that the little triangular flaps from the last step of making each unit will face each other.
Step 14: Next Row: Cube #1

Next color! WHOOOO -- but lots more cubes to make.
The next box has three flaps; it's actually the same as the first box from the previous row. The second box has three flaps, and it's like the third box of the previous row, with one "flat flap."
Step 15: Cube #3


The next cube has three flaps, one being a "flat flap." It's like Cube #4 of the previous row.
Step 16: Cube #4


The next one has four flaps, and none are flat.
Step 17: Cube #5

Last cube of the row! It has three flaps, none of which are flat.
Step 18: Connecting Rows


Connect the rows using the same method as before.
After waiting for the glue to fully dry, you can try moving the cubes around now to test the connection and add glue wherever necessary.
Step 19: Last Row: Cube #1


The first and second cubes of the last row both have two flaps, and one of the pairs is a "flat flap."
Step 20: Cube #3

The next cube has three flaps, none of which is flat.
Step 21: Cube #4


Next cube has three flaps, and it's the same as the previous one.
Step 22: Cube #5


LAST CUBE OF THIS LAYER: it has three flaps, and one is flat.
Step 23: Connecting Rows


Connect the last row with the method used previously.
CONGRATS: ONE LAYER FINISHED!
Step 24: Touching Up

Some joints of the origami may not be very secure. You can fix the looseness by using a brush to apply glue between the folds. You want the paper to be as secure as possible to handle the movements.
Step 25: Next Layer: Cube #1 and 2


For your next layer, make the two cubes with the flap orientations as shown above. Then connect them.
Step 26: Cube #3

The next cube has three flaps, none of which is flat. Create and connect as usual.
Step 27: Cube #4


The next cube has two flaps, and one of them is flat.
Step 28: Cube #5


Next cube has two flaps, and one is flat. First row of the second layer done!
Step 29: Next Row: Cube #1


Cube #1 has three flaps, and the second cube has four.
Step 30: Cube #3


The next cube has three flaps, and one is flat.
Step 31: Cube #4


The next cube has three flaps, one of which is flat.
Step 32: Cube #5


Last cube of the row! It has three flaps, none of which is flat.
Step 33: Connecting Rows

Connect the rows as from before.
Step 34: Next Row: Cube #1 and 2


NEW ROW -- LEVEL UP. The next cubes have three flaps, but the second one has one flat flap.
Step 35: Cube #3


The third cube has three flaps, one of which is flat, too.
Step 36: Cube #4


The fourth cube has four flaps, none of which are flat.
Step 37: Cube #5


The last cube in this row has three flaps, none of which is flat.
PHEW. ONE MORE ROW TO GO. YOU CAN DO THIS!
Step 38: Connecting Rows

Connect the rows as shown before.
Step 39: LAST ROW: Cube #1 and 2


Both of the next two cubes have two flaps, one of which is flat.
Step 40: Cube #3


The third cube has (fittingly...) three flaps, none of which are flat.
Step 41: Cube #4


The fourth cube is basically a repeat of cube #3.
Step 42: LAST CUBE: Cube #5


The last and final cube has three flaps, one of which is flat.
Step 43: Connecting Rows

Connect the rows as done before.
Step 44: Connecting Layers


To connect the layers, line up the four extra flaps as shown above and connect them like you would connect regular boxes.
Step 45: Tranforming


YOU ARE FINALLY FINISHED! Pat yourself in the back and grab a cookie reward -- you've earned it!
Enjoy the lovely pictures above depicting the sequence of transformation. :3

Grand Prize in the
Papercraft Contest

Participated in the
Full Spectrum Laser Contest


