

Introduction: Interchangeable Pendants


I bought some chain to experiment with, and along the way I came up with this simple design (inspired by the variety of infinity knot bracelets on the internet). I love how versatile this is because it's easy to switch pendants to match your thoughts or outfit of the day.
I also came up with a nice way of organizing the different pendants that you make here.
Click below to see a video demonstrating the pendants' usage.
Attachments

Step 1: Materials
- chain (You could alternatively use other materials -- string, etc.)
- jump rings or wire to make your own
- ruler
- pliers
- miscellaneous beads, charms, headpins, etc. (Reuse an old pair of earrings!)
Step 2: Making the Main Necklace


I wanted to make a main chain necklace for pendants, but you can just attach these pendants to necklaces you already own.
To determine how much chain you need, loop some chain around your neck until you're satisfied with the length, and then cut. You can just alternatively cut the standard 18 inches of regular necklaces. Remember that the pendant will add additional inches so factor that in how low you want the pendants to hang.
After cutting the chain, use jump rings to attach clasps.
Step 3: Cutting Chain for Pendants


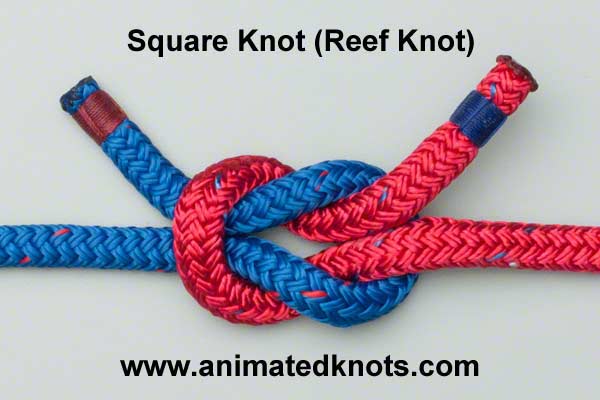
The design of this necklace relies on square knots so here's how to make one of these knots for determining the amount of chain to fit how low you want the pendants.
Put on the necklace you have so far, clasp and all, and pinch the chain at the middle to form a loop. Arrange the chain for the pendant behind the loop you made from pinching the necklace. Then string the ends of the chain through the loop from the pinch. Tug down to tighten. See the pictures above for instructions for additional help.
Next, determine how long or short you want the pendant to be. The ends of the chain will be how far down your pendants will be, so adjust the length of the pendant by tugging (you'll figure out what to tug by sight) until you are happy with the length. Cut and record the length for future reference when you want to make new pendants. My length was about 13cm.
Step 4: Attaching Pendants


Now that you have a pendant and necklace, again, here are the steps on how to connect them with a square knot:
- Put on the necklace.
- Pinch the middle of it to make a loop.
- Hold the middle of the pendant chain behind the loop made from pinching.
- Take both ends of the pendant chain and insert the ends, beads and all, into the loop of the main necklace.
- Tug the pendant down gently to tighten.
- Adjust the lengths of the two beads as you like (one side longer than the other, etc.)
To remove pendants, just tug at the horizontal parts in front and in back of the knot (see the eighth picture of the previous step).
Go back to the main page and click on the video (at the end of my introductory shpeal) to see this in action.
Step 5: Alternative Way to Attach Pendants


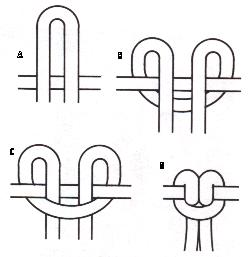
You can attach pendants another way too: by using a lark's head knot.
To make one of these knots, fold the pendant chain in half and arrange it in front of the main necklace, beads above the midpoint of the pendant. There should be a circle/box now created by the horizontal part of the main necklace and the looped middle part of the pendant chain. Drop the beads into that circle/ box and tug to secure the knot. See the pictures above for a better visualization. (or this image here)
Voilà! Time to make more pendants to match different parts of your wardrobe...
If you don't have chain, fret not! Remember that you can always use different materials -- for example, I want to try leather cord and suede lace.
If you need something to organize the pendants neatly, see my tutorial here. Don't forget to have fun. ^^ See the next steps for instructions on pendants that I made.
Step 6: Teardrops Pendant


I bought some supplies from fusionbeads.com, and for this first pendant, I used some blue teardrops.
See above for how to wire-wrap teardrop beads.
After wrapping the beads, use jump rings to attach the beads to the ends of chain that you cut for the pendant. Attach the pendant to a necklace and you're ready to strut your stuff!
Note: This would be awesome for a necklace that has a cloud charm on it. Just saying.
Step 7: Daggers Pendant


For this pendant, I used dagger beads and donut beads.
Use jump rings to attach a donut bead to one end of the pendant chain. Then string three dagger beads to a larger jump ring before using yet another jump ring to attach the dagger beads jump ring to the donut bead. Repeat for the other end of the pendant chain to complete this pendant.
Step 8: Leaves: Part 1


For this I used bicone beads and dried leaves.
To dry leaves, just leave them squashed in a book and wait about two weeks. I left mine in a textbook and forgot about them so they've been there for.. a while...
After that, apply some sort of protective coating to the leaves. I brushed a coat of mod podge on them.
Step 9: Leaves: Part 2


Pierce a hole at the top of a leaf before inserting some wire through the hole. I used 28 gauge wire. See the above photos on how to wire-wrap a leaf, and repeat for the other leaf.
Step 10: Leaves: Part 3


String a bicone bead onto a head pin and cut the headpin so that about 1cm of wire pokes out above the bicone. Use pliers to bend that 1cm into a loop, and repeat for the other bicone.
Use a jump ring to attach one bicone to the loop of a leaf, and attach that same jump ring to one end of your pendant chain. Repeat for the other end.
Anyway, that's the last pendant that I've made thus far, but if you come up with other ones, I'd love to see them in the comments section below! I actually have some 3-month pro-membership codes to give away, so if you do make some pendants by following my tutorial or inventing your own, post a picture (or two) below with the "I made it" button and I'll send you a code.
I hope you enjoyed this tutorial and have a lovely day!

Participated in the
Jewelry Contest

Participated in the
Wedding Contest


