

Introduction: Intro to Unity


This instructable is aimed at super beginners!
You will need to install Unity 4.x (Free or Pro).
http://unity3d.com/unity/download
Start up Unity and create a New Project. Don't worry about importing things yet!
Step 1: This Is UNITY!

http://unity3d.com/unity/workflow/integrated-editor
Let's set our layout to the Default layout.
Go to the Menu Bar and click on Window > Layouts > Default
- Menu Bar
- Object Manipulation Tools (Gizmo): Use this to pan the view and move, rotate, and resize objects.
- Pivot Setting: This changes the location of the Gizmo to either be at the object's pivot point or the object's center.
- Coordinate Settings: Use this to change whether to move an object in the global coordinate system or its local coordinate system (based on the object's rotation).
- In-Editor Game Manipulation Tools: Use these to start/stop, pause, and step the game.
- Layers: Change what layers are visible in your scene in case you want to work only on one set of objects.
- Layout Menu: Change your current window layout.
- Hierarchy Window: Game objects in here are part of the current scene. Manipulate them here.
- Scene / Game / Animator viewer: This is where you view your game. Navigate this by using right click with WASD or the mouse to pan/zoom/tilt.
- Gizmo: This is a Gizmo. Use this to move, rotate, and resize objects based on the selected tool.
- Inspector Window: This is where you change settings for a selected object.
- Project Window: This is where all the assets for the project are stored.
- Console Window: Errors, warnings, and print messages will all appear here. Use this to debug.
- Message Bar: Whenever you have an error, warning, or message, it will show up down here. Go to the console to fix all your bugs.
Step 2: Importing Packages


We're going to start by importing some of Unity's Standard Assets.
In the Menu Bar, look under the Assets tab to Import some packages.
Assets > Import Package > Terrain Assets
Assets > Import Package > Character Controller
Step 3: Terrain


Let's add some mountains!
In the Menu Bar go to GameObject > Create Other > Terrain
Select the terrain object by clicking on it in the Scene or in the object list in the Hierarchy window.
Click the Raise/Lower Terrain button in the inspector panel.

Left click and drag anywhere on the terrain in the Scene to raise the elevation.
Hold down shift to lower.
Experiment with different brush shapes and sizes.

Adding Textures
Now select the Paint texture tool in the Inspector.
Click the Edit Textures button under the Textures heading and select Add Texture.

In the window that appears click select Select in the box labelled Texture.
Double click Grass (Hill) in the window that appears.
Click Add at the bottom of the Add Terrain texture Window.
Add a few more textures using the same method.

Texture Painting
With the terrain and Paint Texture tool still selected select a texture other than grass.
Now, just as with the height modification, click and drag in the viewport to change the texture of the terrain.

Move your Main Camera
Find your camera by double clicking the Main Camera object in the list of objects on the left side of the screen under Hierarchy.
Enable the movement tool by clicking on the 4-directional arrow in the upper left.

You can move objects by dragging the arrows of the tool.

Move your Main Camera object so that the Camera Preview shows something interesting.
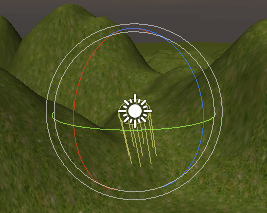
Step 4: Lights

Game Object > Create Other > Directional Light
Try changing the Intensity of the light or play around with the direction and location.
Let's see what the player is looking at!

Now you can see things!
Step 5: Player

Assets > Standard Assets > Character Controllers > First Person Controller
Add a player to the scene by dragging and dropping it into the Hierarchy window.

Rename it to Player by changing the name in the Inspector Window.
Note: if you do not press enter/return after renaming it, the name will not change.
Try positioning the Player on top of the terrain.

Make sure the Player isn't intersecting terrain, otherwise you'll fall through.
Delete Main Camera by right clicking on it's name in the Hierarchy and pressing Delete.
Press play. You should be able to walk around now :)
Step 6: Scene Objects


Let's get a nice building for free!
https://www.assetstore.unity3d.com/#/content/6298

Open in Unity. Download! Create account or log in as needed.
Import all the assets.
Assets > Import Package > Skyboxes
Check only the files relating to DawnDusk
Edit > Render Settings > Skybox Material

Drag and drop the prefabs of the models into your scene.

Step 7: Lock/Hide Cursor

Make a new Javascript Script called "Menu."
We'll start by adding the most basic Menu element for a first person shooter: locking and hiding the mouse when in game.
// True if the menu is open and mouse is unlocked
varMenuOpen:boolean=false;
functionStart(){
UpdateCursorLock();
}
functionUpdate(){
// Check whether the menu button was released
if(Input.GetButtonUp("MenuOpen")){
MenuOpen=!MenuOpen;
UpdateCursorLock();
}
}
// Called each time the Gui needs to be drawn
functionOnGUI(){
if(!MenuOpen){
// Draw the crosshair
// Center the text inside the label
varcenteredStyle=GUI.skin.GetStyle("Label");
centeredStyle.alignment=TextAnchor.MiddleCenter;
// Draw the label at the center of the screen
GUI.Label(Rect(Screen.width/2-50,Screen.height/2-25,100,50),"+",centeredStyle);
}
}
functionUpdateCursorLock(){
Screen.lockCursor=!MenuOpen;
Screen.showCursor=MenuOpen;
}
To get the Menu on the scene, let's create an Empty Game Object (GameObject > Create Empty).
Let's call this "Menu."
Drag the script on to the Menu object.
We'll add more functionality to this later.
Let's add a Menu Open / Close button
Edit > Project Settings > Input.
Open the "Axes."
Under the Size in the Input Manager, edit the size to be 21.
Rename one of the new Inputs to be called "Menu Open" and inside it, set the "Positive Button" to be "escape"
Step 8: Guns and Bullets

Gun
Let's try out this gun:
https://www.assetstore.unity3d.com/#/content/10332
Drag in DartGun Prefab from Compressed Gas Pistol > Prefab > DartGun to the scene.
A prefab is like a Class but in 'object' form. It's the copy with good defaults that you can use for all your different levels.
Put DartGun in Player > Main Camera
Position/Rotate DartGun (Player > Main Camera > DartGun) according to the values below:


Position/Rotate inner DartGun (Player > Main Camera > DartGun > DartGun) according to the values below:

Let's create and shoot some bullets!
Create Sphere by going to GameObject > Create Other > Sphere
Rename the object to Bullet
Add a new RigidBody to the Bullet object.
Click Add Component > Physics > RigidBody

Uncheck Use Gravity
Set Collision Detection to Continuous
Set the scale of the sphere's transform to 0.2, 0.2, 0.2

Let's create a new javascript Script called "Bullet."

// The speed the bullet moves
varSpeed:float=.4;
// The number of seconds before the bullet is automatically destroyed
varSecondsUntilDestroy:float=10;
privatevarstartTime:float;
functionStart(){
startTime=Time.time;
}
functionFixedUpdate(){
// Move forward
this.gameObject.transform.position+=Speed*this.gameObject.transform.forward;
// If the Bullet has existed as long as SecondsUntilDestroy, destroy it
if(Time.time-startTime>=SecondsUntilDestroy){
Destroy(this.gameObject);
}
}
functionOnCollisionEnter(collision:Collision){
// Remove the Bullet from the world
Destroy(this.gameObject);
}
Drag and drop the Bullet script from the Project Window (Assets > Scripts) to the Bullet Object in the Hierarchy Window.
Finally, let's make the Bullet into a prefab and delete it from the scene.
Create a prefab of the bullet by dragging the Bullet object into the Project window to the Assets > Prefabs in the Hierarchy Window.
Let's create a new javascript Script called "Gun."
// This is the bullet prefab the will be instantiated when the player clicks
// It must be set to an object in the editor
varBullet:GameObject;
// Fire a bullet
functionFire(){
// Create a new bullet pointing in the same direction as the gun
varnewBullet:GameObject=Instantiate(Bullet,transform.position,transform.rotation);
}
functionUpdate(){
// Fire if the left mouse button is clicked
if(Input.GetButtonDown("Fire1")){
Fire();
}
}
Drag and drop the Gun script from the Project Window (Assets > Scripts) to the Gun Object in the Hierarchy Window.
Drag and drop the Bullet Prefab into the Gun script where it says "None (Game Object)."
Remember to always apply changes to the prefab by going to the scene object > inspector window > prefab > apply.
Let's make sure the Player doesn't get shot!
Layers > Edit Layers

Create Bullet Layer
Create Player Layer
Select the Bullet object and set its layer to Bullet.

Select the Player and set to Player layer.
Say yes to changing the children.
Edit > Project Settings > Physics
Uncheck Bullet/Player and Bullet/Bullet

Step 9: AI

http://www.mixamo.com/editor/new/86
Press yes to viewing the animation.
Click Download
Click Sign Up
Create Account
Click Download again
Click Checkout
Select FBX for Unity for Download Format
Click Download
Create Models Folder in the Projects window > Assets
Drag and Drop the Zombie into the Models Folder
If a warning window pops up when importing the model click Fix Now.
GameObject > Create Empty
Rename the GameObject to Zombie
Drag the Zombie model onto the Zombie Object
Put a Character Controller on the Zombie Object

In the inspector set the Center Y to 1
Add a Capsule Collider component
Add Component > Physics > Capsule Collider
** Make sure to copy the exact values over.


Create a new script named Zombie in your scripts folder.
Put script on the Zombie.varVisionDistance:float=200;
varMovementSpeed:float=2;
varHealth:int=2;
functionFixedUpdate(){
// Get the Player object
varplayer:GameObject=GameObject.Find("Player");
varcharacterController:CharacterController=GetComponent(CharacterController);
// Get the position of the Zombie's eyes
vareyePosition:Vector3=transform.position;
eyePosition.y+=characterController.height;
// Get the difference between the player and the Zombie positions
// This creates a direction vector pointing in the direction of the Player.
varlookDirection=player.transform.position-eyePosition;
lookDirection=lookDirection.normalized;
// Only look for the player or objects that are part of the scenery (terrain, buildings, etc.)
varlayerMask:int=1<<LayerMask.NameToLayer("Player")|1<<LayerMask.NameToLayer("Default");
// The direction the Zombie will move, defaults to standing still
varmovementDirection:Vector3=Vector3.zero;
// hitInfo will contain information about what the Zombie can see.
varhitInfo:RaycastHit;
if(Physics.Raycast(eyePosition,lookDirection,hitInfo,VisionDistance,layerMask)){
// If the Zombie can see the Player move toward them.
if(hitInfo.collider.gameObject==player){
movementDirection=lookDirection;
movementDirection.y=0;
movementDirection=movementDirection.normalized;
}
}
// Face and move in the chosen direction
if(movementDirection!=Vector3.zero){
transform.rotation=Quaternion.LookRotation(movementDirection,Vector3.up);
}
characterController.SimpleMove(movementDirection*MovementSpeed);
}
Create Zombie Layer (Layers > Edit Layers)
Put Zombie into Zombie Layer so that the Zombie can 'see through' other zombies.
Drag and drop the Zombie into the Assets > Prefabs folder to create a prefab of it.
Step 10: Animation


The same way you made a script, this time, make an Animator Controller
Name it Zombie Animator.Now double click on the Zombie Animator.Project Window > Right Click > Create > Animator Controller
Now in the Project Window, locate the Zombie@walking_3 asset again.
Open up the asset by clicking the arrow next to it.
Now drag and drop the walking_3 animation into the Animator Window.

Connect the Any State to the walking_3 state by right clicking on Any State > Make Transition and then click on walking_3.
First, let's make sure that the walking 3 loops correctly by editing the Transition arrow (click on the Transition arrow).
Make sure the walking animation doesn't over lap and the arrows on the timeline are next to each other.

Next, let's make sure the animation isn't super duper slow by editing the walking_3 animation inside the Animator window.

Set the speed to around 3.4.


Now in your scene, go to the Zombie and drag the animator controller on to the animator object.
Uncheck Apply Root Motion and set the culling mode to Always Animate.
Finally, go to Prefab > Apply and apply the settings to the prefab. Make sure that the Zombie prefab now also has an animator controller!

Test it out in the scene!
Step 11: Spawning Zombies
Create a new empty GameObject.
Name the object Spawner.
Create a new script named Spawner and add the following code to it:
// The object to be spawned
varSpawnObject:GameObject;
// in seconds
varSpawnStartDelay:float=0;
varSpawnRate:float=5.0;
functionStart()
{
InvokeRepeating("Spawn",SpawnStartDelay,SpawnRate);
}
// Spawn the SpawnObject
functionSpawn()
{
Instantiate(SpawnObject,transform.position,transform.rotation);
}
Add the script to the Spawner.
With the Spawner selected drag and drop the Zombie prefab into the Spawn Object property of the Spawner script.

You may notice that this script is very similar to the Gun script.
Make this into a prefab.
Place some in your map!
Step 12: Stats and End Condition

Add a new script called Player in the scripts folder.
The following code will allow the Player to be damaged, and restart the game when the player is killed.
// The number of times the Player can be damaged before the game restarts
varHealth:int=10;
// Minimum number of seconds between the player getting hurt
varDamageInvulnerabilityDelay:float=2;
// Keeps track of the last time the Player was damaged
privatevarinvulnerabilityStartTime:float;
functionStart(){
// Set initial value so the Player is temporarily invulnerable at spawn
invulnerabilityStartTime=Time.time;
}
// Attempt to damage the player by the specified number of hit points
functionHurt(damage:int){
// If we have waited at least as long as DamageInvulnerabilityDelay
if(Time.time-invulnerabilityStartTime>=DamageInvulnerabilityDelay){
// Damage the Player
Health-=damage;
// Reset the invulnerability timer
invulnerabilityStartTime=Time.time;
}
// If the Player has no health left
if(Health<=0){
// Reload the level
Application.LoadLevel(Application.loadedLevelName);
}
}
If the zombie collides with the player, hurt the player.
// When the Zombie collides with something
functionOnTriggerStay(other:Collider){
// Get the Player that the Zombie collided with, if any
varplayer=other.gameObject.GetComponent(Player);
// If it collided with something other than a Player player will be null
if(player!=null){
// Subtract one from the Player's health
player.Hurt(1);
}
}
If the bullet hits a zombie, hurt the zombie.
Replace the OnCollisionEnter function in the Bullet script with the following
functionOnCollisionEnter(collision:Collision){
// Get the Zombie that the Bullet collided with, if any
varzombie=collision.transform.gameObject.GetComponent(Zombie);
// If it collided with something other than a Zombie zombie will be null
if(zombie!=null){
// Subtract one from the Zombie's health
zombie.Health--;
// If the zombie is out of health remove them from the game
if(zombie.Health<=0){
Destroy(collision.transform.gameObject);
}
}
// Remove the Bullet from the world
Destroy(this.gameObject);
}
Step 13: HUD and Menu System

Let's add Resume, Restart, and Quit buttons as well as something telling us how much health is left.
Add both of these functions to the Menu script:
functionDrawHUD(){
// Get the health from the player
varplayer=GameObject.Find("Player");
varhealth=player.GetComponent(Player).Health;
// Position
varleft=10;
vartop=10;
varwidth=100;
varheight=25;
// Make a background box
GUI.Box(Rect(left,top,width,height),"Health: "+health);
DrawCrosshair();
}
// Draw the menu
functionDrawMenu(){
varcenterX=Screen.width/2;
varcenterY=Screen.height/2;
// location of the menu
varmenuLeft=centerX-50;
varmenuTop=centerY-50;
varmenuWidth=100;
varmenuHeight=100;
varbuttonX=menuLeft+10;
varbuttonWidth=80;
varbuttonHeight=20;
varbuttonDist=25;// distance between each button
// Make a background box
GUI.Box(Rect(menuLeft,menuTop,menuWidth,menuHeight),"Menu");
// Start / Resume
if(GUI.Button(Rect(buttonX,menuTop+1*buttonDist,buttonWidth,buttonHeight),"Resume")){
MenuOpen=false;
UpdateCursorLock();
}
// Restart
if(GUI.Button(Rect(buttonX,menuTop+2*buttonDist,buttonWidth,buttonHeight),"Restart")){
Application.LoadLevel(Application.loadedLevel);
}
// Quit (Only works in the Build. Does not work in the eidtor!)
if(GUI.Button(Rect(buttonX,menuTop+3*buttonDist,buttonWidth,buttonHeight),"Quit")){
Application.Quit();
}
}
Now replace the OnGUI function with:
// Called each time the Gui needs to be drawn
functionOnGUI(){
if(!MenuOpen){
DrawHUD();
}else{
DrawMenu();
}
DrawCrosshair();
}
Enjoy visual feedback!
Step 14: Play Around and Have Fun
Make some more interesting Terrain.
Make some arms and fingers for the gun. Rotate them backwards on shoot to emulate recoil!
You could try, for instance, making the Zombie run to the player and then do gangnam style by downloading some animations:
http://www.mixamo.com/motions?page=1&order=relevance&free=1&limit=48


