

Introduction: Iron-leg Poplar Dining Table


This is an older design I've been kicking around.
All you need is a few pipes with reducing tees, flanges, and some 5' wood boards and you can build and stain this project in about 3 weekends.
We had it done in time for thanksgiving!
Step 1: Primary Assembly


Materials Needed:
- 12 x Steel floor flanges (3/4")
- 4 x 3.4" and 1/2" Reducing Tee (2 x 3/4" and 1 x 1/2")
- 4 x 1/2" Pipe
- 5 x 12 x 3/4" iron pipe
- 4 x 18 x 3.4" iron pipe
- 5 poplar (or other hardwood boards) (1.25 inch width; total final table lenght is 5')
- A whole bunch of screwhole plugs (3/8") and wood screws of 2." length
- Hardwood Dowels 3/8" x 1.5"
- 5" Bolts and associated wingnuts
- ChalkString
- Power drill
- Palm sander
- Chopsaw
- Rubber Mallet
- 3/8" screw hole drillbit
- Philips Head Bit
- Gorilla Glue
1. Sand your wood bits until smooth using increasing smooth grit.
2. The table design here is two sides of the table plate are doweled and glued. A center leaf is dowled and balanced/supported by a final central post which is supported by the four table lets and suspended by iron crosspieces. It's not a crazy difficult design, but you need to pay attention to your distances as your metal pipes are built finitely.
3. Start By Aligning your pieces of hardood board to make the one side straight. Use a pencil to mark and drop in a dowel on the side of the boards you want to dowel together.
4. Use the factory edge to get your distances to the dowel holes. Drilll the dowel holes in and glue them in to get each edge of the table to act as a larger piece for the left and right side of the table.
5. Repeat the process to get the central leaf to marry up to the side boards. Use your drill bit, dowels, and glue to make 3 leaves for the top of the table.
Step 2: Table Top


1. Build a central cube to bind the corner legs to each other using the 3 way reducing Tee and hte 1/2 bars.
2. Drill the dowels and glue and clamp into place. Use adorable red headed minion for rubber malleting (if available).
3. Build and connect the central leg cube
4. Take picture of mock-up table top.
5. Teach more rubber malleting and clamping.
6. Cut the boards to length.
Step 3: Sanding!


1. Line up the assembly on the corners and determine how uniform the corners of the assembly are after laying out the legs.
2. Before final assembly, you're going to have to stain/seal/poly your boards. So it's a good idea to make certain everything fits and is lined up at this point. Make sure the whole thing fits together before you poly it.
3. Sand with decreasing grit unti smooth. Don't forget to round your corners! Then cover with 4-6 coats of stain/poly drying in between and light sanding before application of subsequent coats.
Step 4: Seondary Assembly


The flanges you purchased need to have their distances checked against the distance of the metal legs after assembly.
So:
1. Used the marked corners and then screw in the 4" squares to the table. Then connect the leg flanges to to the table top.
2. Build the underside bolt/wingnut blocks, drill your holes for the dowel connection points for the central leaf to line up with the blocks and drill the block connection points down through the top of the table. Using the 3/8" inch screwbit, sink the screw holes into the table top and screw the blocks into the table. Connect the bolt blocks to the edge of the central leaf where the dowels are located and finish the table top with the screw hole wooden bits.
3. Connect the dowels together and wingnut the bolts such that it pulls all leaves of the table together.
|. . . . . .|. . . |. . . . . .|. . . |. . . . . .|
|. . . . . .|dwl.|. . . . . .|dwl|. . . . . .|
|. . . . . .|dwl |. . . . . .|dwl|. . . . . .|
|. . . . . .|. . . |. . . . . .|. . . |. . . . . |
4. Build 1x3" frame to tie the whole table together.
Step 5: Final Build Out


- Have a helper turn the table over carefully.
- Check Level: Do victory dance.
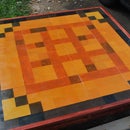
- Photograph table
- Check table sturdiness with child. Heavy enough to deal with a four year old or even Thanksgiving dinner
- Total cost: 500 dollars.

Participated in the
Wood Contest


