

Introduction: Just Some Ordinary Concrete Cufflinks


I've been playing with 3D-Printed concrete molds for some time now and decided to try my hand at creating some cufflink molds. I also took this opportunity to give AGT's (Ambient Glow Technology), glow sand products a try. Here's what I came up with.
Step 1: Materials and Measurements

- Caliper or Ruler of some kind
- Cufflink Backs
- Concrete (Quickcrete 500, Portland Cement or Mix of Portland / Sand)
- Stone Dust (Pool Mix, Marble)
- Plastic Covering
- Several Containers (Mixing Concrete, Water Bath, and Storing Aggregates)
- Water (Mixing, Curing Concrete and Wet Sanding)
- Sifter
- Strainer
- Plastic Spoon and Knife
- PAM Cooking Spray (Mold Release Agent)
- Flat-Head Screwdriver
- Wet/Dry Sandpaper 400/600/1000 - grit
- Water Based Penetrating Concrete Sealer
- Clear - 2-part Epoxy made for Concrete
- AGT Glow Sand
- Epoxy Applicator (wooden toothpicks or skewers)
- Carnauba Wax for Concrete
- Cloths / Rags / Paper Towels (Carnauba Wax application, Sealer removal)
- 3D-Printer
- Old printed ABS filament
- Scissors
Take measurements of your cufflink backs. I know there are several different types of cufflink backs out there, I purchased mine from a local hobby store. You can go as far as making some if purchasing them is not an option.
Step 2: Design and Print


Sketch out some designs on a scratch piece of paper and then transition those to your 3D software of choice. I used the following software for their ease of use and free-ness... Google SketchUp for modeling, OpenSCAD for mold making, and Netfabb Studio Basic for any cleanup/repair.
Once modeled in SketchUp I printed out a single cufflink to test actual size dimensions against my cufflink backs.
http://www.youtube.com/watch?v=uzmdle8D2MM
Satisfied with the design, I created an inverse of the model in OpenSCAD. This model will function as the actual mold for the concrete.
http://www.youtube.com/watch?v=B3BJo5XOFRg
Netfabb Studio Basic was used to cleanup and repair my models in each step of the process so that the model was ready for 3D-Printing. You can also use the web version of Netfabb Studio if you don't want to download and install Netfabb on your PC.
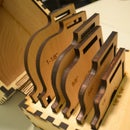
The last step is to print out your final concrete mold versions, both the top and bottoms. See attached .rar file for the initial .skp, .stl and .scad files used. If you don't have access to a 3D-Printer you can visit my new Shapeways shop and get the concrete molds printed from there.
Attachments

Step 3: Prep: Concrete, Aggregates and Molds


As with any concrete, please use proper protection: Eyes, gloves and a mask. Allergic contact dermatitis, is a bad word that you can contract from playing with concrete without proper protection and it will mean you can't play with concrete any more.
For concrete, I've had good results using Quickcrete 5000 and straining out the large aggregate stones. Quickcrete 5000 already has both concrete and sand mixed in so you can accomplish the same with Portland Cement and Sand Mixture at a 1:1 ratio. However, you don't necessarily have to have sand as it's a rather large aggregate for the small scale we'll be dealing with. Just keep in mind, as a general rule, the more aggregates your concrete has the stronger it will be. Strain out a much as you'll use for a few runs.. a good cup full works for a while.
I add Marble stone dust to my mix that had been sifted twice, with a flower sifter. I was lucky enough to get Marble stone dust at a local quarry but I believe some can be found under the name of "Pool Mix" at local hardware stores. Pool builders use it to strengthen their concrete mix and make the concrete resistant to water absorption (less porous). I've found it not only makes your final concrete stronger and less porous, but also helps with shrinkage... not a man cold-water thing, but cracks that form in your concrete when curing. Sift the stone dust into a small container, using about the same amount as the concrete.
Lastly as an option, I played with adding left over ABS filament strands from past 3D-builds... all about recycling. I couldn't find any real documented proof that ABS adds anything to your final concrete product, but I ran several mixes with and without the ABS filament strands and both worked well. I've read that polypropylene does add tensile strength and also helps reduce shrinkage cracks, and the properties of ABS are similar to polypropylene, when related to concrete aggregate use, so I decided to give it a shot. You'd have to get in a lab to see if it helps, but it does give the concrete a unique character. Cut the larger strands into about 1cm lengths for the cufflinks.
Mold prep includes PAM, my miracle mold release agent, and with the added butter flavor... mmm. Put a good coat of PAM on any part of your mold that will touch concrete. Then wipe up the excess with a towel or rag, make sure to get it into every corner so that de-molding is cleaner. Using PAM is a great alternative to an expensive mold release agent for this application.
Step 4: Mix Concrete and Fill Molds


There are plenty of resources out there for properly mixing concrete and I am no expert, so I would ask that you take my advice with a grain of salt. This is just what I've found works for me.
My Mix:
1 tbsp. Quickcrete 5000 (strained, large stone aggregates removed)
1 tbsp. stone dust (Marble, sifted twice)
(Optional) Small amount of ABS fibers (cut into small pieces)
Basically a 1:1 ratio of Quickcrete 5000 to stone dust. If using Portland Cement use a 1:1:1 ratio for Cement, Sand and Stone Dust.
Once your portions of Cement, Sand and Stone Dust are measured, combine all the dry ingredients thoroughly before adding water.
I use very small amounts of water at a time and mix as I go. The concrete should be completely wet but not liquid, this isn't an exact science and there is plenty of wiggle room so just experiment. I find that a good concrete mixture has a toothpaste or creamy peanut butter consistency. If your mixture gets too liquidy (that's a word right?), just add more ingredients in equal amounts.
Once mixed spoon your concrete into your molds. After I placed the concrete in my molds I used a plastic knife to push the concrete into the mold and then level/shave off the top. Once shaved I tap my molds on a hard surface several times to get everything to settle and any trapped air bubbles out.
Clean up your plastic-ware with water for re-use.
Step 5: Curing Process and De-molding


Curing your concrete should take place over the course of 24-48 hours. Keep your molds covered in plastic, and keep the concrete surface wet as much as possible. I added a small amount of water to the top of my molds every 8-12 hrs and then recover with plastic while curing.
Once curing time is complete de-mold. With the given design, I added two spaces on each side of the top mold to fit a flat-head screwdriver and pry the two pieces apart. A scrap piece of wood serves as a good fulcrum.
Use the same screwdriver and light pressure to remove any excess concrete off the top mold and push the rough cufflinks out of the top section.
Once the cufflinks have been removed, you can re-prep your molds with PAM, which also removes any residual concrete, and use them again.
I like to shower the concrete with more water when they come out of the molds and then allow them to dry for a few hours before moving on to the next step.
Step 6: Wet Sanding


The purpose of wet sanding at this stage is to remove any sharp edges and additional concrete, we're not looking for a finished product just something that won't hurt us in the long run. Wet sand all of your concrete cufflinks, paying special attention to corners and edges, but without sanding the face (we'll do that in the 2nd phase). I use 400 grit wet/dry sandpaper for the initial wet sanding. Your sand paper will fill with particles rather quickly as you wet sand, so I bathe the sandpaper in a water bath to clean it off every so often. Keep your sandpaper and concrete wet and you should be good.
Once completed, set your concrete cufflinks aside to dry for a few hours before moving onto the next step.
Step 7: Sealing Concrete


Get a good water-based penetrating concrete sealer and follow the directions. Mine asked to pour the sealer on the concrete let stand for 2 mins and then remove any access before it dried. I used a small bottle cap to pour the sealer into and then dunked the cufflinks in one at a time. Once removed I just dried them off with a towel or rag and set them aside.
My directions called to test the concrete for water absorption 4 hrs after applying the first coat of sealer and reapplying as needed. Repeat every 4 hrs until dropping water on the top of the cufflinks doesn't get absorbed. Usually 2 coats did it for me.
Curing time for my sealer was 24hrs, so set your cufflinks aside and let the sealer do it's thing before moving on to the next step.
Note: Acrylic sealers are not the same as a penetrating sealer, they'll just seal the surface of the concrete, but because we'll need to do some wet sanding again you'll want the latter.
Step 8: AGT


AGT (Ambient Glow Technology) sells photo-luminous aggregate products that can be used for concrete work. 10+ hours of illumination after being exposed to only 10 mins of light with a 20+ year life span are some very nice statistics. First time using their product, but thanks a bunch to Peter Tome for the pointers on proper application. I was pleasantly surprised when I called the company and the CEO was the first to answer and excited to help me out.
We'll be using the Sky Blue fine glow sand 250-mesh for our application and a "clear" version of a two-part epoxy. You'll only need a very small amount of the fine AGT sand and epoxy as the epoxy is almost unworkable after a few minutes.
Pour out equal amounts of the epoxy next to your sand and mix everything together for about a minute. Once thoroughly mixed, use an applicator of some sort, a wooden skewer in my case, to fill in your cufflink crevices. It doesn't have to be pretty but as a rule, more is better as we'll sand it down to size soon. You'll only be able to get to two or three cufflinks before the epoxy is un-workable and you'll have to repeat the process to make more.
The epoxy I'm using sets in 1 hour (cures to full strength in 12 hours), so I give your cufflinks 2+ hours before moving on to the next step.
Step 9: Final Wet Sanding and Wax


The 2nd phase of wet sanding will be a little more involved. Here we'll use three different types of wet/dry sandpaper, 400/600/1000 grit, to get our final look. The goal for our wet sanding here is to achieve a finished feel to our cufflinks and remove all the excess epoxy.
Since most if not all our epoxy should be located on the face of our cufflinks, start there with the 400 grit sand paper. Sand it down until you start noticing that you're almost at concrete. I moved on to the 600 grit to finish off the top sides and edges and then on to 1000 grit to clean everything up.
During each sanding you'll again make use of the water bath to remove particles of concrete every so often. Do it more regularly once you get to the 1000 grit sandpaper as we're looking for a finished feel.
Once done, you can apply the Carnauba wax. I got mine from an online vendor "Concrete Fabricator" and it has worked well. The directions on my wax say to apply and allow 5-10 minutes to dry, buff, then re-apply a second coat.
Step 10: Finished Cufflink
Attach your concrete cufflink to your cufflink back with the same two-part epoxy used earlier and you have your finished product.
A nice added bonus is that after just a few minutes in any type of light the cufflinks will give off an amazing glow in a dimly lit room.

Participated in the
3D Printing Contest

Participated in the
Epilog Challenge V

Participated in the
Craft Contest

Participated in the
Jewelry Contest


