

Introduction: Keres, a Pocket Sized Fighting Robot.

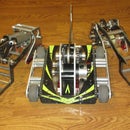


Keres is my latest combat robot project. This is my smallest robot to date, weighing in at just under 150g.
The main motivation for this build was to test out the prototype "Mini-Spark" gearmotors from FingerTech Robotics (http://www.fingertechrobotics.com/) that should be released in the very near future.
The attached .rar contains the drawings for the top plate, bottom plate and weapon bar as well as the .stl you would need to have the chassis printed. The chassis is also available on shapeways at http://www.shapeways.com/model/769811/kereschassisv3.html if you would prefer to just order it. I used White, Strong, & Flexible, which is laser sintered nylon.
Attachments

Step 1: Component Selection

Component selection for robots this small is fairly limited, but luckily there are still a decent number of quality parts available that aren't too large for the minuscule weight budget.
The radio system is a Spektrum dx6i, as that is what I already had and there was no point buying new radio equipment when my current gear can handle several more robots.
The receiver is a hobbyking R410 OrangeRX. It is one of the smallest receivers on the market that I am aware of with programmable failsafes that is also compatible with the dx6i. For a robot this small with the dx6i, it is one of the best receiver options. (http://www.hobbyking.com/hobbyking/store/__11972__OrangeRx_R410_Spektrum_DSM2_Compatible_4Ch_2_4Ghz_Receiver.html)
The battery is another hobbyking product, the Turnigy Nano-Tech 180mAh 2s lipo battery. I've run the larger cousin in my 30lb robot Nyx successfully, so it was an easy decision when I was looking for a small two cell battery. (http://www.hobbyking.com/hobbyking/store/__23135__Turnigy_nano_tech_180mah_2S_25_40C_Lipo_Pack.html)
The weapon motor controller is a Plush10 from hobbyking. These are a common brushless controller that appears to pair well with my weapon motor. (http://www.hobbyking.com/hobbyking/store/__4204__TURNIGY_Plush_10amp_9gram_Speed_Controller.html)
The weapon motor is an Emax GT Series 1560kv brushless outrunner. The original motor I was looking at went out of stock and instead of waiting and hoping that it would return to stock, I found this and have been happy with the performance. (http://www.himodel.com/electric/EMAX_GT_Series_1560KV_Outrunner_Brushless_Motors_Type_GT2203.html) One minor change I have made is the stock shaft has been replaced with one of the spare hardened 3mm shafts discussed in my instructable on my 1lb robot, Algos (https://www.instructables.com/id/One-Pound-Fighting-Robot-Algos/step5/Shaft-Replacement-and-Hardening/)
In addition to the weapon shaft, Keres uses the same weapon hub as my antweight Algos. The lightweight 3mm hub from ServoCity seems to work quite well in this application. (https://www.servocity.com/html/lightweight_set_screw_hub__3mm.html)
Drive motor controllers are FingerTech TinyESC's. I've used these in all of my small robots and they have proven to be a fantastic brushed motor controller. At this point, I use them in any application that they're appropriate for. (http://www.fingertechrobotics.com/proddetail.php?prod=ft-tinyESCv2)
The drive motors are 20:1 prototype Mini-Sparks which will be available soon at http://www.fingertechrobotics.com
One additional component will be added shortly before the debut event for Keres. In addition to being used to test the Mini-Spark gearmotors it will be testing a prototype power switch also from FingerTech Robotics.
The chassis is held together via 3 7/16" long aluminum standoffs. The McMaster part number is 93330A515. These press into the printed nylon chassis.
Step 2: CAD Development


I had been kicking around the general concept in my head for a while. It wasn't until I spoke with FingerTech Robotics and found out that they had a prototype gearbox they wanted me to test that I decided to move forward on the design.
Many traits survived through the design iterations, however there were also several major changes over the course of development. The single largest change motivator was the backordering of the original weapon motor. This forced me to look at alternatives and while doing so I decided to drastically change the layout of the chassis.
Outside of the weapon motor, the major components remained the same across the iterations. The initial concept was a 5" weapon bar that would extend in front of and behind the short, wide chassis. This arrangement allowed for a front and rear attack but was a somewhat inefficient use of space due to the weapon motor sitting right in the middle of everything, which meant it needed a wire guard to keep the brushless outrunner from grabbing on wires after an impact. This concept went through several variations and was eventually chopped down enough that if it were built, it would make weight.
At this point the intended weapon motor went on backorder and I decided to tweak the concept a bit while integrating the new motor. The weapon moved forward giving it a wider frontal attack range and making it somewhat less prone to lifting the nose off the ground under acceleration. Once again, it was chopped down to weight in cad and at least for the time considered done.
After spending some time thinking about it, I was unhappy with the amount of material removed from the top and bottom armor and decided that I needed a more tightly packed chassis. This led to the final revision which was used for construction. The chassis width dropped by 2 inches without much increase in length and gained a few small touches that should help in combat should it end up not in its intended orientation. The small pointed protrusion at the back of the chassis should prevent it from resting flat on its back in a position that may prove difficult to escape, which should minimize the risks of immobilization. The other feature is the invert sticks, the two prongs sticking up just behind the weapon motor. These will drag on the ground instead of the motor body when the robot is inverted allowing for easier weapon spin-up and a higher top speed when operated in an inverted position.
Step 3: Chassis Fabrication

Chassis fabrication was the easiest part of the build. The weapon bar and armor plates were all waterjet cut out of .031" and .080" titanium. The chassis was printed by shapeways and is made of sintered nylon. There was little work needed to prep the chassis. The four front holes in the chassis were bored out slightly to allow the plastite screws to more easily thread in and the 1/4" holes for the aluminum standoffs were bored out to allow for a slight press fit. 10 screws later and the chassis was done.
Step 4: Wiring and Component Installation


Wiring the machine was a bit more difficult. As you can see there is very little room for wire routing between the front and rear of the robot. I had to carefully wedge three pwm cables and 10 power leads between the two drive motors when the motor leads are counted. The result of this is a heavily layered wire path that will need to be carefully disassembled and reassembled should any components need to be replaced.
The power leads all go to a single JST connector as at the moment the "power switch" is just a mechanical disconnect. This is soon to be replaced by a proper power switch that will allow the battery to remain plugged in at all times and simplify the power up and power down process. Part of the power switch installation process will be the shortening of the pwm cables to make room for the switch and reduce the weight by a large enough margin to keep the robot from going over the 150g weight limit.
The drawn electronics layout shows the general electrical layout. In the case of Keres, mixing is done on the transmitter to save weight and the weapon motor is brushless, so a third wire is present. (Note, to reverse the direction of rotation on a brushless motor with a single directional esc you simply swap any two motor leads)
Step 5: Drive System and Failsafe Testing
Step 6: Weapon Testing
Step 7: Final Thoughts

Overall, I am very happy with how the build turned out. The weapon is as powerful as I had hoped and Keres is very easy to drive. As small as it is, it's still not that difficult to work on should the need arise and the components were all relatively inexpensive, which means I am able to have spare parts on hand for the parts most likely to be damaged in combat.
Keres will debut at Motorama on February 15th. After the weekend is completed I will be uploading video of the entire event to my YouTube channel http://www.youtube.com/user/mikencr and I will update this page with Keres' match videos.

Finalist in the
Pocket Sized Contest

Participated in the
Instructables Design Competition

Participated in the
UP! Contest


