

Introduction: Kool-Aid Yarn Dyeing


Today is one of those gray, dreary days where a little more color is a welcome sight. It's a perfect day for Kool-Aid dyeing wool yarn.
There are two things to remember about Kool-Aid: 1. It is a protein dye, meaning that you can dye hair, wool, and silk with it. 2. Wear gloves & safety goggles because it can and will dye your hands and can sting your eyes!!
Step 1: What You Need:


You will need an old, junky pot that you don't cook in anymore;
a medium sized wash basin (critter feed bowl from Fleet Farm);
old ladle or spoon you don't cook with;
pair of rubber gloves to keep your hands from being dyed;
safety glasses or safety goggles
cider vinegar;
1/2 cup measuring cup or liquid measuring cup;
Kool-Aid in the colors you wish to work with - I always figure 1 packet per 2 ounces of fiber I want to dye;
yarn
Step 2: Prepare Waterbath


Fill your ceramic pot (you can see mine is very well used for dyeing) about 3/4 full with cold water.
Add 1/2 cup cider vinegar.
Stir.
Step 3: Place Dye Pot on Stove and Add Kool-Aid


Place dye pot on stove and turn your burner on somewhere between medium and medium-low.
Pour in your Kool-Aid powder. I used 2 packets for 1 3.5 ounce skein of Icelandic wool yarn.
Stir with ladle or spoon and let sit until the top of the water looks like it's being sprinkled on (You'll see little tiny bubbles popping on the surface of the dye bath - about 20 minutes).
Step 4: Prepare Yarn for Dyeing


Run medium hot tap water into the wash basin until about 3/4 full.
Unwind the skein of yarn and make sure it's tied good in at least 2 places. If not, tie 2 pieces of yarn at opposite ends of the skein making sure to knot well, but not too tightly or the dye won't reach where you've tied the yarn.
Push yarn into wash basin making sure to get all air bubbles out by holding the yarn under the water.
Let sit until dye bath is ready (previous step).
Pour off water, then take skein up and squeeze most of the water out of it. (Last picture in this step.)
Step 5: Place Pre-wetted Yarn Into Dye Bath


Place ladle or spoon under a section of the skein so it'll hang on the ladle.
Carefully suspend skein over dye bath.
Gently lower skein into dye bath.
Push skein all the way into dye bath and leave sit on heat set on low for about 1/2 hour to 40 minutes.
Step 6: Remove Dyed Yarn From Pot and Cool


You'll know your yarn is ready to be removed when you can see that most of the color has been absorbed.
Remove dye pot from stove and place in sink and cool until you can handle the yarn comfortably (with gloves on, of course).
Step 7: Rinse Cooled Yarn and Hang to Dry


Use ladle or spoon and lift yarn out of dye pot.
Allow to drain over sink (you'll notice the water is not clear and thus the yarn needs to be rinsed)
Fill wash basin with lukewarm water.
Slip yarn into water and let soak for about 10 to 15 minutes. Do this as many times as it takes until the water runs clear from the yarn (I usually only need to do this 2 or 3 times).
To ensure the yarn will not bleed when washed, add a couple of drops of dish soap to last rinse bath and let sit for 10 minutes and follow above soaking and resoaking step until water runs clear from yarn. I usually only need to do this once. (Next to last picture shows yarn running clear.)
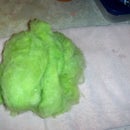
Gently wring water from yarn and hang to dry, periodically squeezing excess water from bottom of skein. It takes about a day to dry in winter.

Participated in the
The Mad Science Fair


