

Introduction: LED Control Using Bluetooth

SORRY FOR THE BAD QUALITY OF VIDEO. I COULDNT GET A PROPER SHOT AND I AM NEW TO ARDUINO AND COMMUNICATION WITH BLUETOOTH
Hello everyone, This is my first instructables here. This a small acitivity i have made to control the led using bluetooth module HC-05 via the arduino. I know this is not much but i have started app development and using bluetooth control. This activity is great for beginners who are looking ways to control their arduino wireless using a bluetooth and it can give you basic understanding behind bluetooth control and arduino. I have made the app using MIT app inventor which is a great place to design app for beginners and understand how it works. I recommend anyone who is new to arduino and bluetooth control to explore their website and learn how to desgin one. It is pretty simple and can be done easily. This whole activity can be done less than 10mins provided you have the necessary items as listed. this is not a project but a simple activity for anyone who is new to bluetooth control using arduino. THIS APP ALLOWS YOU TO CONTROL A SINGLE LED BY TURNING IT ON AND OFF. each time you press on and off the app it sends back 0& 1 to the bluetooth , the arduino then interprets the 0 and 1 and acts accordingly. i am not going to cover what bluetooth technology and arduino is as you might have a slight idea what it is, if not you can always google it. Please feel free to post your comments. Also any kind of trouble with any steps are app can be posted and I with my best knowledge can help you out. Looking forward to hear from you all.
Thank You
Attachments

Step 1: COMPONENTS YOU WILL NEED :


1.HC-05
2. LED (COLOUR OF ANY CHOICE YOU WANT) x1
3. 1K ohms resistort X4
4. bread board X1
5 jumper cable/wires -few
6. arduino uno
7. Android phone
Step 2: MAKING UP THE CIRCUIT
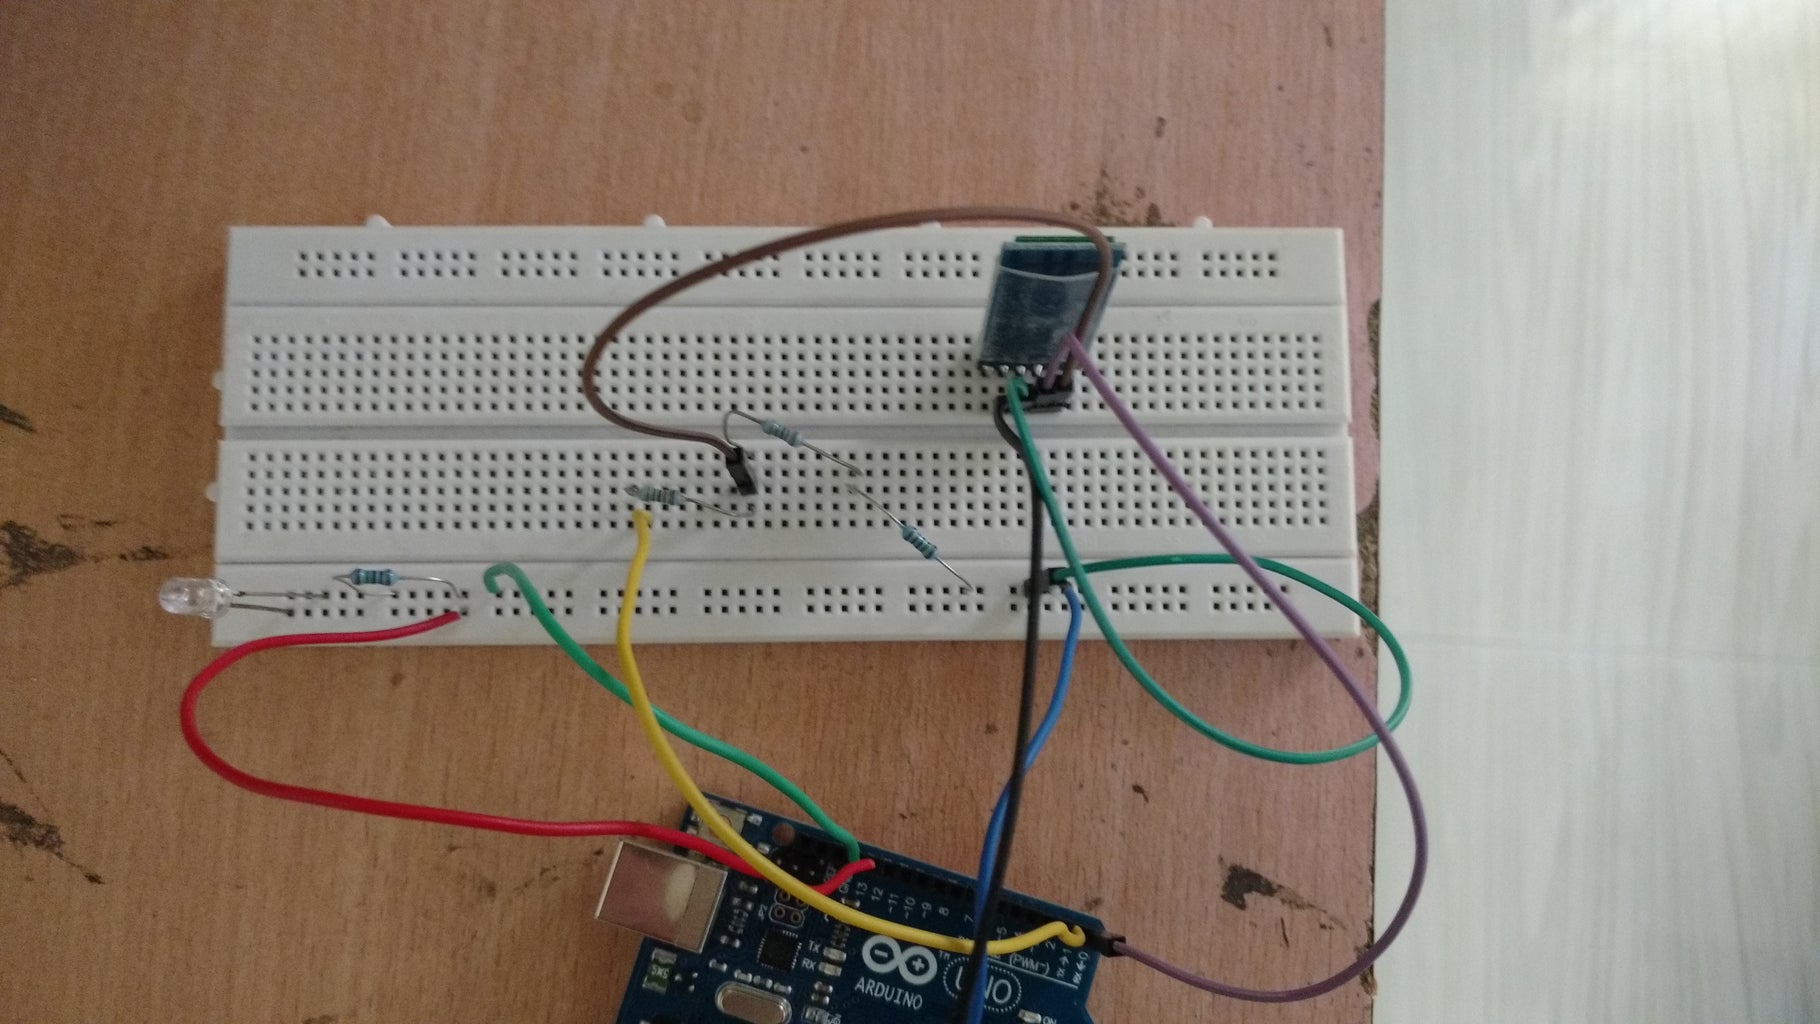

we see that there are two resistors going from the Rx pin of the bluetooth module one needs to be half value of that of the other. This is because the logic level of Rx is 3.3V hence we need to step down the 5V of arduino with the voltage divider circuit. If you don't step this voltage down then you might fry up your bluetooth module as Rx pin cannot tolerate 5V. From the simple calculations we see that voltage steps down to 3.3V as
V=5V*(2k/3k). Hence one we see that black value of resistor needs to be half of that of orange. instean of using two resistors having one value of double I hooked up two 1k ohms resistors in SERIES connected to ground and another 1kohms connected directly to the Tx. Of course you can use any value of resisitors in which one is half of another but make sure the voltage level is stepped down to 3.3V.
The connection is pretty simple
1. the Tx pin of HC05 directly goes to the Rx( pin 0) of the arduino uno
2. the Rx pin goes to the voltage divider circuit in my case 2k ohms and 1kohms
3. connect the other end of 2k ohms to ground ( you can use the common ground)
4. connect the other end of 1k to the Tx(pin 1) of the arduino
5. connect the GND (ground) of bluetooth module to GND( ground) of arduino. ( you can again use the common ground)
6. Now is the difficult part if your Hc-05 comes out in breakout board like mine then you can connect it to the 5V of arduino since it has a inbuilt voltage regulator. If it doesn't then connect it to the 3.3V of arduino.
I connected mine in both 5v and 3.3v and both worked fine. However if you are a first time user of bluetooth module and not sure about your bluetooth device then i suggest you connect it to 3.3v in the beginning just to be in the safe side
7. connect the longer leg(anode of led) to pin 13 and other shorter leg (cathode) to one end of 1k ohm resistor and the other end of 1k resistor to ground of arduino
GREAT NOW YOU HAVE FINISHED UP THE CIRCUIT LETS GO TO THE CODE!!
Step 3: ARDUINO CODE
the code is pretty simple below you will find the attached file. I have used pin 13 as output you can change it to any pin you want.
IMPORTANT-
1. WHEN EVER YOU ARE UPLOADING THE CODE TO ARDUINO UNO REMOVE THE VCC( 3.3v OR 5V ) FROM THE ARDUINO .
2.REMOVE Tx AND Rx WIRES CONNECTED TO THE BLUETOOTH MODULE
REASON- THESE TWO STEPS SHOULD BE DONE COMPULSORY AND ABSOLUTELY NECESSARY BECAUSE Tx and Rx PINS OF THE ARDUINO ARE BUSY WHEN THE CODE IS BEING UPLOADED. YOU SHOULD HAVE OBSERVED IT EVERYTIME YOU UPLOAD THE CODE YOU SEE THE Tx and Rx LED GLOWS SHOWING THAT IT IS BUSY.
SO PLEASE BE SURE TO FOLLOW THESE TWO STEPS WHILE UPLOADING THE CODE.
HERE IS THE FOLLOWING CODE-
char data = 0; //Variable for storing received data
void setup() {
Serial.begin(9600); //Sets the data rate in bits per second (baud) for serial data transmission pinMode(13, OUTPUT); //Sets digital pin 13 as output pin
}
void loop()
{
if(Serial.available() > 0) // Send data only when you receive data:
{ data = Serial.read(); //Read the incoming data and store it into variable data
Serial.print(data); //Print Value inside data in Serial monitor
Serial.print("\n"); //New line if(data == 49) //Checks whether value of data is equal to 1 digitalWrite(13, HIGH); //If value is 1 then LED turns ON
else if(data ==48) //Checks whether value of data is equal to 0
digitalWrite(13, LOW); //If value is 0 then LED turns OFF
}
}
Attachments
Step 4: CONNECTING IT TO THE APP


I have made a custom app just to control the led using the MIT app inventor. THIS APP ONLY WORKS ON ANDROID AND ON NO OTHER OS VERSIONS. YES I AM SORRY FOR THAT. I am new to app building so the App looks bit shabby. However i have included the TTS( text to speech control ). when ever you press the ON button your phone will say " LIGHT ON" and when you press the OFF button it will say "LIGHT OFF" and when you press the DISCONNECT button the phone will say " DISCONNECTED" . I have a also given a status to see if the bluetooth is connected successfully or not connected or disconnected. This app is simple and good enough for me to understand the basic bluetooth communication of smartphone. Connection to the app is very simple.
1. download the .apk file to your computer and transfer to to your android phone.
2. Install the file on your phone
3. you need to pair your Hc-05 to the phone first.
4. from settings-> turn on your bluetooth ( depends upon phone to phone but i am sure you know how to turn on your bluetooth. )
5. power up the Hc-05 by connecting it to the 5v of arudino .make sue that the ground is connected before hand and the Tx and Rx pins are also
6. you should see the led light on the bluetooth module light up and led is blinking up fast about 5 times a second indicating that is it looking for a pair
7. from your bluetooth device manager search for buletooth devices there you should see the name Hc-05 click on it
8. enter the default pass code 1234. and click connect
The onboard LED shows the current state of the module.
– rapid flash (about 5 times a second) – module is on and waiting for a connection or pairing
– single quick flash once every 2 seconds – the module has just paired with another device
– double quick flash every 2 seconds – connected to another device
The HC-05 remembers devices it has paired with and after cycling the power you do not need to re-pair. This means you can go from – rapid flash (about 5 times a second) – module is on and waiting for a connection or pairing, to – double quick flash every 2 seconds – connected to another device directly. ConnectionsThe onboard LED shows the current state of the module.
9 the led on bluetooth flahses once every second indicating that it has paired with your phone.
10.remove the Tx and Rx pins from the arduino and also the 5v
11.upload the code using the serial usb cable. after you have uploaded the code PLUG IN THE Tx ,Rx pins back to Arduino make sure you see the connection is correct go back to step 3 if you have a problem or you forgot which wire goes to which pin.
12. finally plug in your the Vcc of bluetooth to the 5v of arduino and you see the red led of the bluetooth module blinking fast about 5 times a second indicating that it is ready to connect
13. open the app the press connect. There you should see list of paired devices click on HC05 and now you should the bluetooth led blkinking once per second and also the status has changed to connected in the app.
14. press ON and OFF and see the led switch on and off with your phone saying is out.
Attachments
Step 5: PRECAUTIONS AND OTHER REMEDIES
1. MAKE SURE ALL THE CONNECTIONS ARE TIGHT AND NO LOOSE ENDS ARE THERE
2 IF YOUE CODE IS NOT UPLOADING THEN YOU HAVEN'T REMOVED THE Tx AND Rx PINS FROM ARDUINO.
3 MAKE SURE 5V CONNECTION IS REMOVED BEFORE YOU UPLOAD THE CODE AND ALSO THE GROUND IS CONNECTED EACH TIME YOU PLUG THE 5V OUT OR IN
4 IF STATUS LED OF BLUETOOTH IS NOT BLINKING MAKE SURE YOUR CONNECTIONS ARE CORRECT AND YOUR ARDUINO IS ALSO POWERED UP. IF ITS STILL NOT GLOWING TRY CHANGING THE BLUETOOTH MODULE
5. YOU NEED TO PAIR YOUR HC-05 TO YOUR PHONE IF IT'S NOT SHOWING WHEN CLICKED ON CONNECT BUTTON ON APP.
6. IF THERE IS NOT TTS OUTPUT ON YOUR PHONE. YOUR PHONE IS NOT SUPPORTING TTS BUT STILL YOU CAN SEE THE LIGHT TURN ON AND OFF .
please free reach me through comments sections. As this is my first instructables and also i am new to app development and bluetooth control using arduino. i might help with whatever knowledge i have.
Thank you.


