

Introduction: LED Matrix Editor


There are some ways how to store this kind of matrix in the Arduino code.
Like this:
byte image[] = {
    0, 0, 0, 0, 1, 0, 0, 0,
    0, 0, 0, 1, 1, 0, 0, 0,
    0, 0, 0, 0, 1, 0, 0, 0,
    0, 0, 0, 0, 1, 0, 0, 0,
    0, 0, 0, 0, 1, 0, 0, 0,
    0, 0, 0, 0, 1, 0, 0, 0,
    0, 0, 0, 0, 1, 0, 0, 0,
    0, 0, 0, 1, 1, 1, 0, 0
}
or this:
byte image[] = {
    0b00001000,
    0b00011000,
    0b00001000,
    0b00001000,
    0b00001000,
    0b00001000,
    0b00001000,
    0b00011100
}
but what if you going to make an animation from a large number of frames?
Step 1: LED Matrix Editor

LED Matrix Editor - the online tool for animating your matrix.
It looks very simple, but it has some handy features:
- Online, free and safe. No additional software required.
- Toggle LEDs using a mouse
- Toggle a whole row or column by clicking the appropriate matrix's index
- Shift the matrix Up, Down, Left or Right via the single click
- Invert or Clear matrix
- Collect matrices in the bottom pane and then reorder them using the Drag-and-Drop
- Update images as well as insert new or delete existing
- Save images as a C code for Arduino
- Use browsing history and save images as a link or bookmark, so you never lost your creations
Step 2: LED Matrix Arduino Code
Make your animation and then put generated code into the your Arduino project:
Like here:
#include <LedControl.h>
const int DIN_PIN = 7; const int CS_PIN = 6; const int CLK_PIN = 5;
const uint64_t IMAGES[] = { 0x3e2222223e3e0808, 0x3e22223e3e2a0808, 0x3e223e3e2a2a0808, 0xbe3e3e2a2a2a0808, 0xbe223e3e2a2a0808, 0xbe22223e3e2a0808, 0xbe2222223e3e0808, 0xbe22223e3e2a0808, 0xbe223e3e2a2a0808, 0xbebe3e2a2a2a0808, 0xbea23e3e2a2a0808, 0xbea2223e3e2a0808, 0xbea222223e3e0808, 0xbea2223e3e2a0808, 0xbea23e3e2a2a0808, 0xbebebe2a2a2a0808, 0xbea2be3e2a2a0808, 0xbea2a23e3e2a0808, 0xbea2a2223e3e0808, 0xbea2a23e3e2a0808, 0xbea2be3e2a2a0808, 0xbebebeaa2a2a0808, 0xbea2bebe2a2a0808, 0xbea2a2be3e2a0808, 0xbea2a2a23e3e0808, 0xbea2a2be3e2a0808, 0xbea2bebe2a2a0808, 0xbebebeaaaa2a0808, 0xbea2bebeaa2a0808, 0xbea2a2bebe2a0808, 0xbea2a2a2be3e0808, 0xbea2a2bebe2a0808, 0xbea2bebeaa2a0808, 0xbebebeaaaaaa0808, 0xbea2bebeaaaa0808, 0xbea2a2bebeaa0808, 0xbea2a2a2bebe0808, 0xbea2a2a2a2be1c08, 0xbea2a2a2a2a21c1c, 0xbea2a2a2a222001c, 0xbea2a2a22222001c, 0xbea2a2222222001c, 0xbea222222222001c, 0xbe2222222222001c, 0x3e2222222222001c, 0x3e2222222222001c, 0x3e22222222221c1c, 0x3e222222223e1c08 }; const int IMAGES_LEN = sizeof(IMAGES) / sizeof(uint64_t);
LedControl display = LedControl(DIN_PIN, CLK_PIN, CS_PIN);
void setup() { display.clearDisplay(0); display.shutdown(0, false); display.setIntensity(0, 10); }
void displayImage(uint64_t image) { for (int i = 0; i < 8; i++) { byte row = (image >> i * 8) & 0xFF; for (int j = 0; j < 8; j++) { display.setLed(0, i, j, bitRead(row, j)); } } }
int i = 0;
void loop() { displayImage(IMAGES[i]); if (++i >= IMAGES_LEN ) { i = 0; } delay(100); }
Step 3: LED Matrix Animation
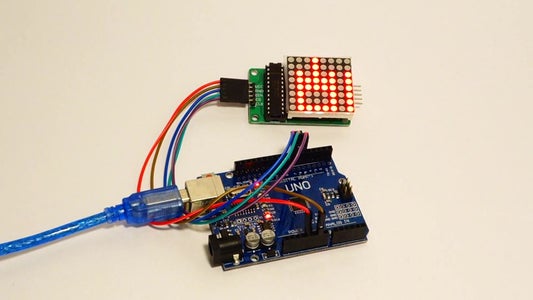

Then connect Arduino and Matrix, upload code and have fun :-)


