

Introduction: Laser Cut Conceptual Art


I visited San Francisco's Museum of Modern Art last week, and was intrigued by the work of conceptual artist Sol LeWitt. LeWitt did not execute much of his art himself - instead, he provided a set of directions to a gallery, which would be carried out by local artisans directly on the walls of the exhibition space. They would then be erased after the show was over. The former practice sounds a LOT like an instructable to me, so for fun I decided to try to recreate a version of one of LeWitt's pieces myself (I have been incredibly distracted while at Pier 9, but have decided to embrace that rather than resent it). I liked his "Cubes in Color on Color":
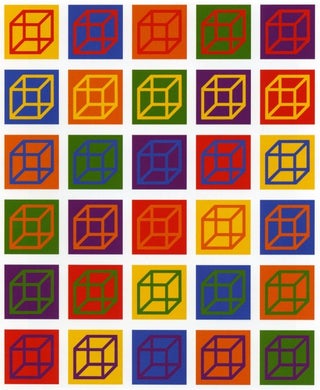
As a scientist, I felt it resembled a collection of colorful unit cells, and the cube evokes the idea of three dimensionality (which I've been thinking in a lot lately), so it spoke to me on multiple levels. Many thanks to Jeff Ponitz, who recommended the MoMA visit and cast a critical eye over the final piece (above).
Step 1: Design

Very little to do here other than replicate LeWitt's design for the purposes of laser cutting. Attached is the .DXF file, which I designed in Fusion360. I resized it so I could fit it into a single sheet of 2' × 3' plywood (each cube ended up 4.66", 118.5 mm).
Attachments

Step 2: Laser Cut


I tiled the shape and cut it out 30 times out of 1/8" thick plywood such that this operation could be completed from a single sheet of 2' × 3' plywood (the bed size of the Epilog cutter I was using). Stack them and sand/brush off any ash residue.
I made extras so I could have some funky coasters (thanks Trent for this tip):
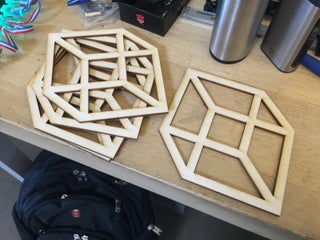
I then cut out a whole lot of 6" (149 mm) plywood squares using the laser cutter (DWF also attached; you will get 24 out of one sheet of 24 × 36" material, so you will need another 6 squares from an offcut). Deeper cuts in material produce kerfs that are wider at the top than the bottom, as well as more burn marks, so I ganged the squares together and sanded the edges. Each cube would be mounted on one of these squares.
Of course, the artwork is entirely scalable: you could make one whatever size you want. Just scale the backboard, the squares and the cubes the same amount.
Attachments
Step 3: Backing Board


I also made a backing board of dimensions 42" × 35 1/8" × 1" (1068 × 893 × 25 mm). Mine was fancier than it really needed to be: I made a rabbeted, mitered frame around a piece of 1/2" plywood, glued it together and sanded the whole thing smooth before priming. Just cutting a piece of MDF to size would have been fine.
Step 4: Undercoat and Paint


Prime everything in white. Do a couple of coats to make sure that the edges are the same color as the faces. Gang together for the edges. Sand between coats. Priming in white ensures the colors are brighter.
Step 5: Color!


Get yourself spray cans of red, orange, yellow, green, blue, and purple paint. Separate the squares and the cubes into groups of 5 squares and 5 cubes. Paint each group in each of the six colors. It is tempting to try to do this quickly but less is more with spray paint. Do many light layers from every angle possible. I put each set of 10 pieces on its own board, and did each coat from 4 different angles. I then turned all the pieces 45 degrees and repeated for the next coat, and so on until the coverage was good enough.
Step 6: Assemble and Hang


I used 5-minute epoxy to glue the cubes to the squares. The completed squares were glued to the backboard in an orderly array, each 1" (25 mm) apart from each other and the edge of the backing board. Assemble the squares in the same way as the original. Or do your own thing. I chose to faithfully replicate LeWitt's layout.
Find a suitable place to hang your new artwork. My wife is much less a fan of conceptual artwork than me, so I suspect this will be going in my office at work...


