

Introduction: Laser Cut Posable Figure


When making my Laser Cut Advent Calendar series I wanted to make a link to another interest of mine: making dolls and posable figures.
I wanted to keep the part count down and go for a simple attachment of the movable limbs. This simple approach means a limited posability and sometimes you need to tweek the rubber bands and even take out a limb en put it back in to get it in the desired position, but it works.
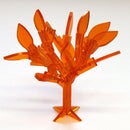
At first, I only made straight arms, but I added some “dancing” arms, inspired by Trip, one of my fellow Artist in Residence at the time (July 2013). Most of the time, he was working with music in his headphones and often even dancing while designing. I kept the legs straight, because I wanted it to be able to stand upright by itself.
Step 1: Materials and Tools:

The rubber bands used are two times 1” x 1/16”.
The design is made for 3 mm sheet material, taking in account the thickness can vary + or – 15%. I made the design in Inkscape. You can find did in pdf and svg format in the zip-file.
Obviously you will need access to a laser cutter or an online laser cutting service. I used a 120W Epilog laser cutter in the workshop at Pier 9, were the Instructables HQ is. On this machine, for 3mm acrylic the cutting speed was set to 50% and the power to 70%.
Attachments

Step 2: Attaching the Legs


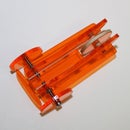
Each joint consists of a small loop of rubber band, running on a laser cut partial “ring” on the body. Make the two bottom loops from one rubber band pulled through the orifice, from each side and keeping it in place by pulling it over the notch, again on both sides. Slide each leg under a loop. Make sure the loops run in the cut outs, to keep things in place.
Step 3: And the Arms...


For the arms we use the same principle. But to get the effect of a small rubber band loop on a ring (the sholder) we need to twist the rubber band on itself several times. Again it is held in place by hooking it on a notch, only from one side now. We slide the chosen arms (straight or “dancing”) under the loops. Again, make sure the loops run in the cut outs, to keep things in place. The figure is ready to pose ;-)


