

Introduction: Laser Cut Puzzle Collection


When I saw the puzzles challenge open on Instructables I knew I wanted to enter something so I went to search my blog to find something suitable. The trouble is I found lots and lots of items and because I own a laser cutter the production technique is remarkably similar for each one. Cut it on the laser and assemble it, possibly using some glue, so I figured I would present a collection of lasercut puzzles and provide the files, tips and techniques for each one. Hopefully you'll find this useful and inspiring (enough to vote for me anyway :) )
I feel like I have a bit of a head start on this matter, my uncle has been making me puzzles since I was four. He's very handy with a scroll saw and anything that can be done with a scroll saw can be easily laser cut. I've also been laser cutting things for five years now. My blog is just about to hit 1000 laser cut items so here are some of the best. I've also taken this opportunity to draw and cut new items just for this instructable.
Step 1: Jigsaw Puzzles


The jigsaw puzzle is a classic staple of puzzling, the first jigsaw was cut around 1760 (by hand obviously) and they usually consist of a picture cut into small interlocking pieces. The laser is very good for making jigsaws because the cut width, or kerf, is only 0.1mm wide. This means the parts fit together snugly straight out of the machine.
There are a few ways to get the images onto a wooden cut jigsaw puzzles.
You can transfer colour images onto the surface wood using a technique like this one, or the laser cutter is capable of engraving a greyscale image onto the surface of the material. Once the image is drawn then it is a simple matter to cut the jigsaw into tight pieces. I took a sample section of jigsaw puzzle from wikimedia, this was already in a suitable vector format, ripe for cutting.
I can't believe I hadn't made a jigsaw on my laser before this challenge, the whole thing only took a few minutes to prepare and it can be infinitely customisable with whatever image you want on your puzzle. I might have to do more of these soon.
Attachments

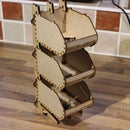
Step 2: Tray Puzzles


Tray puzzles are exactly what they sound like. You get a tray and some pieces and the task is to put all the pieces back into the tray.
Puzzle trays for children usually involve multiple holes that match the shapes being put into them. I drew this Pokemon tray puzzle using the silhouettes from Pokemon Go. Inkscape has a function that allows you to easily trace images, they just needed a bit of cleaning up and they were ready to cut. I put the names onto the board using Hershey Text which is quick to cut and looks good. (I realise my tray is wrongly labelled but I corrected it in the file I'm sharing here)
More complicated tray puzzles usually involve you putting a number of shapes into a single hole and trying to find a way to get them all to fit. This pentomino puzzle was one of the first I ever remember receiving. There are 12 different ways to assemble 5 cubes, these form the basic pentominoes. In this version of the puzzle the shapes are themed like the 12 animals of the Chinese Zodiac.


Step 3: Celtic Knot Tray Puzzle


Celtic Knots use interlacing patterns to describe a knotwork shape. The thread goes over and under itself a within a single knot, lines within the drawing show which thread is on top and cutting some of these lines turn the knotwork into a puzzle. The whole thing can be put into a tray to suggest the overall shape of the knot but the internal route will always remain a question.
The knot work was drawn with the aid of Black Oak Games knotwork dice, these clever die allow you to create fancy knotworks by placing die down and turning them round until you're happy with the shape. I used a digital version I created previously. Once the knot work was drawn I was able to break it down into the constituent parts. In the construction image you can see I curved the ends of puzzle pieces, this creates a closed area for each puzzle piece which can then be coloured to make it much easier to show which part goes where. This would be useful if you wanted to produce a solution drawing. Before cutting I remove all the curved lines.
I like this puzzle because it is simple to produce and the knot dice allow you to make infinite combinations of parts.
Attachments

Step 4: Fractal Puzzles


These fractal puzzles are a slightly different form of tray puzzle. Fractals are a special mathematical set that exhibit a repeating pattern. In these cases they are made up from basic patterns that are repeated over and over again. The whole pattern is essentially just a single line from A to B. These patterns can be broken up into smaller sections that form the pieces of a tray puzzle. The pieces all look remarkably similar and I while I was subdividing the pattern I took a lot of pleasure ensuring that now two pieces were exactly alike, this makes it even harder to assemble. There are three patterns included in that one file.
The Hilbert Curve is a very simple square pattern, the Peano-Gosper Curve creates a more interesting triangular shape and finally the Dragon Curve has lots of nicely rounded sections.
The file is drawn in such a way that the laser will trace from A to B in a single cut and then go back and subdivide the pattern, this makes it really fun to watch while cutting.
Attachments

Step 5: Burr Puzzles


A burr puzzle is made with a series of interlocking pieces, the parts are usually notched sticks which are not something you would immediately associate with the laser cutter because you have to make the notches in two different axis and the laser only cuts vertically. When you have access to a slightly more powerful laser these kinds of puzzles start to become possible. I have an 80W machine and it will cut material 12mm thick, this is large enough to create a stick and because the sticks are square once they have been cut in one axis you can rotate the stick 90 degrees and cut the second axis.
The first Burr shown here consists of 12 identical parts each with a notch in the middle on the second axis. I chose to do the single notch on the second pass because the stick will move slightly as you rotate it. When you cut the stick you need to cut the profile but you also need to clear out to the rest of the hole so you can put it back in sideways. The file attached here will look odd because it is for a single piece and there are two parts to the drawing, one for each pass.
There is a subsection of Burr puzzles that make up the Chuck Family. I've always liked this puzzle. In it's simplest form it's incredibly common, the kind that you would find in Christmas crackers but you can elongate some of the pieces and start to make longer and bigger versions of the chuck. Then you can form pyramids and cubes and all sorts of shapes. It's a bit like a construction set as long as you have enough of the right pieces (it's a good job I can laser cut exactly what I need). Only the 'key' pieces need to be cut in two axis and this file has been optimised for material usage.


Step 6: Burr Box Puzzles


Burr Puzzles can also be made from other interlocking parts. In these two examples sheet materials are cut to appropriate shapes and they get woven together to create a finished puzzle.
The Criss Cross Burr Cube was made from 5mm clear perspex and the burr tube puzzle was made from 6mm ply. These designs can be scaled to any size material you happen to have because all the slots and dimensions will all scale appropriately. You probably want to scale these precisely for you material, the perspex puzzle here was made a little bit loose and the whole thing has a tendency to fall to pieces in your hand once you take the first piece out.


Step 7: Sliding Block Puzzle


The sliding block puzzle was invented in the 1880s with the fifteen puzzle which simply had the numbers 1-15 on the blocks. My homage to this form of puzzle is the eight puzzle which is remarkably similar in concept but only uses 8 blocks which is a much more sensible prototype. You could also put any kind of picture you want on the top of the blocks.
Each block is made up of 3 different layers, the middle layer is shifted right and up slightly to form an overlapping section with the block next to it. Where the tiles overlap the surfaces have been engraved, this reduces the thickness of the material and makes it slide easily in the gaps. The edge of the puzzle also have 3 layers which is staggered in a similar fashion. The edge is backed like the other tray puzzles and this stops the pieces from falling out of the middle. The edge is a single solid piece, because of this the last row of blocks has to be glued into place inside the puzzle so be careful not to spread the glue outside the block or it won't slide correctly.
Because this puzzle is just a series of blocks it could be expanded to any dimension and size you requires. I made this from 3mm poplar ply wood which makes it very easy to have a deep engrave.
Attachments

Step 8: Puzzle Boxes


This byte puzzle box made for an altogether different kind of slide puzzle. The notches on the top of the box are free to slide up or down and will lock or unlock the box. You simply need to get all eight switches into the right up/down positions before you can shift the lid sideways and remove it. There are 256 possible combinations (2^8) which in computing terminology is a byte, hence the name. The box is made from sturdy 6mm plywood so it can withstand a bit of forcing but it was skinned in 0.8mm ply to hide the construction techniques (and the combination).
Like most combination locks it can be opened with a bit of force applied in the right direction, some of the pins are stickier than others so you know which side is locked and which is unlocked and by pulling the lid to one side while you do this you can make some pins sticky. With a bit of practice you can find all eight pin positions in a matter of minutes. I however cheated and marked the side of the lid in very faint pencil.
Attachments

Step 9: The Cryptex

I really want to make this laser cut cryptex that I found on instructables with my own improvement but I ran out of time, it's still a really cool item though so even though this page is redundant I wanted to leave it here and who knows next time you check out this instructable I may well have populated this step with my own reworking of it.
Step 10: Disentanglement Puzzles


There is a whole category of puzzles devoted to getting things untangled from each other, these usually involve holes and string and hoops and beads. The trick is that the hoop is never really on the string in the first place and by carefully moving things around you can free the various parts required to solve the puzzle. These puzzles were made specifically for this instructable competition and were inspired by some of the other puzzles being entered.
The first puzzle is a classic, again something you would find in Christmas crackers to pass away the hours waiting for the turkey to go down. The two pieces are entangled by their strings and form complete loops which can't be separated. Except they don't really, the string can be fed through the hole and over the disk. When you pull it back through the hole the two parts are separated (or double looped if you went the wrong way). The string is captured in the material by using 3 layers of wood and sandwiching it together over a knot.
Puzzle 2, the hoop is on one loop of the string and the goal is to move it over to the other side. It's a simple puzzle and if you just start winding the hoop along the string in the right direction it quickly becomes apparent how to make it jump from one side to the next.
Puzzle 3 requires you to free the hoop from the bottom of the tower. Note how the hoop isn't actually entangled in the string. You'll also note that the bead is able to fit through the hoop and the disks can fit through the tower. With a little bit of fiddling the hoop can be freed easily.


Step 11: Cube Puzzles


I first cut these cubepuzzles 4.5 years ago, they were some of the earliest things on my blog. In fact it was easier for me to download the files from my own site that it was for me to find them on my hard drive. I took the opportunity to freshen up the images and to recut them in 6mm ply.
Many laser cut boxes are made using finger joints in a very similar manor to this. I think it's something that is often overlooked, if the designer were to change the size of some joints over others you could end up with a slight puzzle box but more importantly something that couldn't be assembled wrongly. This could be very useful if you were producing kits with multiple sides that look the same but are subtly different.


Step 12: Assembly Puzzles


This puzzle is one of my favourites. Not all puzzles are flat but this one forms a very sculptural shape. This puzzle looks great on display and it's not surprising because it has artistic heritage. MC Escher drew one in his lithograph 'Gravitation'. The ends of each star were given tight fitting finger joints so the whole puzzle can hold together without any glue.
The puzzle is in assembling it correctly. There are 12 identical parts which all click together. This is one puzzle where it's best to get hands on and just figure out where each bit goes. The trick is getting the twelfth piece into the mix. The solution is to build the model at two separate parts. Five pieces click together to form one corner which should be built around a sixth piece. Once the corner is built you can clip the sixth piece into the others on all 5 of it's points. Repeat that with the rest of the puzzle pieces and then while holding the two completed corners bring the two halves together, interlocking the remaining arms as you do so. Slow and steady gets them together (I also sometimes wrap an elastic band around the newly created corners so I don't have to squeeze it tight for too long).
I have made small 100mm versions and large 600mm versions, I even made a version which included all the lizards from gravitation held loosely into each point, it is a very pleasing shape and build.
Attachments

Step 13: The Laser Collection


Hopefully that has inspired you to make some puzzles. Christmas is not a million miles away and I'm sure many of these things would make suitable gifts and/or items for craft faires. I have really enjoyed making the extra puzzles to go into this instructable and I've been blogging about all of these items over on my blog. If you have a bit of free time, why not swing by and see what else I've made.

Runner Up in the
Puzzles Challenge

Participated in the
Wood Contest 2016


