

Introduction: Laser Cut Selfie


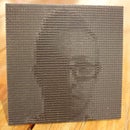
This is how to create a half-tone image using Autodesk Dynamo and Revit for laser-cutting. Dynamo is an open source graphic programming plugin for Revit and Vasari.
You can get a copy of Dynamo at http://dynamobim.org/ ( I suggest downloading the latest daily build) and get a free trial of Revit at http://www.autodesk.com/products/autodesk-revit-fa...
Disclaimer: Dynamo is a new and constantly evolving software development. If for any reason these files or instructions no longer work, or if you have any questions, please direct them to the forums at http://dynamobim.org/forums/forum/dyn/
Attachments

Step 1: Opening Revit and Dynamo

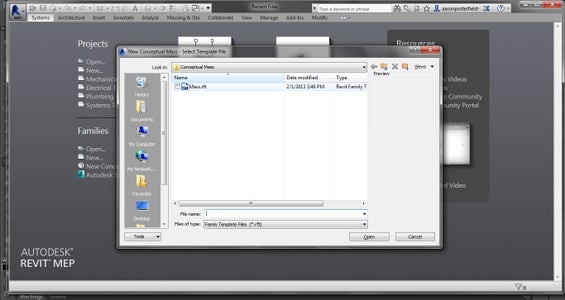

Begin by starting Revit. Click "New Conceptual Mass" and open the file "mass.rft".
Within Revit, click on the Add-ins tab and click Dynamo 0.7 to open Dynamo.
Step 2: Working With the Dynamo Graph


Open the included file "half-tone-image.dyn" and you will see the graph appear. You can use the scroll wheel to zoom around the graph. On the left side of the graph is all the parameters.
On the "File Path" node, you can click browse to open your image. For now, the image must be a square (even amount of pixels in both dimensions). Use the number slider titled "Number of pixels" to set the x and y number of pixels you would like to generate. This must be the same number of pixels in your image or an even division.
Click "Run" and you should see you image appear in the backgroud. You can hold escape and use the scroll wheel and middle mouse button to navigate the 3D preview.
Use the "Pixel Size" number slider to adjust the size of the circles in your half-tone pattern.
Step 3: Bringing Your Image Into Revit for Export


Once you are happy with your image, connect the "Circle" node to the "Model Curve" node and click "Run". It may take a few minutes for your image to appear in Revit.
In Revit, click to Top View button in the top right corner of the 3d view, and use the scroll wheel to zoom in on your image. To export, click the Revit logo and choose Export>CAD Formats and choose either DXF or DWG. Make sure the drop down menu in the export options says "current view".
You now have a vector file ready! I chose to laser-cut mine, so the next steps will cover that process.
Step 4: Shooting Laser Beams


Using illustrator or your vector software of choice, draw a square around your image to make a frame. I cut my selfie out of a sheet of 1/16" white styrene. I then cut the same square border out of 1/8" black acrylic to have a dark backing.
Depending on the size of your circles, your cut piece may need some clean up (here I am poking my eyes out with a clay tool).
I used a multi-purpose spray adhesive to glue my cut styrene onto the black acrylic.
Enjoy!


