

Introduction: Laser Cut Ukulele


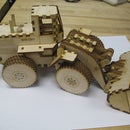


I bet you have been tormented by the age-old question, "What can't I make with a laser cutter?" Well I'm here to tell you that the answer is most certainly not a ukulele because I'll show you how to use a laser cutter to make a nice, semi-attractive, decent sounding concert scale ukulele. This sweet baby will give you hours of Blue Hawaii strumming pleasure and can be made with minimal tools. As shown the ukulele uses a commercially made rosewood finger or fret board but if you prefer to set the frets yourself I've got plans that include a laser-cut finger or fret board as well. This project was undertaken as a gift for a youngster too small to handle a full sized guitar but with a hunger for music. If you have a similar youngster pestering you for their own instrument or you just have a hankering for the dulcet tones that can only be duplicated on the diminutive ukulele, then this is the instructable for you.
Step 1: Materials

The pictured ukulele is made using 1/8" thick baltic birch plywood exclusively for the wooden parts. Mainly because it was handy, not for any acoustic reason. In general, stringed instruments such as this do not get made of plywood even though it can be cheap, light and strong. The reason, near as I can figure, is that the laminated layers and glue impact the resonant properties of the wood negatively. The instrument top and to a lesser extent bottom resonate during playing to produce the sound we (sometimes) associate with music. These parts are typically made of high quality single sheets of flawless light and stiff woods such as spruce. The thicknesses of these panels varies by need, are sometimes feathered even thinner near the edges, but they are typically thinner than 1/8", often in the 3/32" range for non-steel-stringed instruments. For a ukulele even thinner is possible. If you have access to high quality panels for your top, feel free to use them. The top would be the most important piece to be of this high quality wood since it anchors the bridge and thus accepts and vibrates due to the energy input from the plucking of the strings. I can tell you that having a 1/8" plywood top on the ukulele shown doesn't stop the instrument from playing although it doesn't have the tone and sustain of a high-end instrument. Not bad though.
Wood:
4x sheets of 12" x 18" 1/8" Baltic Birch Plywood
Optional - Spruce or other soundboard wood
Plastic:
1x piece of 2"x 3" 1/8" delrin
Misc:
4x string tuners
1x rosewood fret board
Titebond III wood glue
Tools:
Clamps
Sandpaper
Beltsander
Angle grinder
1/4 sheet sander
Step 2: Design Considerations

The pictured ukulele is a concert scale size, which means an approximate 15" scale length. (Thanks to Action Pig for his excellent cigar box ukulele ible) but with some creativity and any of the numerous online fret calculators you can make a standard scale length ukulele (tenor, baritone, etc) or something of your own. The scale length is the distance from the nut to the bridge, the free span of the strings.
Another design area to consider is the volume of the ukulele. I basically tried to make a box that had approximately the same internal volume as a regularly shaped concert scale ukulele based on rough measurements of real instruments. I think I got within 10%, close enough. I was shooting for about 2.9L.
If you want to use the designs attached here, then you'll need to buy or manufacture a concert scale fret board such as I linked to in the previous materials step. With that and the tuners I linked to, you can cut at will. However, there are a number of design changes you can explore.
One area of changes that I am really interested in and plan to explore is in the bracing or lack thereof in the pictured design. The thick top with a small area doesn't need a lot of bracing to counteract the pull of the strings on the bridge. However as shown, the top has two crossing braces. My thought is to use the "raster" engraving function of the laser cutter to selectively thin the plywood top to increase the sound quality of the instrument by increasing the efficiency with which it vibrates in response to energy input from the strings to the bridge. Two ways to accomplish this, though decreasing mass and moving the resonant modes of the top in line with the musical notes desired. My opinion is that the 1/8" plywood top and bracing is too stiff and thus doesn't resonate well in the range of frequencies the instrument generates. So by removing material I'd hope to improve that and thus the sound. I have not been able to test this hypothesis yet since you essentially have to build an entirely new instrument to try each time. Or do you? My latest plan is to build a test mule as pictured, but then prior to applying the finish to the wood, to start burning away parts of the top to see how it impacts the sound. It will also look cool. Stay tuned.
Another area you can change the design would be in the sound hole shape, number, position, and size. Many things have been done and written about this aspect of stringed instrument design so I won't pretend to have anything to add. For the pictured design, I made the soundhole have an area equivalent to that recommended for a concert ukulele (2.25" diameter hole). You can do this with one hole as I have, or with many holes, or any combination. Go for it.
I used simple friction tuners on the presented design, but after using them for a while don't like them much. There is reason most guitars have geared machine tuners, they work better. Friction tuners like the pictured, use a small screw to compress the stack of parts together and counteract the tendency of the strings to spin the tuner. So tightening this screw is required to maintain tension on the strings and keep the instrument in tune. Tightening the screw also makes the tuners harder to turn and increases the tendency for "stick slip" turning of the tuners which makes it hard to make fine adjustments to the state of tune. Anyway. If you go with machine style tuners, you will have to change the design of the head piece to allow for the different mounting of such tuners. Take measurements of whatever tuners you choose and alter the design as needed.
The headstock is an area where you can make design changes to give the instrument your own flair. Changing the shape of the headstock or the positioning of the tuners are both areas you can personalize the design.
I'm also working on a design that doesn't require a fret board, but will require installing frets in slots cut in the necl. I'll report back on that once I've tried it. Might be more trouble than it's worth but I like the idea of having the tuners and strings be the only non-laser cut things on the instrument.
Once you've made any design changes you'd like, the next step is to cut
Step 3: Cut and Prep Parts

Whether you use my design files or draw up your own, you will need to cut the parts eventually. When working with wood on a laser cutter, especially plywood, it can be difficult to cut reliably due to variations in density, thickness, and other factors. So the best way to go is to turn up the power and slow down the cutting speed to increase your chances of getting a complete cut. Nothing is more of a pain then having to break your parts out manually and trim or sand the uncut edges by hand. Try to select wood that is minimally warped since the focus of the laser is set at a single point and any motion of the wood out of this plane will reduce cutting effectiveness and increase the laser kerf. In extreme cases loss of focus will prevent the complete cutting of the wood or alter the size of the part to the point that proper fit is lost. So use flat wood. Also try to select wood that doesn't have visible flaws or voids, cracks, discoloration, or other blemishes that will affect the look as well as the function of the instrument.
Once you've cut the wood pieces, collect them and check for any parts that are flawed, lost, or otherwise unusable. You can then recut these so you have a complete set.
The delrin used for the saddle and nut is more uniform and is easier to cut repeatably. One area to be aware of is that in the nut the laser cut slots for the strings tend to be clogged by the swarf from the cut, in that the little peg of waste from the slot cut is fused to the side of the nut that you want to keep. As a result you'll need to carefully clean the string slots and may need a scalpel or similar sharp tool to clean the slots. While the delrin saddle will sit in the bridge loosely, being held in place by the pressure of the strings, the nut will be glued to the top of the neck. Delrin is very slippery, and glues don't stick well, so once the string slots are cleared to your satisfaction you will need to decide which side will be glued to the fret board and neck and rough these faces up with 220 grit sandpaper to help the glue grab onto the delrin.
You will need to cut the #2 file twice to have enough parts to complete the ukulele. So in total you will be cutting 4 sheets of wood (#1, #2 x2, #3) and one small piece of delrin.

Step 4: Assemble the Neck


The most complex piece of this ukulele is the neck. It is made up of a series of plywood layers, glued together and then sanded to shape as shown. The key when gluing the neck layers together is to make sure that the top faces are flush with each other so that the fret board will sit flat on the nick without voids. Apply glue to the surfaces to be joined such that there is glue everywhere. Use a brush or spread with your finger, when you clamp the pieces together your should see glue squeezing out. So get all the layers glued and pressed together, start applying clamps while making sure that the top of the neck is flat and true. As the clamps are applied and tightened, it is easy for the glue to allow the layers to slide. If that happens you have some time to readjust, be sure to do so as this design does not have a truss rod or other method of truing the neck if it is twisted or warped. Also try and use a damp paper towel to clean any glue squeezed out in the neck near the pegs that interface with the body top and bottom as extra glue here will prevent close mating of the neck to the top and bottom and will be difficult to remove later.
One way to help ensure that the neck layers are flat and flush on the top is to attach the neck to the top piece at the same time as layer up the neck. It can be tricky to get everything lined up and glued up before it starts to set up, but it is worth trying to get the neck and top together at the same time. If you do so, you will need to be apply clamps not only to the laminated neck layers but perpendicular to the laminations as well to hold the top piece to the neck. Care must be taken to ensure that the neck and thus top is not twisted. Take note as well that the top piece is actually two pieces in the presented design as the laser cutter bed that I designed this ukulele for wasn't big enough to cut the top complete. Thus there is a small extra piece that attaches at the top of the neck. Make sure you glue that on as well if you are attaching the top when assembling the neck.
Once the glue has dried you will start sanding the neck to shape. You can start with an angle grinder or other coarse shaping method like a spindle sander if you have access. A belt sander also can come in handy. However there are some tight curves that with require a hand file or rasp to shape and a hand sander or simple sandpaper to smooth. Be sure to avoid damaging the pegs that interface with the ukulele bottom piece (and top if you haven't attached it yet). If there is glue that has squeezed out and dried in these areas, use a knife or file to clear it so that the bottom will fit closely to the neck.
From the photos you can see the kind of profile you will want to achieve. If you have smaller hands or have a preference for a different profile, feel free to adjust as needed. One area to watch out for is that in grinding and sanding the taper of the neck, use your fret board as a template. If you have glued the top to the neck already you can use the shape of the top to guide you since it is the same shape as the fret board. You don't want to remove too much of the neck such that the fret board is larger than the neck. Once the neck is attached to the body and the fret board glued in place you will do another grinding and sanding step to make the fret board and neck the same size so if you do go too far it isn't the end of the world, you will just be removing fret board material rather than neck material at that step.
One downside to attaching the top to the neck at the same time as assembling the neck is that it makes it easy to damage the top while you are shaping the neck. Take care as the top is exposed and unsupported.
Step 5: Assemble the Body

Before you attach the neck to the body, be sure to glue the braces in place on the ukulele top as it will be impossible after you glue the body together. With that complete, the next step is to attach the neck to the body which is more like assembling the sides and bottom to the neck and top which are already glued together.
Assembling the body consists of basically applying glue to all the box joint fingers and then placing the sides of the body in place and then gluing the bottom panel to the sides and the base of the neck. As mentioned previously, it is really important that the bottom fit tightly to the neck so pay attention and use clamps to hold these parts together as the glue dries.
Step 6: Assemble the Headstock


The headstock is made of a series of layers that include a cutout for the end of the neck and holes for the tuners. There are three layers that interface with the end of the neck and a single complete layer that provides a cosmetic "top" to the headstock. Apply glue to the layers and to the section of the neck that the headstock mates with. Lots of glue at the headstock to neck joint as you want to ensure a strong joint. Clamp everything together and let it dry. Wiping up excess glue that squeezes out is a good idea if you can get to it. You also don't want to glue your clamps to the ukulele.
In fact if you are ambitious and have a lot of clamps you can attach the headstock while you are gluing the body together as shown in the pictures.
Once the glue is dry you will want to repeat the shaping and sanding process to blend the headstock to the neck. Also you are going to need to make sure the tuners fit in their holes and drill them out if needed.
Step 7: Attach Bridge


Prior to gluing the bridge on, take some time to sand the top smooth as you won't be able to easily do so after the bridge is in place.
The bridge is two layers thick and is positioned on the top by the string anchor pieces which have pegs incorporated into them. The saddle locating layer of the bridge is located on the bridge with a pair of laser cut square pegs. Apply glue to the layers and pegs and put them in place and clamp them while they dry. Take care to not apply too much glue to the bridge parts and to wipe up any excess as cleaning up squeeze out after it dries on the bridge will be tough. Make sure though that the string anchors are well glued to the top as they withstand the string tension of the whole instrument.
Step 8: Attach Fret Board

Attaching the fret board is straightforward. If your fret board has excess glue or other imperfections on it be sure to clean it up before gluing it to the instrument. Apply glue to the neck and fret board, position and clamp. Pay attention that the fret board is centered on the neck and that matches up with the end of the neck so that the nut can sit flush against the neck and fret board. If you need to do some touch up sanding or filing to make that happen after the glue has dried that is no big deal.
With everything looking good and clamped, clean up excess glue and let dry. Pay attention to the area where the fret board interfaces with the sound hole and the top as it is difficult to clean up dried glue in these areas so wipe it up.
Prior to continuing with assembly, once the fret board is glued on you will want to shape and sand the neck and fret board to final condition. Also take the time to smooth any rough fret ends at the side of the neck at this time so that they won't catch or cut your hands when playing.
Step 9: Attach Nut

As mentioned previously, the delrin of the nut is slippery and difficult to glue to so you will need to rough it up with sandpaper first. With that done, mix up a good epoxy and glue it in place at the top of the fret board. Pay attention to the slots in the nut and position them at the top of the fret board such that the slots are centered. Apply the epoxy, clamp, and let cure.
Step 10: Finish
One thing to consider is that you may want to install the tuners, saddle, and strings prior to finishing in order to test the instrument out and fix any problems before final finish.
There are a lot of schools of thought on the proper finish for a musical instrument. Traditionally lacquers are most common with a French polished shellac being the ultimate. I'm lazy, so I used oil based polyurethane varnish. Some say that this can negatively impact the sound of the instrument and if you believe that then go ahead and try some of the more involved finishes. I simply wiped on a light stain, let it dry and then applied a satin polyurethane. I did two coats, sanding between with 300 grit paper to get a nice but not too heavy finish. You can do what ever you please.
Prior to applying the finish you will want to hand sand the instrument to 220 or 300 grit depending on your preference. After sanding wipe the dust off with a tack cloth and then with a cloth moistened with mineral spirits to remove the last traces of dust and any oils or fingerprints. Just before finishing, mask off the fret board as you don't want any of the finish on the fret board area.
Step 11: Get Ready to Play
With the ukulele finished, you can install the tuners, saddle, and strings, tune the thing up and play. However there are a couple of final steps to setting up your new instrument. Setting the saddle height and setting the string height at the nut.
Setting the string height at the nut will require special tools to file the grooves deeper and thus I've tried to design the laser cut nut to not require such foolishness. The laser cut nut should set the strings at a consistent 1.5mm above the fret board but since there are variations in fret boards and likely in instrument construction you may have to make adjustments. Read up online as this is an area much discussed. It may be easier to design a nut to fit your finished instrument than to set the string height. Also you can't add delrin so if the slot is too deep and the string too close to the fret board you will need to make and install a new nut.
When installing the saddle you may need to sand the bottom (the part that presses against the bridge) to get the desired action at the fret board. Do this by removing the saddle and rubbing it back and forth on a sheet of sandpaper (220 grit is a good choice) on a flat surface. Do not use a power sander as it will take too much material too fast. You want to keep the part of the saddle that presses against the bridge as flat as possible. I've included two different saddle heights in the cut files, you can pick whichever fits your instrument better and sand to suit.
Installing the tuners is straight forward. If the tension of the strings pulls the tuner out of tune then you will need to increase the friction in the tuner by tightening the small screw. Machine tuners don't typically have this problem.
When installing the strings, start at the bridge and thread the strings down through the hole in the string bar, bring the string up and loop it around the string end that heads up to the tuners, then wrap the loose end around itself a few times similar to a timber hitch. Google has many examples of how to do this so I won't attempt my own version.
The concert ukulele is most commonly tuned to G C E A , with G being a higher note than C, what is called re-entrant tuning. G is the 4th string, the top string and the string closest to your head when you are holding the instrument in a playing position. Get everything tuned up and start strumming. The chord structure takes a little getting used to if you are more familiar with the guitar but doesn't take long to get the hang of. Lots of chord and tab is out there on the web for the ukulele so look around.

Participated in the
Woodworking Contest

Participated in the
Full Spectrum Laser Contest


