

Introduction: Using the Golden Ratio With the Laser Cutter - Made at Techshop!


My first go at Techshop! I can’t believe I have lived in Pittsburgh this long and never chanced upon it!
Well, its a simple go, but it has a concept behind it.
Its all about using both sides of a material. Kinda like Kandinsky’s stick but not contrasting and certainly not as beautiful. Not to mention the material is see-through… Add these ideas to the golden mean proportion and you got endless ways to create line art.
My thoughts were to use the same vector squiggle I made on each side of the plexiglass - but at a different position on each side. Since acrylic is transparent and behaves as such, my hope was I would find an interesting 3D-kinda effect, as you look through from the front etching to the back…..
I did the sketch in Illustrator, as we all do, making sure the line thickness was above 2 pixels so there is enough line to give texture but not too much to get in the way of the other side….
Step 1: Tools & Software Used
Optix Acrylic Sheet (11' x 14' x .093')
Laser Cutter Trotec machine
Adobe Illustrator CC (though I saved it out as a CS3 Illustrator file, just in case)
I made this at Techshop
Step 2: First Steps


Lets set the scene. Show the Grid ( hotkeys are ⌘’) and Rulers (⌘r ). In the Guides and Grid Preferences (⌘,) set the grid to snap and the grid spacing to 0.25 in.
Draw a square (hotkey; m) then drag a guide from the left Ruler and place in the center of the square.
Then draw a circle (l) from the bottom center point on the guide, holding down the ⌘ and ⌥ keys. Drag the circle so its border touches both the square's top corners. This is the circle we will use as a guide to decipher the golden proportion.
Then draw a rectangle from the upper right corner of the square, making the width equal to where the circle intersects. Make the height the same as the square.
Step 3: Creating the Golden Ratio Reference Guide


You can delete the circle if you wish, since it was only used to get the golden proportion.
Draw more squares, dragging until the width of the previous square is met. The corner you use to drag a new square will always be the larger square created of the dissected area.
Now time to create the Arc. select the arc tool and with Shift down, drag from the bottom corner of the main square to the top point.
The next stage is to draw the arcs that will dissect all the other squares. Use the Arc tool holding down the ⇧key until the ending point of the arc touches the opposite corner of the square. Repeat this process on all the squares.
This is the golden ratio-based curves I used to guide the final sketch. Note that the guide is useful at the beginning but dont feel you can't branch away from it to create organic looking shapes.
Step 4: Branch Out Away From Golden Ratio Vector!


the last two images are taken about half way through and towards the end of the process. As you can see, the guide is useful at the beginning but very soon takes on more of a springboard for originality. I also experimented with the stroke width, since this will determine how much the laser cutter will etch away.
When you finish the design and are ready to etch it, make sure you leave the plastic coating on both sides of the acrylic sheet - this ensures your piece doesn't get scratched in the process.
Step 5: Change the Color and Stroke Width for Laser Cutting

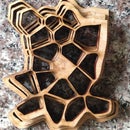
After I did a couple of etches I decided to change the design's stroke to 0.01 and red (255 0 0), which is the laser cutter's setting for cutting, rather than etching. Here is a pic of one attempt. It kinda looks a little like the Scream movie mask!
Attached is one version of the final Illustrator file zipped.
Enjoy!


