

Introduction: Laser Cut a Template for a Sheetmetal Box (flat Pattern)


I made it at TechShop, www.techshop.ws, it's a template that I cut on the laser cutter to quickly lay out cut lines and bend lines on a piece of sheet metal. It's actually half a template as the pattern is larger than the 18x24" cutting bed.
The first step was to draw it in AutoCAD.
Step 1: I Cut the Template in Half to Fit the Cutting Bed

I just drew a line down the middle and trimmed to it in AutoCAD.
Step 2: Open in Adobe Illustrator

After saving as a dxf, open in AI.
Step 3: Set Up Cutting Lines

Make sure colors are in RGB mode and units are correct (inches or mm). Highlight lines to cut and set them to pure red (red value = 255, blue and green 0.) This can be done with the "swatches" button on the right toolbar.
Step 4: Print to the Laser Cutter


Print to laser cutter, set up material type and thickness.
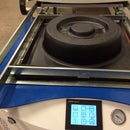
Step 5: Open Laser Cutter Control Panel

Step 6: Position Drawing and Check That Laser Is Aligned


Use the move button to place the image in the right place on your material, and use the button to the left of the relocate button to get the laser to move where you click on the screen. Click on diagonal corners to make sure the entire cut pattern fits in the material. If you open the laser cutter lid, a red locating laser dot will be visible to help.
Step 7: Turn on the Air and Start Cutting


If everything is lined up, turn on the valve for the compressed air supply, and hit the play button to cut and/or etch.
Step 8: Remove Piece After Cutting Is Done.

That's it, remove your completed template. A side note, red lines you set up in AI will cut as a vector, black lines will etch in raster mode. Grayscale will raster-etch with varying intensity. The picture here shows a smaller test piece I made from some scrap to check the program first.


