

Introduction: Laser-cut Coral-inspired Earrings


So, its my sister's birthday coming up at the end of the month and for the first time in years, I am going to give her a present! LOL. I know, I suck at being a brother, but, alas, what can you do?
She loves the sea and whats under it and she never has enough earrings, so I thought I would put the two together for this one! I must say, at this stage, its the thought that counts, because they didnt turn out as pretty as I thought they would.... but she will love them anyway ;--->
I used 1/8 inch maple wood, again, from my favorite fast-shipping wood store.
I made these at Techshop!
Step 1: References


As all good illustrators & designers will say, grab a hold of reference images before you begin. Here are some that I thought could lend themselves to a dangly kind of earring look.
Step 2: Start With a Outline to Follow


Once again, I invoked my trusty friend Illustrator, with a new RGB doc to fit the 5'x17' piece of wood I was using.
I used the Line Segment Tool to produce a rough outline to follow as a trace. I thought about importing one of my reference images, on a new locked layer, but decided to go with my nose. This outline doesn't have to be fancy - its more of a guide on where we will place other vectors.
Lock the layer (I also renamed it 'Template') and create a new one.
Step 3: Elipse Tool to Create an Organic Coral Look


Using the elipse tool (hotkey l) to create a library of circles, each of a slightly different size. Hold down the Shift key to constrain proportions to that of a circle. Don't worry about the stroke thickness etc - we will get to that later. This stage is more about placement. Doing the circles all together allowed me to work quicker, I found.
Now align the larger circles to end points on the templated line, making sure the center point of each snaps to the end point of a line segment.
Step 4: Add Other Circles


Fill in the remaining joints (where line segments intersect) with more circles.
Now make some more circles, smaller in size. I used a different stroke color, just to differentiate them.
Drag these circles to snap along the trace lines, this time on the edge of each circle. Feel free to scale the circles so they fit in proportion to the others. During this time, keep in mind that the interior of the holes will be wood left, so make sure they all touch. I also started copying and pasting groups of circles, then scaling them and moving them somewhere else along the trace lines.
Step 5: Expand All and Fill


Once you are happy with a rough placement, select all on that layer (remember the trace line layer is locked, so wont be included) and expand the lines into fills and strokes - do this under the Object/Expand menu. Use the defaults.
Next, draw a big ass square over the whole drawing, select all again, and press Command m, to bring up the Shape Builder Tool. This tool is your best friend, and is worth hours of fun play time ;-)
Holding down the option key (you should see a little minus sign), click on the outside fill area surrounding all the circles. Select what is remaining.
With them all still selected, Open the Pathfinder palette and click the Unite tool.
And presto! In 2 seconds you have all your circle outlines all compressed into one giant fill object. This is the time where you will see if there are any gaps between circles. Fill these just by adding more fill circles and using the Pathfinder tool again to unite. This is the stage where you should be monitoring how the whole outline of the shape looks, since this is where the laser cutter will be following.
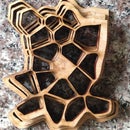
Step 6: Convert to Stroke, Ready for Cutting!


Select everything, and click 'Swap Fill and Stroke' little box in the tools pallete. Then change the stroke thickness to 0.01 px, so the laser cutter will know to cut, rather than etch.
Test a cut on cardboard first, then do your wood. Give the final pieces a light sanding and maybe a little spray varnish. Make sure you use hypoallergenic ball hook wires for the actual stirling silver earring wires...
They're not the prettiest earrings, but my sis will surely like them - they are hand made, after all :->


