

Introduction: Laser Cut Personalized Biz Card Holder


I made these biz card holders for some co-workers down at Techshop Pittsburgh. The design is original, and some of the personalization are from my clipart library, and some are original as well. They have the company name (in this case, Architectural Sign Associates) and name in the foreground, and a personalized image on the back.
Step 1:

Start by downloading my template (svg in a zip file). These were designed to use .25" acrylic. adjust your layout for the material, and add your image files. these were setup for the trotec laser machines, black is engraved first, then blue cut, then red cut. This will allow the maller cutouts to fall without screwing up the rest.
Attachments

Step 2:

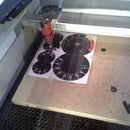
Load your material in the laser cutter, don't do a rookie mistake like me and take off the protective film/paper. it will leave ghosting on the final pieces as the laser engraves!
Step 3:
Once you have everything out, I gave it all a quick wash with mild soap to remove any of the powder from engraving. Since I took off the front film, I had a bit of work to do to polish out most of the ghosting.
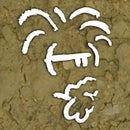
After you wash and let dry, now is the time to add color if you wish. Since these were clear, I added a bit of black t-shirt ink (what we had on hand) and let it sit in the engraving, and then wiped off the excess. if you leave the plastic/paper on, you can spray paint lightly and peel it off after it dries.
Larger fields are harder to do by filling in, as shown by the image below.
Step 4:
Take off any wrapping / film / paper from the plastic. Its time to assemble!
We use some glue (super glue woks, but model glue leaves less vapor residue). Clue the bottom piece (with 2 jagged edges) to the rear of the name plate. use minimal glue, and adhere to either the top or bottom edge. your call, I liked the top better. The spacing was intentional for the look of the part. Change it to be a tighter fit if you wish :)
Let the front and bottom dry until it is a solid bond. You will need them that way for the last gluing step.
Step 5:
The final part, I used the edge of some material to set the back on, and added glue to the other uneven spot on the bottom piece. Using a bit of scrap and a bottle lid as a spacer, I placed the front assembly onto the backer, letting the protrusions stick out a bit in the back (thus the edge of the table / block / material) .
Let the glue dry, polish as needed*, and hold some cards :)
(* a power buffer will catch and toss these things with all the edges.. use a soft cloth and some furniture polish to shine if need be)
Step 6:
Try using the same pattern from other materials! 1/4" birch or poplar works great!


