

Introduction: Leather Dog Collar With Handle


I discovered a new hobby for me - LEATHER! I love it and can't believe I haven't gotten into it much, much earlier.
I just recently finished school and should be looking for a job, but making awesome things is just too much fun! Don't you agree? ;)
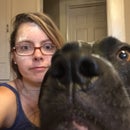
Obviously, since our dog is our (okay, only my) baby, I had to make her a collar, how could I not?! There are a few reasons why I chose to make a collar with handle: 1. we walk her off leash a lot, so it's convenient to just have a handle on her collar that we can grab quickly if needed. 2. for training!
This definitely is not meant to be the same handle you see on service dogs.
Let me show you my process and things that I learned along the way.
Step 1: Tools & Materials I Used

Tools:
- (Fabric) Scissors
- Hammer (regular and rubber kind)
- "Crab fork" in lieu of wing divider or groover
- Hole punch
- Skiver
- Utility knife
- Pliers (to pull the needle through the hole, it's tough sometimes)
- Binder clips etc.
- Solid surface (I'm using a counter top surface sample)
- Rivet setter
- Leather needle & Tapestry needle
- Edge beveler
- Awl
- Cutting mat
- Drill & Drill bit
- Edge burnisher
- - - - - - - - - - - - - - - - - - - - - - - - - - - - - - - - - - - - - - - - - - - - - -
Materials:
- Heavy leather (mine is 4mm)
- Rivets
- D-ring (cast is better than welded or w/ open gap)
- Buckle
- Glue (E6000)
- Waxed thread
- Cardboard (for pattern)
- Beeswax
Step 2: Making the Pattern


I went to school for interior design, so I love drafting, which I haven't done in a few months. This gave me good reason to get back to the drawing table and whip out my drafting tools.
You don't need those, of course, to come up with your own pattern. Either be precise when using just a simple ruler or consider using Illustrator. I've used Illustrator before for pattern making, but I prefer hand drafting, since I have a better feel for what I'm doing when it's on my board in full scale.
I used our only other collar for reference in length and where things like holes should go. I made the new collar wider, except for the part at the end that will go through the buckle and the other end that holds the buckle itself. The widest part is 1 ½" thick and the narrow parts are 1" thick.
Next I also made a pattern for the handle. Here you just have to figure out what you like best. I stood next to our dog and just adjusted it to whatever length I felt comfortable with. However, I have seen some that have a much smaller loop. It's pure preference and the beauty of handmade - you get to adjust it however you want. The widest part is 1" thick and the narrowest part is ½" thick.
The oval piece that holds the D-ring is also 1" thick and 3" long.
Next I used some cardboard I have collected over time from things like notebooks etc. I simply cut the pattern with a x-acto knife and glued it onto the cardboard. Cut out your pieces and you've finished your custom pattern!
I put it together with some tape just to get an idea how it would look and to see if it will fit the doggy. Remember, measure twice, cut once!
Step 3: Cutting, Beveling and Burnishing


For this collar I am using rather thick leather. I forgot how many oz. it is, but it's about 4mm thick. The strips that I am using are actually from the scrap bin and were intended for belts, so you get an idea of what you're looking at here. (If anyone reading this is located in the LA area, I highly suggest going to Sav-more leather in Downtown.)
I clipped the pattern onto my leather using a bunch of binder clips. Mostly because I had so many :P
Using an awl (which I got at the dollar store) I outlined everything, without using hardly any pressure. You can see in the picture that it still comes out fine. Now, using a utility knife (you can try a x-acto knife, but with this weight of leather, you'll be better off getting a heavy duty knife), cut your leather. Next I beveled and burnished my edges. I used just a little bit of beeswax that I rubbed along each edge. I didn't burnish it a lot, by the way, since I figured it'll get a nice look from wear by itself.
FYI, I made my own burnisher. I used a small piece of a large dowel and drilled a hole though the center to put a larger/longer hex bolt through and tightened it with a nut on the other side. Then I plugged that into my drill and with the help of my husband, we used various tools to make grooves into the dowel. I pointed it out with all the other tools at the beginning.
Step 4: Cutting, Skiving, Glueing and Hole Punching


You now want to cut out your pieces for the buckle. For that I punched two holes at either end of the oval and then cut the middle part out with a utility knife.
Since the leather is so thick, I needed to make it thinner in some areas by skiving it down. It's a simple tool that has a razor built in and you pull it across the surface you want to thin out and cut off slivers/slices. Be careful, however, of how much pressure you apply, this could easily cut through your entire leather and ruin your work. I skived the buckle end, the entire oval piece that will hold the D-ring and the ends of the handle.
Next, I used a hole punch to punch the holes by the buckle. I am using those as guides when folding it over and glueing it together. For the glue I used E6000. I guess there is special leather cement, however, this is what I still had at home, so I didn't bother buying anything new yet.
I also glued the other pieces (D-ring holder, handle ends) down, so that once I will make the holes, there won't be any movement. What I didn't show here is, that you should somehow roughen up the areas the pieces will be glued to. Since I have a finished surface, the glue might not stick to it very well. You could either use the skiver or some sand paper.
Also, if you're glueing the D-ring holder down at this point, like I did, don't forget to put your actual D-ring on as well.
While everything else was held together by multiple clips, I quickly punches some holes for the end piece that will go though the buckle.
Let everything sit overnight to dry.
Step 5: Sewing


Now that the glue has set, we can start making and marking holes for sewing. For this collar I decided for both, rivets and sewing.
I used a tool I also found at the dollar store and is actually a crap fork. I found that it works quite well and only cost a fraction of a wing divider. :P
So, mark your pieces with whatever tool you prefer and then, using an awl again, make puncture marks where you want your holes to be. This leather is too thick for your regular hole punches, so I decided to use a drill with the smallest bit that we had. It was a breeze, only my arm got heavy pretty quickly, so take your time and also don't forget to put something under your leather the bit can drill into, like a piece of wood.
The thread I used is black, waxed nylon. It actually was pretty thick, so I had to pull it in half to fit though the holes. Also, my regular sewing needles where too big as well, so I ventured to the crafts store and found tapestry needles that worked wonderfully. They are shorter, but dull at the tip, just like regular leather needles.
The stitching pattern I used is very standard saddle stitch.
When you get to the D-ring part, it's important to really pull the thread tight. See the picture. Here you don't want any loose parts.
While working on the collar I decided to add more rivets for extra support, so after I was done sewing, I marked and punched out additional holes as shown in the pictures.
Step 6: Adding Rivets


Adding rivets is no big deal either. You will need a rivet setter, a hard surface, rivets, a hammer and a little strength. I actually ended up using a regular hammer, not the one shown in the picture.
Put the male rivet part though your holes from underneath and the female part on top. The rivet setter consists of two parts. One that'll hold the bottom part and a longer one that will be set on top. The purpose for the one on the bottom is to keep your rivet round, however, in my case, I wanted the rivet to be flat, so I didn't use that part and set it right on the hard surface. The second part of he setter has a concave part as well, that will be set right on top of your rivet. Before hitting it with the hammer a few times, make sure your setter sits centered and is straight.
The pictures will show you how the rivets will look like when finished. For the ones that are holding the D-ring one, just push the handle to the side to gain full sight of what you're doing.
Step 7: Done! So I Thought...


So I thought this was it, I'm done with this beautiful piece. I put it on Ani, but as soon as I saw it on her, I noticed that I did not like the area right by the buckle. If there is any pull on the collar, which there will be, the narrow part and the buckle will be very uncomfortable for her. I couldn't believe that I didn't think of this earlier, but I came up with a quick fix.
Step 8: Adding a Buckle "Flap"


I pulled out a scrap piece of leather that belonged to a first trial collar that I totally screwed up, that's why there is this u-shaped line on the surface. Just ignore that.
I cut the flap to size and skived it down on the entire back so soften it and on some parts of the front where it'll be attached to the collar. I fiddled around with multiple ways to attach it, but in the end found that the two last holes of the buckle piece were perfect (see picture). We would never use those anyway. So I riveted the flap to the collar and NOW I was done!!!
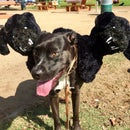
Step 9: Our Supermodel


Step 10: The Finished Collar


If you'd like, vote for us in the Leather Contest. Happy making everyone!

Participated in the
Leather Contest


