

Introduction: Leather SteamPunk Top Hat

Greetings fellow airship traveler! as your captain i require the proper attire of my crew whilst aboard my ship. It can get below freezing in these altitudes so your going to need a hat, but not just any hat. This ship is well known throughout the world as the best dressed ship in the air and if you want to continue serving, you best get yourself a Top Hat!!!!!
I have ALWAYS wanted a top hat but have never been satisfied with the felt ones you get at amusement parks that have weird colors and look like The Cat in the Hat rejected them....
in this step by step guide i walk you through how to build a top hat such as mine.
PLEASE read the discriptions as i did not photograph everything
Step 1: Needed!

Maybe you don't want a top hat that looks like mine, maybe you would rather have a stove pipe style like President Lincoln or taller and more flared out like the Mad Hatter
Paper and Pen, Sketch out how you want it to look, try different angles and styles until you figure out what exactly you want.
A prototype:
1. poster board, manila folders, card stock, anything you can use to cut, staple, tape, glue to make a working, fitted prototype.
2. stiff wire, something if you bend it will hold its shape
3. pencil, pen, markers
4. tape, glue and/or staples
5. razor pen
The Hat:
1. Leather, i recommend you use 3oz leather
2. razor knife
3. fine point sharpie
4. Sewing Machine and thread
6. water!!!
Step 2: Making the Prototype


I assume you already sketched out some designs and are eager to start making a hat. Lets begin by taking the solid wire and wrap it around where hats go, the crown of your head. twist off the ends to help keep its shape an make sure it fits all dimensions of your dome
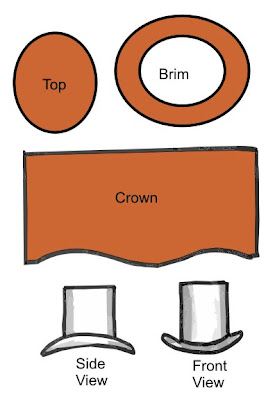
once you have that, go to your poster board and trace the head on the inside of the wire mold on to your poster board with about three inches of space away from the line. enough space to make the brim of your hat.
cut out your brim and set it aside
next take the wire form and cut one side of it so you can straighten it out to for the crown. mark off where the ends are and then wrap and secure the marked ends of the poster board together on the bottom and start slowly forcing the top of the crown to flair out until you reach your desired shape. if you think its too tall, cut off an inch from the top at a time until you feel its right, if you feel its too short, add material until its where you like
remember to keep fitting it to your hear every time you adjust
secure the seam of the crown with tape, staples and/or glue and flip it up side down on more poster board to trace the top
once you have all three pieces ready to go, its time to get the prototype together, i used tape but you can use what ever you want to put it together.
Tip: if you want the brim to have a curve to it, fold your crown in half by bringing the sides together and cutting a slight curve where the brim and headpiece meet. look at Tom Banwell's top hat pattern for reference
Step 3: Take a Break!

think it over, make sure your happy with it before you cut your leather to make sure your satisfied
break time crab rolls:
cooked instant rice, sticky with no excess water
sushi-nori sheets
imitation crab
mayo
and a bamboo mat (99cent store bamboo place mat works just as good as the sushi mats you pay more for)
place your bamboo mat down with the slats going horizontal, place a nori sheet at the bottom of the mat, spoon on and smooth the rice until all but the top inch of the nori sheet is covered in an even layer of sticky rice. 1/3 the way from the bottom spoon on your finely chopped imitation crab coated in a fine layer of mayo in a horizontal line. take the bottom of your bamboo mat ans slowly start rolling the the nori up and over its self to until it gets to the i inch of blank nori sheet, wet the exposed nori with water and finish rolling. with the bamboo mat, firmly but gently pack the roll
place the roll on a cutting surface and with a very sharp knife, cut the roll in half and place the two halves side by side, clean the knife with a wet paper towel and begin cutting the pieces, cleaning the knife after every time you cut
mix and ounce of soy sauce with a pinch of brown sugar for your dipping sauce.
enjoy it and then get back to work
Step 4: Transfer Your Pattern, SEAM ALLOWANCE!!!


Dismantle your prototype and cut the crown down one side.
carefully trace your pattern on to the rough side of your leather
remember: SEAM ALLOWANCE!!!!!
were going to be sewing this together and you'll need space to get your seams lined up
cut out your leather and place the pieces in hot water for a few minuets
pat the excess water on the surface of the leather with a towel
Step 5: Sewing It Up


i would suggest having heavy duty needles on your machine when working with leather.
start by lining up the crown and top pieces of wet leather grain side to ground under the foot and manually driving the needle through the first time by turning the wheel towards you, then slowly progress the machine forward with the peddle while lining up the curved edges. this will get more and more difficult as you go along so you will nee to be ready to manually drive the leather forward while it talking shape
once your crown and top are sewn together, size the bottom to your head, i know its cold and wet but you have too, mark the position and sewthe crown seam closed... or do what i did and leave it open, nothings wrong with that
next flip it inside out, its a bit tricky and you want to move slow and steady so you don't tear your seams
make sure your seams are creasing where you want them to and then proceed to sewing on the brim
the rough side of the brim should be overlapping (a quarter inch) the smooth side of the crown where the head fits in the hat. if you made the brim flair you will want to take care to not sew unaligned.
Step 6:


once you finish sew the brim to the crown you will need to place the hat back in to more warm water and then begin shaping it.. i didn't take picture of this process because i needed to use both my hands and keep moving until it was finished.
i used a large coffee can and placed the hat over it. with a hair drier on high i started drying the crown while pulling the sides down resting the top on the coffee can to make straight-ish walls
then i put a cowboy crease on the brim and began using the hairdryer to dry the brim in the shape i wanted it in.
after about 20 minuets of shaping with the hairdryer, i had a fully functional hat (as pictured)
my nephew likes it too!
Step 7: Finishing Touches


you will want the hat to continue drying for at least 24 hours and then your ready to dye it.
i used Fiebing's Black Leather Color
sponge brush
rubber gloves
and a well ventilated area
i evenly coated the outside of the hat and the underside of the brim. i used an excess amount on the brush in the seams to make sure to penetrate thoroughly.
after i used Tandy Leather Eco-Flo Super Shene to give it a shine and wrapped an orange bandanna around as a band

Participated in the
Sew Warm Contest


