

Introduction: Leather Watch Strap

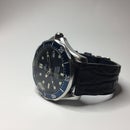


Today I'm going to teach you how to make a leather watch strap. This will take a while so don't rush. First you'll need a few tools. Don't worry this watch throughout this instructable is a fake rolex, maybe ill put this strap on a real one one day.
Step 1: Tools

These are the tools you'll need to make this strap. Some of these tools are improvised or made by hand in place of a tool you can buy. Links below for the real deal. What I didn't include in this picture is a large swatch of leather, fabric glue or elmer's glue and a hole puncher.
Real burnishing tool: https://www.tandyleatherfactory.com/en-usd/search/...
Hole Punch: https://www.tandyleatherfactory.com/en-usd/search/...
Beveling Tool: https://www.tandyleatherfactory.com/en-usd/home/de...
Stitching Groover: https://www.tandyleatherfactory.com/en-usd/home/de...
Step 2: Initial Strap Cut

Cut two straps of leather both of which are the same dimensions. Be sure to make the width the same as the distance between the two lugs. These are my specs: 20mm x 22cm. Then fold one strap in half than fold the other one so there is about 3cm one one side. Fold it there, then fold the 3cm over. I clamped these to crease them more and you can see where the folds were. This will help in the next step.
Step 3: Thinning


The next step is to thin out the leather at the fold points. I used an xacto knife and scraped back an forth switching direction once in a while. It doesn't need to be drastically thinner than the rest of the leather but just enough to make it fold easier.
Step 4: Cutting the End

There isn't a great way to do this without a punch, they do sell them but I don't have one. I believe the best way is to fold a paper in half and cut it how you want it to look, then tracing it down onto the leather and cutting from there.
Heres where to get an end punch: https://www.tandyleatherfactory.com/en-usd/home/de...
Step 5: Stitching Holes


This is where the chisels come in. First I used my flat chisel attached to a pen cap contraption to make a groove along the edge. Put the pen cap up on the edge of the leather and run the chisel along the leather. Then, on the groove, start marking holes with the pointed chisel or fork. To keep it as even as I can, I put the first two points on the chisel in the last two points I made. when I get to the curve I only keep the first point on the chisel on the last point.
Step 6: Inside the Strap


Inside the strap is another piece of leather. Mine is made of a different type of leather that is thicker and stiffer. It can be made from the same swatch of leather as the rest of the strap. I lined up the leather so it was just a bit thinner in width than the stitching. Then I lined up the piece of leather with needles poked through the holes. I then glued it down with fabric glue. Normal Elmer's glue would work but don't use a lot. You don't want the glue making the strap too stiff.
Step 7: Repeat Last Step


This I just the same as the last step. Make sure to keep the flap at the end.
Step 8: Buckle Hole

I measured how wide the tang of the buckle is and marked it. I then Folded over the flap and cut on the marks. It was just trial and error until I had the buckle move in the way I want.
Step 9: Time to Sew!


This is a fairly easy step. Just go through each of the holes and once you get to the end. Only half the holes will be filled to just go back through each other and they should all be filled. Then just tie it off and depending on the type of thread burn the ends. Check the picture for very important annotations.
Step 10: Edge Finishing


Check the pictures for each step of finishing.
Step 11: Hole Punch


This is make or break, it is difficult to make the holes an equal distance apart and all in line. Even in this one the last hole is slightly off. If you don't have a hole punch (which I suggest getting, its amazing), I first used a small pipe and a hammer. It isn't as good but it works okay. This is the last step, I put the conditioner on it at this stage but congratulations and enjoy your watch strap.
Step 12:


Participated in the
Hand Tools Only Contest

Participated in the
Teach It! Contest Sponsored by Dremel


