

Introduction: Magnetic Mario Earrings Super Stars


My lovely wife loves the Mario Mushroom earrings I made for her last year but I thought she might enjoy another set with a little twist.
As any fan of classic Mario knows the appearance of a super star can bring joy to your play and to me my wife is very much a super star.
If you want to make along you will need some wood, neodymium magnets, a rotary tool with some bits and a glue gun, glue and some paints or nail varnish.
Step 1: Thickness


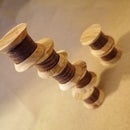
If you have some wood which is in the dimensions you want then you are very lucky.
For me I was almost there with an off cut of holly but needed to get to the right thickness.
I created a zero clearance base for my Dremel fret saw and clamped on a scrap of wood at the desired thickness away from the blade.
Running the wood against the scrap wood fence slowly into the blade helped me to achieve a consistent cut resulting in a uniform thickness peace of wood.
I cut this uniform thick wood into squares.
Step 2: Glue It Like Its Hot


Using my Dremel hot and low temperature glue with low temperature glue I glued the uniform thickness squares onto a scrap peace of MFD. This makes working with the wood a lot easier and reduces the need to find clever clamping methods when carving or shaping.
(interestingly you can get hot and low temperature glue guns.. There useful for different things. I first got mine to work with kids craft groups with the aim of reducing the risk of burns)
Step 3: Holly Wooden Magnet Holes


I used a tool to create a divot in the wooden squares before drilling a space for the magnets. This divot helps to keep the drill bit from slipping and potentially damaging the project.
The drill bit wasn't thick enough for the magnets to fit into the holes so I extended the holes with a Dremel rotary carving attachment.
Step 4: Add Some Veneer


I cut some scrap veneer available which I cut into small shapes and glued to the square peaces with magnets.
Its important to remember to adjust the position of the magnets so they attract each other. I did this by placing magnets on top of the veneer which made the magnets underneath the veneer move to the correct orientation.
Step 5: Love That Glue Gun

Using a chisel and very little effort you can dislodge the now magnetized squares and remove the old glue. If your using a tight grained wood the glue should come off easily in one peal.
Then glue the squares to the board veneer face down.
Step 6: Carving


Locate the magnet by placing another magnet onto of the square. This will give you an idea of how much room you have to make your star shapes.
I freehand drew the five pointed star shapes and used the Dremel tool with carving attachment to remove the waste wood. (I occasionally made one or two cuts with a chisel because it was there)
I used the drum sander in the Dremel tool to further refine the shape and soften the edges.
Once I was happy I gave the stars a quick spray of sanding sealer before heading home to paint.
Step 7: Woohoo Painting


So I had this ace idea that nail varnish was the best thing ever because it looks smooth and shiny on nails.
In reality it drys really slowly and needs lots of coats. I did one coat before using normal acrylic paints to finish the Mario Super Star using internet images as reference.
I should say that i made sure the size was right before panting.
Step 8: Give the Gift


If your making these for someone then giving them is a great time.
I am rubbish at putting off gifting to people so I could have waited for a birthday or some time when gifts are needed but these were given just because I made them.
I think she is very happy with her new magnetic ear rings. And when there not in use they work as fridge magnets :)
Health and safety
Magnets are potentially dangerous.
I would advise against giving these to small children.
If you feel discomfort whist wearing I would advise to stop wearing them.
The magnets are held behind wood sanding sealer ect ect but with most paints magnets ect there is a chance of chemicals which aren't the best to have against your skin. if you feel itchy ect then stop wearing and wash the area.
Other than that you should be fine and have a lot of fun.

Participated in the
Full Spectrum Laser Contest 2016

Participated in the
Gaming Contest


