

Introduction: Make Money With Arduino


**** ENTERED IN THE HURRICANE LASERS CONTEST****
What would I do with a Laser Cutter? Build Simple Robotic Kits to teach people a Hobby that I Love.
Ever wanted to make some money from your projects?
This Instrutable will show you how to Simply interface a coin selector with your Adruino.
And also how to then connect that to your Visual C# Project.
Then it's all up to you and that great idea you have, if it's electronic or a program/game,
The Buck Starts Here.
You will need:
A Coin Selector: There are many different type's, the CH-926 accepts the most amount of coins so thats what I'll be using.
UK Stock, US Stock
Any 12v Power Supply, Batteries or Wall Wart.
An Arduino UNO
Microsoft Visual Express 2010 C#: Free Download, Scroll down until you see the correct option.
Note: Only needed for a coin operated Program, Not electronics Projects.
Let's get Started!
Step 1: Coin Sampling

For your Coin Selector to know what type of coins it accepts, you have to set it up and then feed it samples of those coins.
It is recommend to sample at least 15 coins of the same type, up to a maximum of 30. Don't feed the same coin through 30 times, it's make the selector to fussy about what it accepts.
A Coin Selector works by comparing the material, weight and size of coins past through it to the samples you provide. If a coin is not reconised it drops out the return slot, if it is reconised the Unit sends out pulse's on the "COIN" line.
So to make it easier for the programming side we use a "greatest common factor" rule.
eg. We'll use the following coins (UK) 5p, 10p, 20p, 50p,& £1, (US) 5c, 10c, 25c, 50c & $1.
All the the coins can be made up with multiple 5p or 5c coins, so we make 1 pulse equal to 5p or 5c.
5p/c = 1 pulse, 10p/c = 2 pulses, 20p = 4 pulses, 25c = 5 pulses, 50p/c = 10 pulses, £/$1 = 20 pulses.
Now, TheSetup:
First the switches...
select "NC" by sliding the top switch to the bottom position.
select "FAST" by sliding the bottom switch to the top position.
Power Up the unit with a 12v supply.
1. Hold the "ADD" and "MINUS" buttons down at the same time for about 3 seconds, release and then the letter "A" will appear on the LED display.
2. Press the "SETUP" button once, and the letter "E" will appear. Then use the "ADD" and "MINUS" buttons to choose how many kinds of coins your going to use. Press the "SETUP" button again to finish.
3. The letter "H" will appear. Use the "ADD" and "MINUS"buttons to choose how many sample coins your going to feed it later. Press the"SETUP" button again to finish.
4. The letter "P" will appear. Again use the "ADD" and "MINUS" buttons to choose the amount of output pulses you want. Press the "SETUP" button to finish. Refer to the above example to determine number of pulses.
5. The letter "F" will appear. Using the "ADD" and "MINUS" buttons, choose the accuracy. The value is from 1 to 30, with 1 being the most accurate. I use 10 and it works fine. Again "SETUP" to finish.
You have now setup the first coin, depending on how many coins you selected in step 2, you'll have to repeat Step's 3 to 5 for each one.
The letter "A" will appear when you've setup all the coins. Hold "SETUP" for 3 seconds to finish, the letter "E" will appear.
Finally, switch the unit off and then back on.
Sampling time:
1. Hold the "SETUP" button down for about 3 seconds, release and then the letters "A1" will appear on the LED display. This is your first coin (5p/c)
2. Feed the Coin Selector your sample coins, the LED display will show the amount of coins you've entered. "A1" will appear again when finished.
3. Hold the "SETUP" button down again for about 3 seconds, release and then"A2" will appear, repeat these steps until all coins are sampled.
If your not using all of the coin types available (eg 5 coins of a 6 type coin selector) the unit will ask for samples of a coin type you haven't setup, just hold the "SETUP" button down for 3 secconds of each of the remaining coins.
The Coin Selector restarts itself and is now ready to connect to the Arduino.
Step 2: Arduino Time
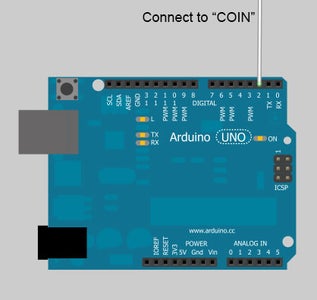
To Wire the Coin Selector to the Arduino is easy.
The white "COIN" Wire from the Selector connects to pin 2 on the Arduino. It has to be pin 2 or 3 as these are Interrupt pins.
Now if your using a different power supply for the Coin Selector to the Arduino, you must connect a common Ground. So the Red wire from the Coin Selector connects to +12V of the supply and the Black wire to ground of the supply AND to ground of the arduino.
Note: USB will NOT power the coin selector.
Step 3: Some Simple Code
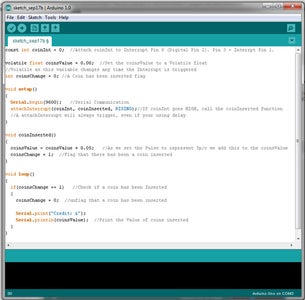
Now, Fire up the Arduino IDE and let start coding:
PROGRAM START:
const int coinInt = 0;
//Attach coinInt to Interrupt Pin 0 (Digital Pin 2). Pin 3 = Interrpt Pin 1.
volatile float coinsValue = 0.00;
//Set the coinsValue to a Volatile float
//Volatile as this variable changes any time the Interrupt is triggered
int coinsChange = 0;
//A Coin has been inserted flag
void setup()
{
Serial.begin(9600);
//Start Serial Communication
attachInterrupt(coinInt, coinInserted, RISING);
//If coinInt goes HIGH (a Pulse), call the coinInserted function
//An attachInterrupt will always trigger, even if your using delays
}
void coinInserted()
//The function that is called every time it recieves a pulse
{
coinsValue = coinsValue + 0.05;
//As we set the Pulse to represent 5p or 5c we add this to the coinsValue
coinsChange = 1;
//Flag that there has been a coin inserted
}
void loop()
{
if(coinsChange == 1)
//Check if a coin has been Inserted
{
coinsChange = 0;
//unflag that a coin has been inserted
Serial.print("Credit: £");
Serial.println(coinsValue);
//Print the Value of coins inserted
}
}
PROGRAM END!
This simple program will write the total value of coins inserted to the serial monitor.
If you'd like your project to start automatically after say 50p or 50c has been inserted then replace:
Serial.print("Credit: £");
Serial.println(coinsValue);
with:
if(coinsValue >= 0.50)
{
//your code here, eg Big Flashing Lights!!!! and Serial.println("I'M MAKING MONEY!!!!");
}
CONGRATULATIONS
The Electronics Side is finished, Continue if you want to Interface with a Window Application you've created
Step 4: Basic Windows Form Application


Load up Microsoft Express 2010 and create a new "Windows Form Application".
I'm calling mine Coin Selector.
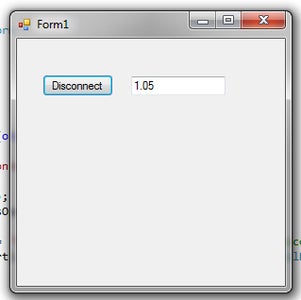
Now to your form add the following components:
1. A Button, Change the Text to "Connect"
2. A Text Box, Change the Text to "0.00"
3. A Serial Port, Change the PortName to the COM Port your Arduino connects to.
Step 5: Coding Time

Double Click the "Connect" Button and you'll open the Code window, paste the following code in the brackets:
if (button1.Text == "Connect") //If the button say's connect
{
serialPort1.Open(); //Open Serial Port
if (serialPort1.IsOpen) //If the Port Opens
{
button1.Text = "Disconnect"; //Change the Button to Disconnect
this.serialPort1.DataReceived += new System.IO.Ports.SerialDataReceivedEventHandler(this.serialPort1_DataReceived);
//Adds an Event when the serial port receives data
}
}
else
{
serialPort1.Close(); //Close the Serial Port
button1.Text = "Connect"; //Change the Button to Connect
}
We have to add a few functions, the first will close the port if we close the application. The second tells the program what to do if data is received and the third is what it does. So Just below the final "}" of "button1_Click"
add the following:
//CLOSE PORT ON EXIT
private void Form1_FormClosing(object sender, FormClosingEventArgs e)
{
if (serialPort1.IsOpen)
{
serialPort1.Close();
}
}
//SERIAL DATA RECEIVED EVENT
private void serialPort1_DataReceived(object sender, System.IO.Ports.SerialDataReceivedEventArgs e)
{ //serialPort1 runs in a different thread, to call a function in the main code Invoke must be used
this.Invoke(new EventHandler(serialReceived)); //Calls the below function
}
private void serialReceived(object sender, EventArgs e)
{
double coinsValue = Convert.ToDouble(textBox1.Text); //converts the text to a number
coinsValue = coinsValue + 0.05; //Add 0.05 to that number
textBox1.Text = Convert.ToString(coinsValue); //Converts it back to text and puts it back in the textbox
}
Now, Scroll up and you'll see some "using" lines, add "using System.IO.Ports;" as we'll be using Serial port functions.
The Basic Program is finished, On the Arduino side:
replace...
Serial.print("Credit: £");
Serial.println(coinsValue);
with...
Serial.print(0); //Sends 1 piece of data over the Serial, the windows program add's 0.05 for every piece (println would send 3)
Upload, Run the windows Application, Click "Connect" and your away!
Step 6: CONGRATULATIONS
You can now activate your projects by receiving the right amount of money!
Good Luck & when your a Millionaire please send me some!

Participated in the
Hurricane Lasers Contest

Participated in the
Hack It! Contest


