

Introduction: Make Multicolor Crayons


Do your kids have a bunch of old crayons that now go unused due to their small size? Dont want to throw them out because you just bought them last week? My mom is a first grade teacher and I recently saw a large bowl full of half-used crayons in her classroom that had supposedly been growing in numbers for a few years. I got the idea to turn these unwanted stumps into some new crayons that the kids might enjoy.
What You Will Need:
-- some crayons
-- a microwave-safe container
-- some foil (or any shaped mold you want to use)
Step 1: Make Some Rainbow Goo


Get together all of the crayons you can, and start breaking them apart. Make sure there are no pieces bigger than about a quarter of an inch long - the smaller the better. Once you have a bunch of crayon chips, find yourself a microwaveable safe container (I used paper cupcake inserts) and toss in all of the bits. It is probably smart to cover this with a paper towel, just so you dont come after me if you happen to have a rainbow explosion in your microwave.
Toss them in the microwave and turn it on high for about 3 minutes. It may take more or less time depending on the amount that you melt, how big your container is, etc. In case you hadn't guessed, this mixture is going to be hot when you microwave it, so be smart. You may need to stir the mix to make sure that it is all melting, but be careful not to over-stir or you will blend all of the colors together and just end up with some ugly green/black crayons.
Step 2: Welcome to the Mold


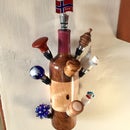
Once you have a nice, gooey concoction, its time to bust out those molds. You can get creative here, it all depends on what shape you'd like to have rainbow crayons in. Anything that has depressions in it or is open on only one end can be used. I decided to make crayon shaped molds out of alumium foil because it is easy to get the wax out once it cools, I wanted them to be easy for kids to use, and I had plenty sitting around the house.
If you decide to use the foil idea, just grab a pen or a crayon (if you happen to have any left) and use a few square inches of foil to wrap around it, making sure to fully cover the bottom and sides however high up you want the crayons to be. Next, grab a funnel (you can make one out of foil if need be), or think of another way to easily pour the crayon solution into your molds. Once they are full, stick your molds into the freezer to cool/dry them. You can just leave them out to dry, but it will take longer. A few minutes later (I would say 5 just to be safe) you can take out the molded crayons, peel away the foil being careful to make sure that the wax has fully hardened, and tah dah, you've got some rainbow crayons.
(Sorry about the quality of the pictures - they do look better in person)


