

Introduction: Make Your Own Layered Magnet


These magnets can be fun and cute. They are made in layers of clay to create the illusion of depth and can be as easy or as difficult as you are comfortable working.
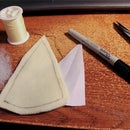
You're going to need a few things before you start.
- Polymer clay (I use super sculpey)
- Paper
- Sharpie
- A rolling pin (not one you use for food)
- Acrylic paints
- Paint brushes
- X-acto knife
- Sculpey bake and bond
Optional things to make this easier are
- A clay tool for smoothing
- Some kind of glaze or sealant (optional)
Step 1: Step 1: Draw Your Images

This step is really easy, but important. You have to pick what you are going to make for your magnet.
If you aren't very good at clay or sculpting, pick something simple. Look for something that is made up of mostly simple shapes, or something that can be simplified. You can either find an image of what you want, or make up your own. Just be sure you feel comfortable working with it and remember that you need to have a space big enough to put your magnet.
Then draw your image with sharpie onto your paper. I use post it notes to make sure the magnet stays a reasonable size. Make sure your lines are dark.
I personally like making pokemon, their bodies are already really simple so they are easy.
Step 2: Step 2: Transfer Your Image


Now you set the magnet down in the biggest space and squash your clay over it. Use a rolling pin to flatten your clay, making sure it reaches all the parts of the picture. When you peel it off the paper, you'll have an ink outline copied onto the clay.
Step 3: Step 4: Cut and Smooth the First Layer


Now just take your X-acto knife and cut it out.
Since this is going to be a layered magnet, you have to pay attention to what layer you are working out. I started with the bottom layer. For me this was the back wing, feet, and tail.
After cutting it out, you want to smooth the top edges a bit so they aren't jagged. I just take my wooden tool and sort of roll it over the edges.
Step 4: Step 4: Cut Your Next Layer


Now you simply repeat the last step, only this time for your top layer. For me, this was the head, body, and top wing.
Press them over the paper, cut them out, and smooth them down.
Step 5: Step 5: Put It Together


(If you choose to do any more layers, do those too, though I don't suggest too many)
Now lay your top layer over your bottom layer. Smooth anything that needs it. For example, I joined the legs together more smoothly. I always assemble everything right back on the post it note, then I can slide the whole thing into the oven.
You may want to rough up the two surfaces or use bake and bond to make sure the two layers stay together when baking.
Step 6: Step 6: Add Details and Bake


Add any small details and make last minute adjustments before baking.
I always attach small bits with bake and bond to make sure they stay put.
You can brush your little sculpt with alcohol and a soft brush to remove fingerprints and bumps. Don't use too much or you will melt out your details.
I also gave the wings a curve upward.
When you are done, you can slide the whole thing, paper and all into your oven to bake according to your clay's directions.
Step 7: Step 7: Paint and Finish


Paint your magnet however you like. I personally use acrylic paints with a coat of white paint underneath.
When you are finished you may choose to spray it with a glossy spray to seal the paint from scratches and help protect it.


