

Introduction: Make Your Own Go Kart


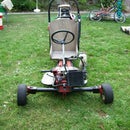

This is a go kart that I made and hopefully you will be able to as well. I used the back end of a bike and the front axle from a ride on lawnmower. Plus some other pieces of scrap I had lying around.
Before you begin there are some important thing you will need to have:
-Angle grinder (or if you don't have one a hacksaw)
-MIG Welder (this is the most important thing you will need)
-Basic tools (spanners, hammer, sockets, socket drive etc)
-And a lot of space to build the thing!
And remember if you have any questions please dont hesitate to ask.
Step 1: Finding a Bike

This part is really the most important thing you are going to have to do in this whole build. Selecting a bike that is suitable for your specifications and requirements is cruicial.
There's really not a lot I can tell you about this except I chose a 1998 Suzuki Katana AY 50 because it was the only one I could get for free (it wasn't running, but I fixed it). I would recomend a bike like this but really any bike will do, as long as it starts and goes.
Step 2: The Big Cut

This step is definitly not for the faint hearted as it involves cutting your'e bike in half! - A crutial, but devistating part of the build. If you would would rather have a bike than a go kart then you may as well quit now.
First of all remove all unnessecery bodywork including the seat (but keep them intact because you can sell them and make some money). Then remove the brake cables, radiator pipes plus radiator (if water cooled) and the wiring from the front half of the bike. Keep these safe and do not damage them otherwise the bike will no longer run.
There should be a large central pipe which is part of the frame, which runs from the front half of the bike to the back half. You should cut this pipe leaving at least 4 or 5 inches on the back half.
You should put the back half on the kick stand to hold it up to stop in from falling over.
Step 3: Making the Chasis


Now here is the hard, maths consisting part to this build.
You need at least 3 1/2 meters of two inch box section. You need to work out how long they have to be and that all depends on how long the brake and throttle cables are. You need to mount them so you can operate them with your feet, so they have to be long enough. Extending them would be hard so getting it the right length helps.
You need to establish how you are going to mount the box section on to the front axle as this helps you a lot with the back. All axles vary in size and shape so this requires some thinking.
I had an axle that had a steering wheel to high so I had to lower the angle by bending the box section to match.
Remember to mount the box section so that it comes together at the bike half, and splits apart at the front axle.
You can also paint the box section.
Step 4: Adding a Footrest

This step is really simple and all it consists of is a piece of plywood.
You should cut it into shape as the picture shows. I have not included any dimesons as these are specific to your mahine, so they will be obvious when you make it.
When bolting it to the chassis you should attach it to the underside of the go kart, making sure that it does not hit the wheels. Just drill four holes in the box section and four corresponding holes in the footrest.
When bolting the footrest to the box section make sure to use rather large washers to avoid the wood being crushed when the nut clamps down on it.
Step 5: Adding the Radiator

If your bike is not water cooled then you can skip this step completely.
You can mount the radiator any where on the go kart but try and make it as low as possible to avoid a top heavy go kart.
The pipes from the bike will not be long enough if you mount the radiator were I have put it so I added some copper tubing with some black insulation foam tubing which can be bought at any good pluming store.
Cut the origonal rubber pipe in half so half of it goes from the radiator and half from the engine and then connect them with the copper pipe.
Step 6: Adding a Throttle & Brake


Adding the throttle and brake is an essential step to get right, after all they are the two most important controls!
You will need to cut off part of the handlebars that surround the throttle and brake and weld these bars to the go kart so you can operate them with your feet.
With the brake you need to turn it round so that it is on the right side of the go kart to avoid confusion when operating. As for the throttle you should remove the rubber sleeving from the assembly and drill a hole for a steel bar to go through to a allow you to operate it.
Step 7: Adding the Electrics


When doing this step you should try and get the ignition barrel in front of the driver so they can shut down the bike in emergencies. Other than that the electrics can be stuffed anywhere on the go kart as long as they can be accessed to repair or adjust.
If you want to have the headlights, indicators, brake lights and horn then I suggest you make a control panel to house all the switches for them. This is easy to make and works a treat.
Mounting it is easy as I just used one bolt, a nut and a washer.
You can also mount the horn if you want it. I suggest right at the front, so you are not blasted with it when it goes off.
Step 8: Making a Seat

This is really simple as it only needs and few bits of plywood to complete.
You could make a bit of plywood to fit on the chassis which goes under the seat so that only 4 screws are nedded to attach the seat onto the go kart, making for easy removal.
A seat is rather a personal thing, so you will obviously have to work out your own seat measurments to fit you. I have two different sized seats, which means that a wider range of people can ride the go kart.
Step 9: Testing the Go Kart
Now we get to the fun part! Testing.
Here is a video of my first test run, sorry it's bad quality, I took it with my phone.
Attachments

Step 10: New Test Video
At the end of the run I decided to do a hand brake turn, that worked suprisingly well!! Unfortunately you can barely see it on the video due to the poor quality.


