Introduction: Make Your Own LED Bulb Replacement for Regular Torchlight
LED torchlight are pretty common these days, but if you happen to have an incandescent filament light bulb based on 100 years old technology, here's your chance to have it updated with LED that last 8000 years! (if incandescent has a human lifespan)
What this instructable does:
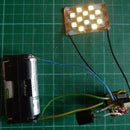
Take a regular PR 2 bulb with a P13.5s base (i.e. those most commonly in torchlight), reuse the base and insert 3 x 5mm diameter white LEDs. See image of end result below.
The shortcut to this project is to go into a shop and buy one of these. But hey, what's the fun in that when you can make your own!
Step 1: Removing the Glass Bulb
This task is pretty hazardous, so be very careful, tiny shards of broken glass cut easily and are painful to remove (from my own encounter with a broken bottle), I suggest covering the bulb with a kitchen towel and gently grip with a plier, twist and nudge it out.
The glass bulb is fused to the metal base with a clay-like cement, and should crumble easily. Once the bulb is removed, use a mini screwdriver scrape the metal base clean. The internal surface wall of the base has to be electrically conductive.
What's left is seen in the image below.
Step 2: Desoldering the Remnant of the Glass Bulb From the Base
Having done this, you can now insert the LED legs through this hole, where it will be the positive connection to the battery.
Step 3: Shaping the Legs of LED
Now for some Uri Geller magic tricks!
What you need to do is bend the legs, solder the anodes together (that's the positive polarity leg, the longer one, or see http://en.wikipedia.org/wiki/LED ). A bit of tape would help securing them together while you do the soldering.
Next, fold the cathode legs into a u-shape, about 7mm long, these have to make contact with the internal wall of the metal base.
Once you have done that, what you have is something like the image below.
Insert this into the metal base, through the hole at the end, solder and cut away the protruding excess.
Step 4: An Important Final Note
The electrical characteristic of the LED bulb is completely different from a normal incandescent bulb, if you have chosen to use white LEDs, you would typically need at least 3.3V to turn it on, producing optimum light output ( say, 3 x 1.2V rechargeable nickel metal hydride) , if you are using red LEDs, these may require only 2.2V, and can be used as a direct replacement bulb for a 2 cell torchlight, no problem.
When using a white LED, the easiest method of driving these, is a connection in series, with a shunt resistor. Working on typical values for a 5mm white LED.
For 3 battery cell, between 3.6V to 4.5v, depending whether you're using alkaline or rechargeables, assuming a nominal of 4V, with the white LED operating voltage and current at 3.3V, 30mA respectively, (4 - 3.3)/30e-3 , a 22 ohm resistor will do.
For 4 battery cell, between 4.8V to 6V, assuming a nominal of 5.4V, with the same typical values for a white LED, (5.4 - 3.3)/30e-3, a 68 ohm resistor will do.
A direct placement of the resistor in the metal base could save you more hassle.


