

Introduction: Make Your Own Knife


Hello again! This is an instructable on how to make a simple knife. In fact, you will just be making the wooden handle, as making the blade itself requires a lot more tools and knowledge than I have.
Oh, and a disclaimer: Knives are sharp and some tools potentially dangerous. Use protection. Really, I mean it.
There-let's start!
Step 1: Materials Needed

For this specific knife you will need the following:
- a blade
- a piece of nice wood for the handle
- a thin piece of brass/metal for the guard
- a few pieces of coloured distance material
Step 2: Drilling a Hole for the Blade Shaft

This is a step that requires some patience and control. Get it wrong and you may have a shaft protruding from the side of the handle - or a crooked knife. Draw a line on the outside of the wood and try to keep the drill aligned. You may have to drill two or three holes next to each other to get a sufficiently big hole for the shaft. This can be tricky without a mounted drill rig, but possible.
Step 3: Prepare the Metal Guard

Drill two or three holes in order to get a hole big enough to fit the knife. Shape a rektangular hole using a very small file. Sandpaper and polish the side that will be exposed. It will be harder to do afterwards as the blade will be in the way.
Step 4: Test the Spaces and Metal Guard

Make sure that all pieces fit together as planned.
Step 5: Glue It All Together

Here I would suggest that you use a two component glue. Make sure you get enough glue into the hole in the wood piece. And between all the pieces. Don't worry about excess glue. It will be sanded off later.
Step 6: Let It Dry

Use your imagination in order to put the knife under pressure during the drying process.
Step 7: Take a Break

Take a well deserved break!
Step 8: Prepare for Sanding

When dry, it is time to start sanding.
Step 9: Set Up Sanding Tools

There are many different tools that can be used for sanding. The picture shows my choice and setup.
Step 10: Get a Rough Shape

This is where your creativity comes to play. Make up your mind on how you want the knife to look like when finished. Start sanding, but take it slow as rotation sandpaper eats the wood fast.
Step 11: Refine the Shape

Refine the shape using files and some 40 grade sandpaper.
Step 12: Work Out the Details

When you are satisfied with the shape start using 80 grade paper and gradually change to 200, 400, 800 and1200 paper.
Step 13: Get That Smooth Finish

Keep sanding!
Step 14: Add Oil

When satisfied with the finish, add some oil. In my case I used olive oil.
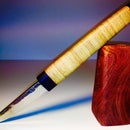
Step 15: Take a Step Back and Feel Satisfied

... and finished!
Step 16: Enjoy the Living Material and Non Poisonous Oil


Participated in the
Hunter-Gatherer Contest


