

Introduction: Making 1000 Nails - Colonial Blacksmithing


My brother is a blacksmith at a colonial model farm and estate, where everything is done as it was in George Washington's time. They plow the fields with horses, they use an icehouse to keep things cold, and they make everything they need on site.
It's strange to think of metal tools wearing out, but they do. Eventually, rakes snap, shovels wear dull, and the metal rusts away, and the blacksmith has to make another one. That's what my brother does- he makes the tools, by hand and in the colonial fashion, that keeps the farm running.
An often overlooked and under appreciated tool is the humble, simple nail. My brother makes them incessantly, because it seems like they never have enough. (Also, they sell them in the gift shop.) When he isn't making trowels or knives, hooks or trivets- he's making nails. Nails they use everywhere in the 400 acre estate. Though they seem simple, you'll see that it takes a few steps to actually make them, and that it takes a lot of practice to make them well.
My brother's word's will be in bold and italics throughout the instructable. He describes how he makes a "Colonial Rose Head Nail".
"I have heard it stated a number of times that a Smith must make 1000 nails before they start to get good. After experiencing this myself, I too will be saying it."
Step 1: Tools and Supplies


These are tools my brother believes any self-respecting would-be nail maker should have on hand.
Forge
Anvil
Hammer
Tongs
Hot cut or hardy
Square metal punch
File
Oil for quenching
Flux
3/4" sq. X 6" iron bar
1"x2"x1/4" steel plate
1/4" iron drawn wire
I asked my brother about his list, because as a historical re-enactor, it's basically his job to answer these questions all day. It's a format he's gotten used to, I think. I hope so, at least.
What's a "Hot cut" or "Hardy?"
"A 'hot cut' is a narrow chisel that cuts into hot metal. The 'hardy' is similar, but fits into the anvil so you don't have to hold it."
How big is the forge you use, and how big does it need to be to just make nails?
"The forge at the site is quite large- big enough to make all sorts of tools. At home, I use a gas forge made from a propane tank. It's about 4-5 inches square, and more than enough for the nails. It can't make the nail header, though."
Where do you get your iron bars from?
"Salvage. I keep my sources a secret- so people won't buy it up. Iron is expensive, and I can't risk losing my source."
Step 2: Make Tools to Make Tools

Something that seems to be a constant across time, whether you are a blacksmith living in the 1700's like my brother, or a programmer living in 2015 like me, is that it seems like you spend more time making things to help you make things than you do actually making things.
When my brother makes "Rose Head Nails", he uses a tool called a "nail header" to help him along. In keeping with his quest for historical accuracy, he makes the nail header in the same fashion, and with the materials they would have had available. I think those of us in the modern world are allowed to take some short cuts, though.
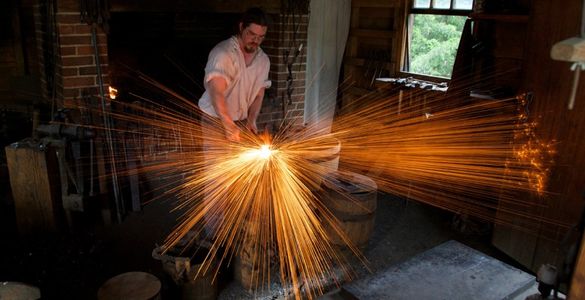
"It is important to note that for THIS project, a very hot fire is necessary. Working wrought iron and performing a forge weld both require a fire that will bring the metal to the melting point. Wrought iron has a grain structure similar to wood unlike the common mild steel. If it is not worked at very high temperatures, the fibers will shear apart and splinter."
Yeah, ok. I know YOU can just hold your hand over the fire and tell how hot it should be, but for those of us who use an infrared thermometer, what temperature is that?
"It's about 2800F. The metal will be literally white hot. The top of the metal should be fluid, even goopy feeling."
Shouldn't we say something about safety? That's pretty hot.
"Don't touch it."
You can do better.
"There will be a lot of sparks, so some people wear aprons, goggles, gloves. I find they hinder my movement, but they are always advised even if I don't wear them."
Did you make your own hammer and anvil, too? Blacksmithception!
"My hammer, yes, anvil no. I made my tongs, punches, and other tools. You can get an anvil from a blacksmith supply store."
Step 3: The Nail Header


Here is his description of making the nail header:
"I start this project with a bar of salvaged wrought iron. The bar I used was taken from a 19th c. gate and is 3/4" square and cut to roughly 6" long. I cut my bars by heating in the forge and using either a hot cut (chisel to be used on hot metal) or a hardy (an anvil tool fitting in the square hardy hole with a chisel edge). I'll take this bar and hammer it out flat, approximately 1/2"x1". Next, by using the edge of the anvil and precise hammer strikes, I define the head of the tool then start to draw out the handle. The header will require steel on the face as the iron alone will not hold up to repeated use. I use scrap steel generally from old files or wagon springs. Cutting the steel to fit the face of the header, I make sure there is not any overhang, otherwise the steel will over heat and crumble when I weld. Flux the steel and set it aside to cool. Several fluxes are available now, but fine sand was often used in early American smithing. I'll bring the iron up to an orange heat slowly letting the heat really sink in, quickly Flux, place the steel and bring the whole piece up to a welding heat. I'll repeat the weld a couple of times to seal up any gaps then punch the hole in the header. I start the hole from the back and finish it from the top. I like to clean up the edges on the handle and make it comfortable to grip and put a hook or loop on the end. The header is brought back up to temp and quenched to harden. Once a nail header is made, I'll pass a few nails through it and break it in a bit before I start production."
Why don't you have any pictures of you actually doing this?
"Because I can't hold a camera at the same time as I swing the hammer."
Tripods, dude.
"I can't set up a camera and tripod at a historical re-enactment. That's for the tourists- they take plenty of pictures."
Step 4: Making 1000 Nails


So after those preparations, he's now ready to actually make some nails.
"To start a nail I'll heat the tip of my nail rod / drawn wire (round or square iron only slightly wider than the hole in the header) and hammer it out to a point. Then, using the edge of the anvil, I create a shoulder on two sides of the nail. The taper of the nail gets cleaned up on the anvil and drawn down so it slides smoothly into the header and rests on the shoulder. I will then notch the rod about 1/4" above the shoulder, make sure I have a good heat and break it off in the header. Quickly, so as not to lose my heat I'll hammer down the head of the nail with 4 clean strikes on the 4 corners of the head. If these steps have correctly been followed, the nail should slip free of the header."
How long does it take to actually make each nail, once you've done all the prep work?
"It takes me about a minute to make a nail, but most people should expect to spend 5-10 minutes each."
What do you do with the nails after this? Is there a finishing process?
"You should let it naturally cool- don't quench it. Nails shouldn't be hard because they break and shatter if you hit them with a hammer. So nails should actually be a little bit soft."
Quench?
"Quenching is a way of cooling hot metal by dipping it in a liquid. The way the metal cools affects the properties of the metal."
Is there any difference, performance-wise, between your nails and the ones we could buy at the store now?
"They are harder to drive, they bend. But they split less, and hold better. Round nails tend to punch through wood, which leads to splitting. Because they are larger, they hold the wood better, though that is what makes them harder to drive in."
Step 5: An Actual Demonstration
Here's a video of my brother making a nail at a demonstration session. Sadly, he is wearing modern garb, but you get a very clear view of the techniques he describes above.
If you watch the whole video, you can see him answering questions and demonstrating a variety of techniques, such as nails, and different hooks. Ironically, you can hear someone in the background asking many of the same questions I did. I guess I should have done my homework.
If you want to see him quickly make a nail and demonstrate the process he describes above, you can skip to about 10:13 of the video.
Step 6: The Metaphor of Nails

I think we often take a lot of our modern conveniences for granted, and I think that's not a bad thing. As makers, advances in technology (both in tools and techniques) mean that things that were once the province of the wealthy or only the truly truly dedicated in the past can be affordable and accessible to nearly everyone.
Think about the hours invested in a old barn or house, where every board had to be hand shaved, and every nail had to be hammered out individually. And now, we don't even count that as part of the time-budget for the process; it just takes a short trip to the hardware store to get everything if you have a truck big enough to haul it.
Habitat for Humanity says that the modern house uses more than 40,000 nails. Just think- if it takes my brother just 1 minute per nail, then that would mean nearly TWO MONTHS of making nothing but nails, working ten hours a day.
I hope reading about my brother's techniques gives others a chance to admire and respect the hard work of our ancestors, while appreciating the many opportunities we have today!
If you want to learn more about my brother's work, you can sometimes find him on Facebook here:
https://www.facebook.com/kimball.crafter
As a re-enactor, he truly enjoys answering questions about the life and work of people in colonial times. Or if you prefer, leave a question below, and I'll ask it for you.
I asked my brother if he had any "final words" for this write up:
"I burned all the hair off my arm today."
Goodnight everybody!

Second Prize in the
Metal Contest


