

Introduction: Making a Logo With EL Wire


We had some guests coming to Omaha Maker Group that were having trouble finding our space in the evening. We decided that we needed some sort of light-up logo for our front window. We decided some Cool Neon EL Wire would be the easiest tool to use for this!
Step 1: Materials! and Tools!


You will need the following materials:
- A piece of black foam core on which to mount the EL Wire
- A length of EL Wire, with a power inverter (for this Instructable, I used a piece of 15' EL Wire)
- Floral wire, to attach the EL Wire to the foam core
And you'll need the following tools:
- Needle-nose pliers, to cut and form the floral wire
- A straightened paper clip, or other straight pin for punching small holes in the foam core
- A pencil, for tracing the logo on to the foam core
- An LCD or other overhead projector (not shown), for projecting the logo on to the foam core
Step 2: Get Your Logo On


Use the projector to shine your desired logo on to the foam core. Adjust the settings, either in your graphics program, on the projector, or physically on the board, until the logo is the desired size. Trace the outline of the logo lightly on to the foam core with the pencil. The pencil will leave a light, shiny trace when you are done.
Don't worry about a perfect trace (mine looks like I have some serious coffee shakes!). The EL Wire will cover most of your tracing, and the tracing will be almost completely covered by the EL Wire.
Since I may someday add the OMG (Omaha Maker Group) letters to the logo, with additional colors of EL Wire, I went ahead and traced them on to the foam core while I had it all set up. Again, the tracing is barely visible, so it does not detract from the finished product.
Step 3: Get Wired!


I found it was easier to pre-make a bunch of wires. I ended up making batches of about 10-20 at a time for this project, and a good length was around 1-1/2". You could go shorter if you were conserving wire, but it does end up being a little harder to handle the shorter wire.
I marked my length on a piece of paper, and used this as a gauge for cutting the wire. I then grabbed the wire close to the middle, using the needle-nose pliers, and folded the wire into a "staple" by hand.
Step 4: Start Mounting


Place your EL Wire along the pencil tracing of your logo. Using the paperclip (or a straight pin), punch a pair of holes, one on either side of the EL Wire. Place one of your wire "staples" over the EL Wire and through the punched holes. On the back side of the foam core, pull the wire staple tight and fold the legs over. I found the crossing the wire legs held tighter than splitting them apart.
Step 5: Keep on Keeping On

Continue to lay out the EL Wire and attach it to the foam core using the wire staples. I found that the EL Wire followed the tracing pretty easily. I typically placed the wire staples about every 6", slightly closer when I was making tighter curves. I also bent the EL Wire where needed to make sharper corners, and any time the EL Wire came close to itself (such as in the base of the light bulb), I placed a single staple over multiple strands of EL Wire.
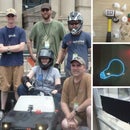
Step 6: Enlightenment!

And here is the finished product!
For the last few inches of EL Wire, I cut a small slot from the edge of the foam core into the the logo, and then pulled the EL Wire through this slot so that it was on the back side of the foam core. The inverter and battery pack are stuck to the back of the foam core using zip ties and self-adhesive zip-tie mounting pads.
The logo was hung in the front window using some small double-jack chain and some existing brackets from an old set of blinds. The black foam core really helps the logo stand out, even when the inside lights are turned on.


