

Introduction: Making Designer Toys Part II (better Molds)


As a follow up to my first self produced designer toy the ice scream man https://www.instructables.com/id/How-to-manufacture-your-own-designer-toy-or-start-/ I decided to design another plastic part that i could self manufacture but this time using a slightly different process.
This time i wanted to do a single solid cast part rather than a rotocast part.
this would require a different type of mold and casting in a pressurized environment.
I also wanted to experiment with a new technique for mold registration that i thought would make my process much more efficient.
Since i and many others have covered 3d print finishing techniques, silicone mold making and resin casting in the past i will skip over some of those details to focus on the more innovative portion of this project.
For the design I stuck with a melting theme but this time worked in the idea of melting weapons as i thought it suggested a sentiment of anti violence.
Step 1: Realize the Concept

the first step in my process after some sketching is to refine the concept in 3d software and check the details for manufacturability.
My software of choice is solidworks.
the knuckle design was a few simple extrusion commands, the first from the front plane to build out the actual knuckle portion and the second from the ground plane to create the general shape of the melted puddle. I added a few chamfers around the edges of the knuckles and a lof of filleting to blend the puddle in to the knuckle portion in a convincingly melted manner.
after the 3d work was completed the file was exported to an objet 3d printer.
after a significant amount of high grit sanding and a light gloss coat i had a pattern ready for a silicone mold.
Step 2: Designing the Mold GOOD STUFF

This step is the main reason for this instructable, i developed a new system for mold registration. I didn't want to have to use tape or elastic bands to hold my mold halves together when casting, it seemed like a very cumbersome detail in the process of creating resin multiples.
I wanted to be able to run multiple molds at once and i didn't want to have to strap and unstrap each mold every time needed to remove a finished part.
I wanted to streamline my process so i could set my molds in my pressure chamber, mix and pour fast casting urethane resin, close the chamber, pressurize, wait 4 minutes, unload the parts and start over. If i could create simple two part molds that didn't need to significant attention prior to each casting i could really speed up my process.
MAGNETS!
I designed a fixture and 3d printed it, this fixture allows me to mount rare earth magnets in my mold when i poured the silicone.
The melting knuckles were affixed to a mold wall and tapered support peaks were designed to reach half way up the mold and reach a level just below where i wanted my parting line to be.
i mounted rare earth magnets on the peaks with a small drop of hot melt glue, just enough to keep them in place temporarily.
i poured a fairly rigid silicone until it just covered the top of the magnets and let it cure over night.
once he first layer of silicone had cured i sprayed mold release over the cured surface and poured another 1/8" layer and let it cure overnight again.
now add another set of magnets, this time they will simply snap in place and register with the first set which is embedded in the first layer of silicone.
now fill the mold boz all the way up with another batch of silicone and let that cure
Step 3: The Mold

Once the final layer of silicone is cured, you should be able to pull the whole assemble off of the mold frame if it was designed correctly with tapered pins and no major undercuts. The magnets should be well embedded in the rigid silicone and the tiny drops of holt melt should just break away allowing you to use the mold frame over and over again.
as you may have noticed, this mold has absolutely no keys or other method of registration. if they are strong enough, and arranged properly the magnets do all that work for you. They will align the two mold halves and pull the silicone parts together compressing them just enough to eliminate leakage but not so much as to cause deformation.
these two mold halve simply snap together and pull apart easily to allow for simple removal of cast parts.
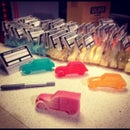
Step 4: Manufacturing


With my new molds, my process was as efficient as i had hoped.
i could use fast casting urethane resin and run 6 molds at a time to achieve an excellent cycle.
the parts require very minimal post precessing, i remove a small amount of flash, buff the bottom on a disc sander, sign them, wrap them in tissue and put them in a custom package that was designed and sourced the same way i did them for them fro my previous release.
Step 5: How About That


It turns out that Smooth on Mold Max 60, the high durometer silicone tha ti used for this project is also a high temperature silicone.
I purchased a small melting furnace by the Lyman company called the "big dipper" and ordered some high nickel content pewter from rotometals.com and was able to cast solid pewter parts in the same molds i was previously casting urethane resin in.
THAT'S PRETTY COOL!!!

Participated in the
Instructables Design Competition

Participated in the
UP! Contest


