

Introduction: Making Your First Video Game (with Flash)


First off this Instructable assumes you have no experience using flash. I'f you know a little but have never made a game before skip the first steps involving the use of tools.
I've been cursing this site for a while and haven't come across many Flash tutorials so i decided to make one. If this site isn't really for this type of software instructions then I apologize.
Most websites are flash based, so is YouTube.
Creating a game in Flash can be super complicated or vary simple (this one is super simple). I have tried to be vary thorough in this ible but if i missed something or you need help comment your problem.
Also I realize this Instructable will probably have allot of steps for a simple project, but don't be intimidated Flash takes a bit of getting used to but it is easy.
First off the requirements:
Any version of Adobe Flash (link to 30 day free trial)
Mouse
Key Board
Step 1: Setting Up


I assume you already have flash or at least know how to download and install it. If not there's probably an Instructable for that.
First thing to do is open up a new Action Script 2 document.
Next we need to set the size of the game's play area. Modify --> Document. The default size is OK but being able to change the size of the stage is good to know.
Also a few useful shortcuts (sorry i don't know the mac equivalent) Hold Alt while dragging to copy, Hold Alt with the magnifying glass to zooom out., Ctrl Z to undo , ant Ctrl T for free transform. (These are the ones that I use most often)
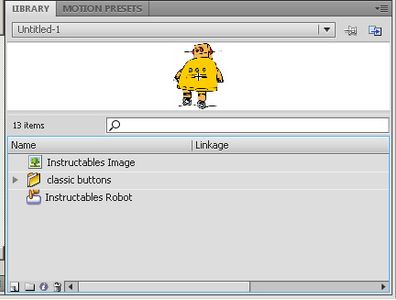
Look at the picture for the names of the different areas of the program yours may not be in the same place but they will look the same. You can move them around by dragging the gray bit at the top and moving it wherevers, if it turns blue it will be docked. If it is completely absent it will be under the Window tab at the top.
Step 2: Magnifying Glass Tool


The magnifying glass is used for what else? Zoooooming in and zooooming out.
This is useful for navigating around the stage. The picture shows it's icon and it's properties.
Step 3: Pen Tool


The pen tool is great for drawing complex curves and simple characters. However it takes some trial and error to get used to. You cannot fill a pen drawing with color unless it is a closed loop. The way to tell if it is a closed loop is that there will be a little O underneath the cursor when it is over a closing point.
Step 4: Geometry Tool


This is probably the most useful tool in simple game making . It is used to draw ovals circles, squares, rectangles, polygons, and stars. Complicated characters can be made by deforming and by combining these simple shapes easily. in order to change the shape being drawn click and hold the square icon and select the object you want to draw. To change the type of polygon or star being drawn click the polygon tool from the list. Next go to it's properties and click Options in the little window that opens you can set the number of sides and the star point size as well as whether you are drawing stars or polygons. Hold Shift while drawing to draw a perfect square or circle.
Step 5: The Different Mouse Tools


There are three mouse tool in flash all are slightly different, but all can move things around the stage.
The first is the black mouse tool. It is used to move things around and to bend lines. This is the default tool. To select one line segment click it. To select the whole outline double click anywhere on the outline. To select the whole object double click the fill. (these rules also apply to the free transform tool).
The second is the white mouse tool. it is used to modify geometry by dragging single vertexes into place. If the little box bellow the cursor turns black it will drag the whole object.
The third is the free transform mouse (a black mouse with a box). By far the most useful of the three (I Think) it can rotate, move , and scale an object. This Tool can also move the rotation point of an object (the little white dot in the middle of the object).
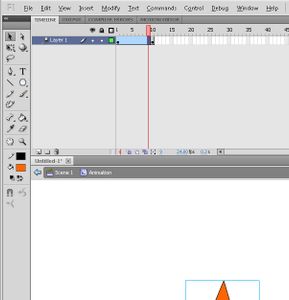
Step 6: Different Types of Frames


If you noticed that as soon as you drew on the stage of the first frame it changed to a darker color. This indicates that it is no longer a blank keyframe. In Flash there are many types of frames, there are examples in the first picture. The only one missing is a little a above the frame showing that it has code attached to it.
The red bar represents were you are in the timeline.
Tweens are ways to get the computer to draw in between steps for you. This simplifies animation allot. They will be discussed more in the animation step.
Time Frames are the same frame repeated over and over so that it stays on screen longer. The amount of time it is displayed depends on how many frames long it is and the frame rate (indicated at the bottom __ Fps). so if your frame rate is 24 fps and you have 24 frames of something then it will be displayed for 1 second. Again this will be explained more later under the animation step.
Step 7: Drawing the First Frame

The First frame for our game will be both the title screen and the "failure screen" (were you go when you get a question wrong). Feel Free to decorate it as you like.
Step 8: Buttons


In order to make your button game do anything it's going to need some buttons. In flash there are three types of symbols:
Buttons : have 4 frames Up which is what the button will do when nothing is happening to it. OVER which is what the button looks like when the mouse is over it. DOWN which is what happens to the button when it is being pressed. and Hit defines the area that can be clicked on. By default this is set to the buttons Up size. It is also not visible during playback.
Movie clips: little animations that can be nested to avoid really long timelines
Graphics: These are just pictures.
The easiest way to get buttons is to use the default ones that flash comes preloaded with. To access these go to Window --> Common Libraries --> Buttons. Next look through the library to find a button you like and then drag it onto the stage.
OK thats great but what about making your own buttons. This is also vary simple. First either select Insert -- > New Symbol and then under the drop down menu select button and name it. Or right click on an existing shape (like our instructables robot) and select Convert to symbol then select button from the drop down menu and name it.
In Flash everything is made up of symbols within symbols (called nesting), even our really simple instructables robot button has two components (the robot picture and the button itself) . When you first create a button you go inside it in order to edit it (you can tell what your in buy looking at the bar just above the stage) however when you are outside the button you will not be able to edit it.
to add some creativeness to our really simple button I made a new keyframe (by right clicking on the timeline) on the over step in the button. Then I added some stars to the instructables robot (you can do whatever you like).
Ok Only a couple more tings to do.
Step 9: Animation


Movement in flash is created by showing on object in a different position then it was before. It does this so fast that your eye is fooled into thinking something is moving. It is like drawing on each page and then flipping through them quickly except that instead of pages they are frames.
The most simple way of making an animation in flash is to make a series of keyframes in which the object moves a little in each one. This can be problematic unless you nest the animation in a movieclip. Making a movie clip is the same as making a button except in the drop down menu you select movie clip.
The above process takes a long time. a much faster way is to use a tween. A tween is a sequence of frames that the program creates for you all you need to do is tell it were to start and were to end, it fills in the rest. Making a motion tween is simple either right click on a section of Time frames and select create motion tween (if a window pops up telling you a motion tween can only be applied to symbols. And asks you if you want to turn your current shape into a symbol just click OK). You should now have your starting position for the tween to make the end position hold Ctrl a click on the end of the blue section of frames, then position the object in it's end position.
Step 10: Second Frame (First Question)

using the the skills already posted you should be able to make the first question of the game. Mine has four buttons (answers), and some text.
Step 11: Actions


In order to add interactivness to our flash game we will need some code. Flash uses action script (sort of like java) this is an object oriented programming language. The good thing about actionscript (Action script 2 in this instructable) is that you don't need to type any code. The code is already written and can be accessed on the side of the actions panel.
To access the Actions panel go to Window --> Actions. Or right click on a Symbol and select actions, or press F9.
Now the first thing to do is navigate to the pre-written pieces of code we're looking for. Open the Global Functions folder then Movieclip Control and Timeline Control.
Next click on the stage of the first frame. The actions panel should now say Action - Frame in the top right corner. After scroll down in the Timeline Control folder till you find stop. Double click on this. All done.
Now to make the instructables robot button take us to the next frame we will need two pieces of code first the on (press) {} statement and the the gotoAndStop(); function.
The on press statement listens for when the button is pressed on by the mouse, it then executes what is in the curly brackets.
the gotoAndStop(Frame you want goes here); statement does what it says it goes to and stops on a specified frame. You put the frame you want into the brackets that follow it.
The completed code for the istructables robot button looks like this:
on (press) {
gotoAndStop(2);
}
For the first question there are two pieces of code. One will take the player forward to the next question (right answer code) and one will take the player back to the tittle screen (wrong answers).
The right answer code :
on (press) {
gotoAndStop(3);
}
Wrong answer code:
on (press) {
gotoAndStop(1);
}
this can be copied onto all the wrong answers
Step 12: Finishing Touches


just saving a flash file will only allow you to open it up in flash. However you can also export them as swf's (what youtube videos are) or as .exe's or .app's.
to do that go to File -- > Export -- > Export Movie... to make a swf file
or File --> Publish Settings --> Publish to make an exe or app.
This type of quiz game is really simple to make and can be as simple or complicated as you like. One good example is the Impossible Quiz created by SPLAPP-ME-DO
please have fun and be creative when making you're own. If this instructable is received well i will try to make some more within the next 30 days so you're trial will still be active. Please let me know what you think and if you have any problems comment them. Thanks for reading (and making).
Sorry couldn't include the mac .app because it was in a folder and i didn't know which file to use.


Participated in the
Game.Life 2 Challenge


