

Introduction: Making a 1 Watt Solar Array.


I love my neighbor’s garbage I call them the parts department. In this, instructible I am building a Solar Array out of 30 solar lights my neighbor threw out.
For this project I am only going to use 18 of the solar cells for the array I am building. The array will be able to charge a 12 volt 10 watt hour battery in a day. The total cost of building this array is about 5 dollars, a comparable array or solar cell can run you 60 dollars.
Since all the parts are salvaged, I will test every thing every step of the way, I don't want to completely assemble the array only to find out one of the components I used is faulty.
For testing you will need a multimeter.
Step 1: The Lights.


My neighbor threw out 3 different styles of solar lights.
I took them apart and kept the tops with the solar cells and electronics.
At this point you don’t need tools all the parts clip or press together.
The white spot next to the solar cell or in the solar cell is a photovoltaic cell the photovoltaic is used to set the light into charging or lighting mode.
Step 2: Dissamble the Tops.

I took apart solar light tops and kept the internal parts, the solar cells and electronics.
At this point all the tools I needed was a screwdriver and a wire cutter.
Step 3: Clean the Solar Cell.

Clean the caulking and other debris off the solar cells, a utility knife works well, try not to damage the solar cell by scratching it.
Step 4: The Usefull Parts.


The parts inside are, the circuit board with an LED light, the solar cells, and the photovoltaic.
Some of the solar cells have the photovoltaic attached to the solar cell, like this green solar cell.It can be remover by unsolder the connections.
Some of the photovoltaic are hot glued together just apply a little heat and they come apart.
At this stage the tools I used was a wire cutter, a soldering gun, and a hot air blower.
Step 5: The Salvaged Parts.


When deconstruction is complete these are the parts you have salvaged.
Surprisingly you can buy a solar powered light for less than buying the parts.
The circuit board sometimes useful sometimes not.
The LED light
The solar cells
The photovoltaic
Some rechargeable batteries, most of the time the batteries are no good.
Step 6: Fixing a Cell.

Plastic solar cells can be compromised by scuffing on the surface of the plastic cell, or oxidation of the plastic due to UV light from the sun.
Coat it with UV resistant clear coat or lacquer and test the cell again this can improve your cells by 20%.
Step 7: Connecting and Testing the Solar Cells.


Under room lights check the voltage coming out of the solar cell you should get some voltage.
If you get no voltage the cell might be damaged or the wires might be bad.
Replace the wires and test or replace the cell.
Solder the cells in series + to –
Under room lights check the voltage coming out of the solar cell array.
If you tested all the cells before assembly and get no voltage after assembly, one cell might be connected backwards or the wire connections might be bad.
Resolder the cells or replace the wires and test.
I know I might sound like I am repeating my self but there is an old carpenter rule. “Measure twice, cut once.”
Step 8: Testing the Array.
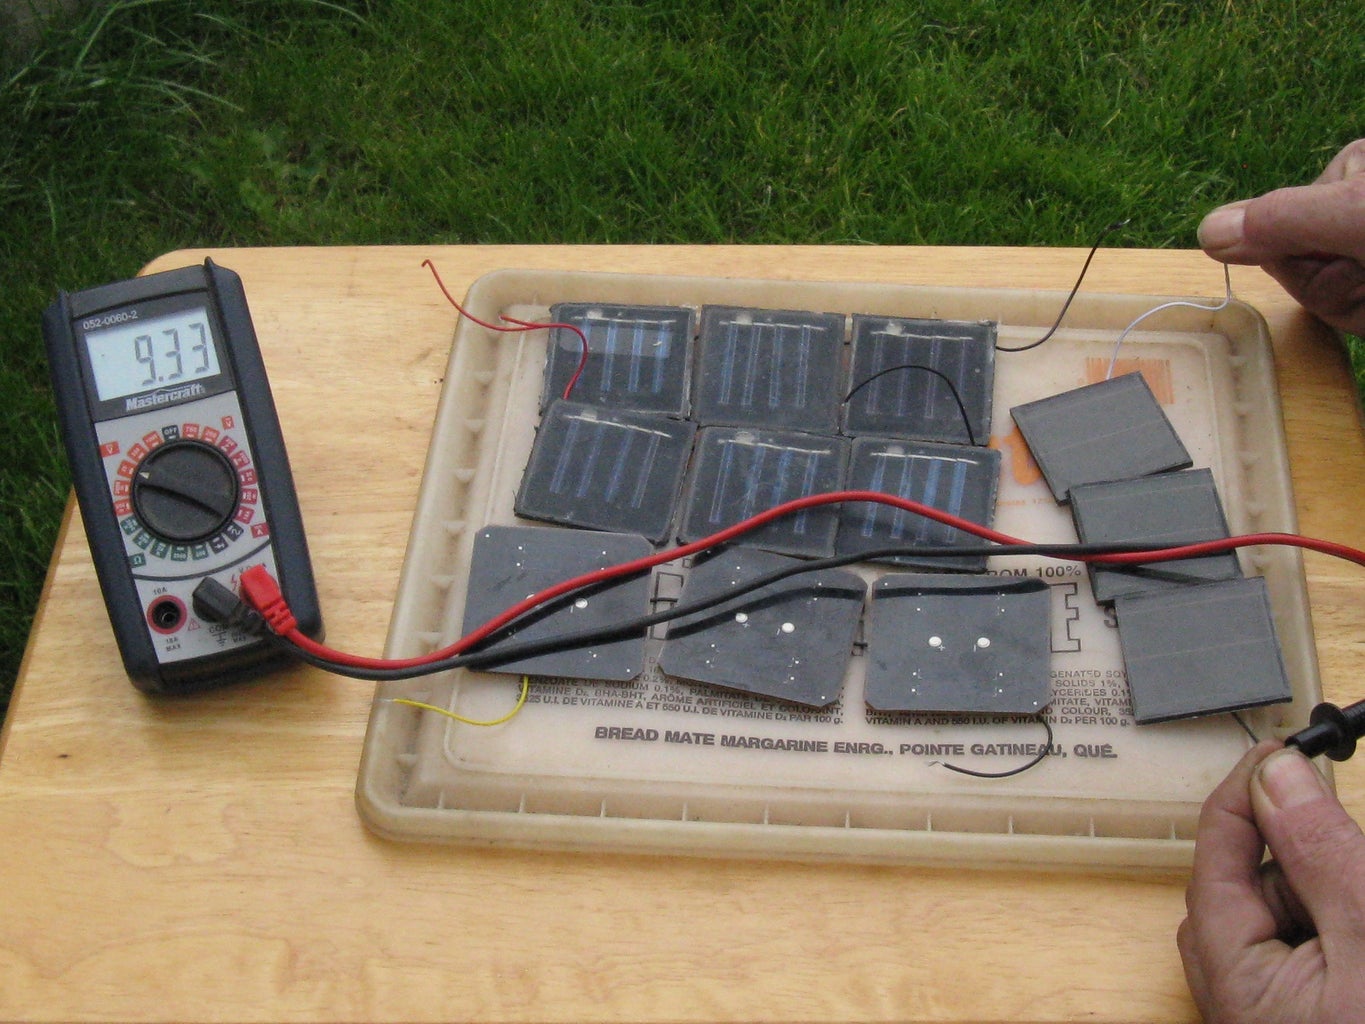
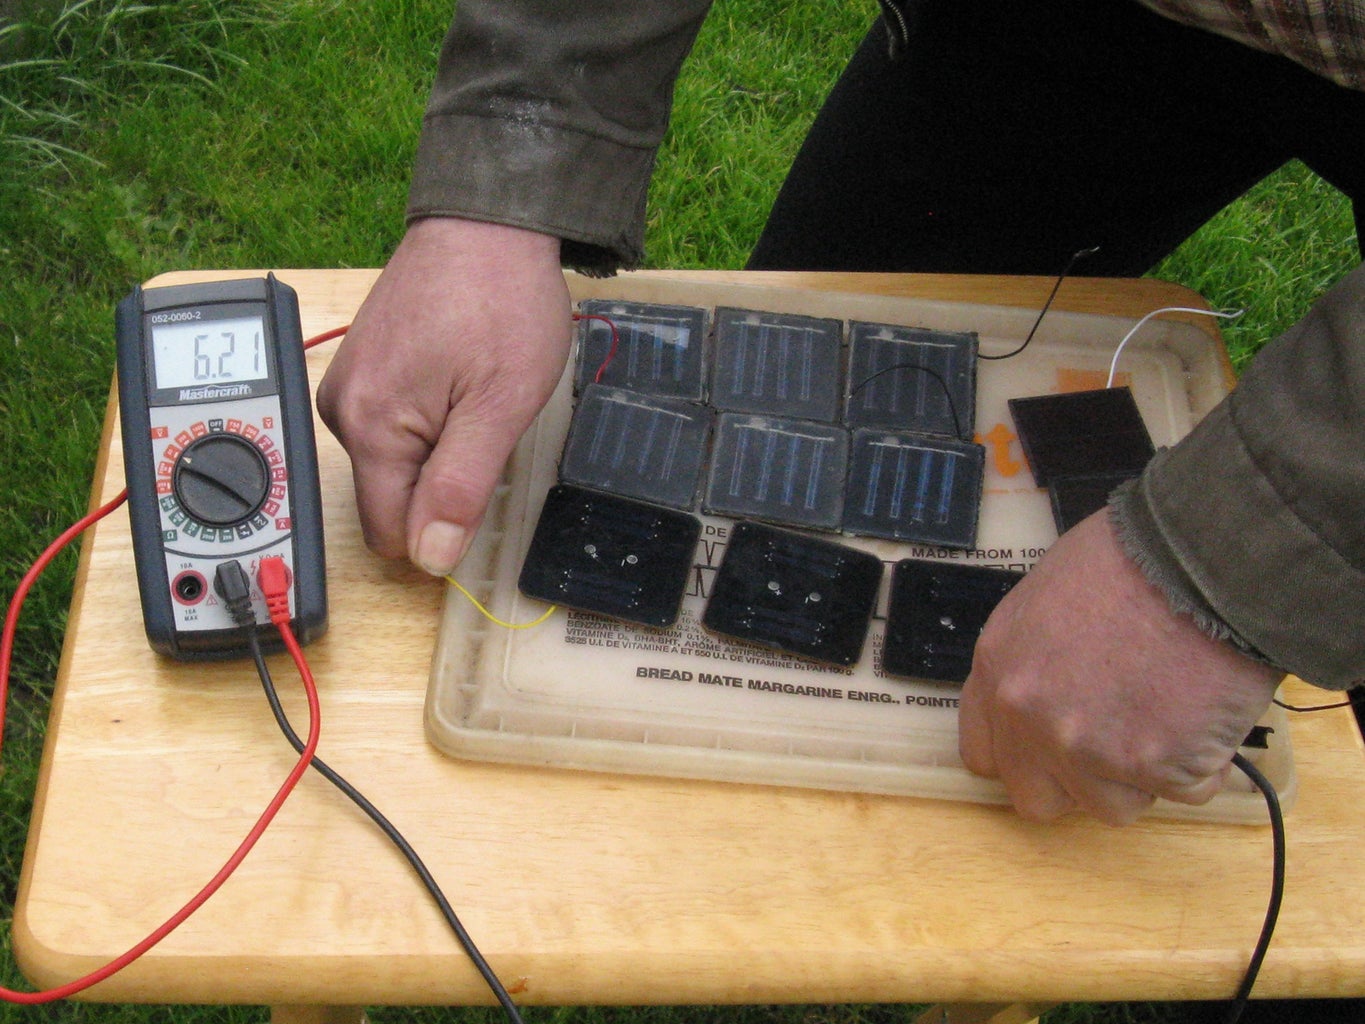


Test the array under diffuse sunlight and full sunlight checking the voltage coming out of the solar array.
You will get little differences in the voltages for different light levels within its function range.
The voltage you get will be different for the different cells.
Plastic cells give about 2.2 volts, glass cells give about 3.1 volts a cell.
Glass cells give you a higher voltage then the plastic ones.
Keep adding solar cells until you get the desired voltage.
About 1 volt above the voltage you want, so if you want 12 volts add solar cells until you get at least 13 volts.
This is for a Diode to protect the solar cells from reverse current, there is a voltage drop across a diode.
If you are planing on using a voltage regulator like LM7812 you will need to add more cells to get more voltage.
Step 9: Schematics.

I had a total of 7 glass solar cells, 7 black solar cells, and 16 green backed solar cells.
With salvaged solar cells I don’t have the specs so I don’t like to mix different cells in series to be sure I don’t create an over current in a cell.
With solar cells you should always have a diode to prevent a back current from batteries and strings of solar cells in parallel.
The 1N5819 Schottky Diode prevents back current when the different cells are connected in parallel.
Since there are three different cells of different sizes I only used the green and the black plastic cells for aesthetic reasons.
In a 12 volt array which I wanted, I had 7 glass solar cells, 1 black solar cell, and 4 green backed solar cells left over from the thirty solar lights.
This is the Schematic.
Step 10: Assembling the Array Strings.


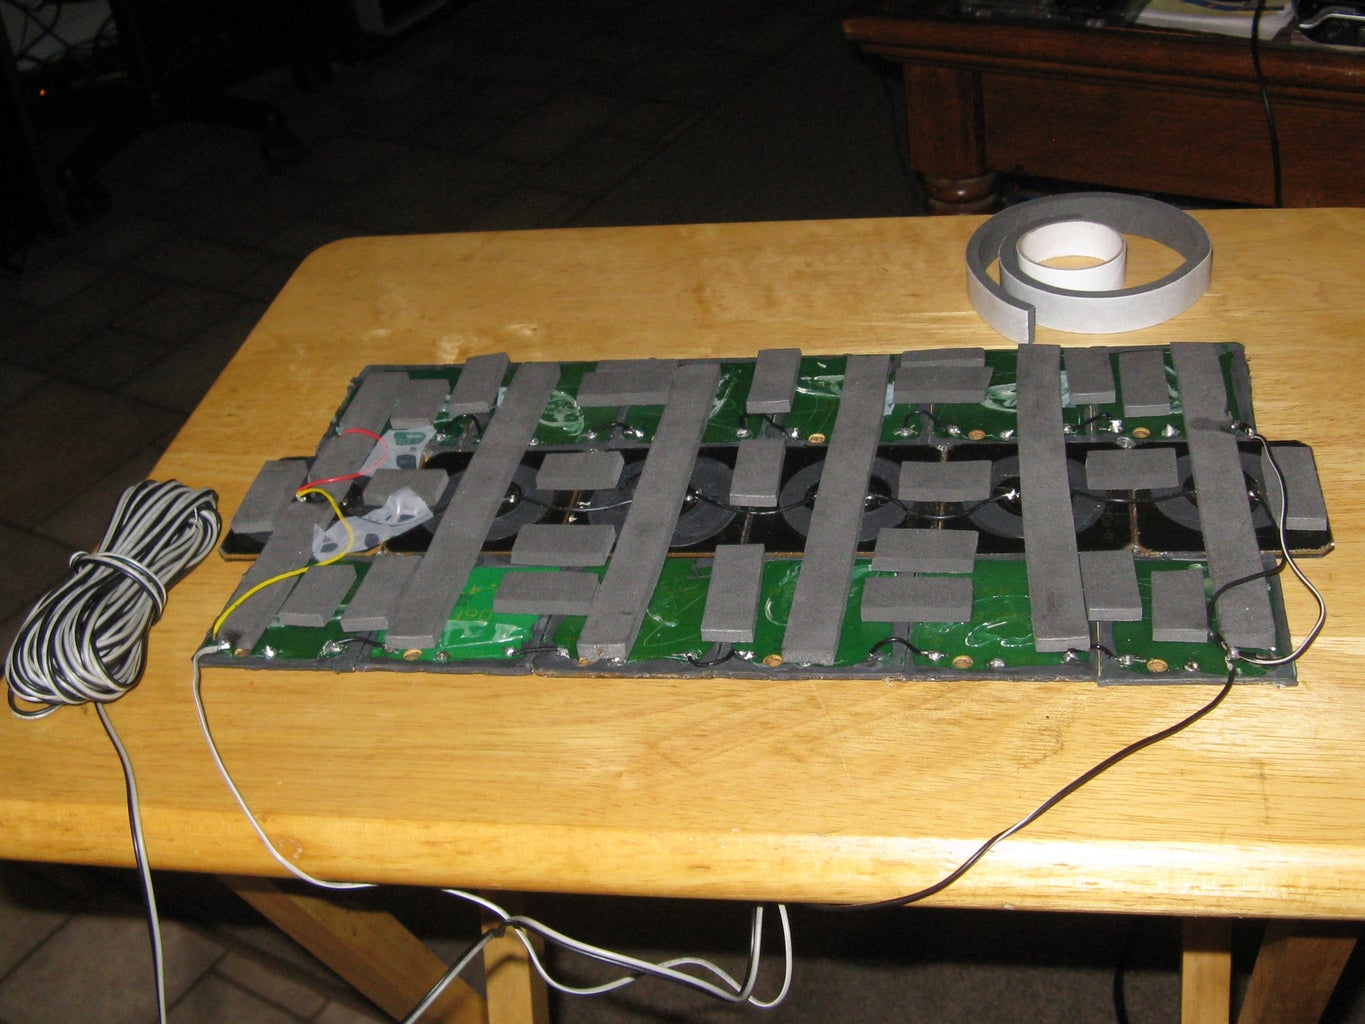

Start with a straight edge, line up the solar strings and tape them in place.
When you have all the strings in place it is ready for the internal sponge.
For the internal sponge I used ¼ inch sponge rubber weather seal. This will hold the cells in place against the faceplate.
Replace the tape with the weather seal systematically in order to keep the internal parts in the shape you wanted and connect the lead wires.
Then test to make sure you are getting the right output.
Step 11: The Outer Casing.


The front and back of the outer casing is made with Plexiglas, I of course got from my neighbors garbage and the edges are made of ½ inch thick sponge rubber weather seal. Cut the Plexiglas 1 inch wider then the assembled solar cells. In my case that was 8 by 14 inches.
The cutting tool I use to cut Plexiglas is made out of a standard screwdriver.
I ground the tip of the screwdriver to this shape.
Scratch the Plexiglas deeply following the straight edge.
Then flip the Plexiglas over and bend the Plexiglas at the scratch it will break along the scratch.
Step 12: Assembling the Outer Casing.


Place the solar cells face down on the front of the outer casing and attach the ½ inch sponge rubber weather seal around the parameter holding the cells in place.
Place the back of the outer casing on to the array and tape the Plexiglas in place.
Drill one hole at a time in the center of the sponge rubber weather seal and bolt finger tight. Over tightening the bolts can break the Plexiglas.
Drill the next hole at the opposite end of the array in the center of the sponge rubber weather seal and bolt finger tight.
Repeat this until the bolts are around the parameter of the array housing and remove the tape.
Step 13: The Final Test.

The last thing to do is test the array.
This does not need a charge controller to maintain a car battery or a battery in storage it is not strong enough to charge a car battery from dead but it will maintain a large battery not in use.
If you do make an array make an instructible on it and here is a little advice.
Try not to mix different makes of cells in string series to be sure you don’t create an over current in a cell in the string or the string may fail if a cell burns out.
With solar cells, you should always have a diode to prevent a back current from batteries and the other strings of solar cells in the array hooked up in parallel.
Back currents can drain your battery at night or burn out a cell string even when you are not using the array.
There is a voltage drop across a diode, try to pick a diode with the smallest voltage drop.
Small cells like the ones I used create a small current so if you use diodes rated for 1 amp you should be safe.
Make sure the diode is rated for a voltage greater than the string voltage generated by the string, the 1N5819 Schottky Diode is a good diode it is rated for 40 volts and has a voltage drop of less than 1 volt.
High-speed diodes have the small voltage drops and Germanium diodes have voltage drops as low as .45 volts.
Last seal up the array so morning mist and rain wont short out the array, you wont believe how many commercially available solar cells cannot be let get wet.
Hope this is helpful
Joe

Participated in the
Hack It! Challenge

Participated in the
The Mad Science Fair

Participated in the
ShopBot Challenge


