

Introduction: Making a Rope Handle for a Jugger Chain


This instructable is part of a series looking at manufacturing equipment for use in a sport called "Jugger." Jugger is a game derived from a 1980s action flick called "The Blood of Heroes" written by David Webb Peoples (12 Monkeys, Blade Runner, Unforgiven) and can be thought of as being like rugby with weapons. An example of a game can be seen here.
The chain is arguably the mightiest weapon on the Jugger field, those fail to argue so often end up facing an irate chain player. But what the cowering staff-player facing three meters of rage fails to realise, is that even the most frightening chain has a humble beginning. A seed, if you will, from which it's fury sprouts. This is the story of how to plant your own seed...
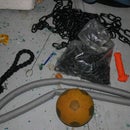
For this instructable you will need...
-Some cable ties
-A lighter
-Some synthetic rope (I used doubled 8 strand polyaramid, but the process is much the same for other braids)
-A glass of water (Not pictured)
-Electrical tape (Optional)
-A marlinspike (I used a cooking skewer and a biro due to marlinspikelessness)
-A breadknife (Or other serrated blade, a hacksaw would do quite well)
Also pictured are a craft knife and a scissors, I'd forgotten quite how tough polyaramid rope is and they turned out to be pretty useless.
Sourcing rope: This is an excellent project to use up spare bits of rope you might have lying around. So long as they're twisted or braided rope they should be fine. Compound ropes with cores tend to be too complicated to braid. If you don't have any old rope, a chandlers (boat shop) or hardware shop are a good bet.
The basic idea is to create a loop which easily fits over your hand, with two tails spliced into each other to serve as a handle. If you've never spliced rope before I recommend starting with a simpler braid of rope, but it is simpler than it looks.
A simpler method of making a chain handle is to sew a piece of polyester webbing tape into a loop, with a smaller loop at the other end to attach to the chain. An even simpler way is just to follow step one of this instructable, and then simply duct tape the ends of the rope together without splicing. Even simpler still is to just duct tape the chain to your arm, but if you're reading this I'm guessing you care about how your equipment looks and want to make something that will last the test of time, as well as the much more serious tests of hitting things and getting soaked in mud.
Armed horde: -GET ON WITH IT!-
Oh all right...
Step 1: Cutting to Length
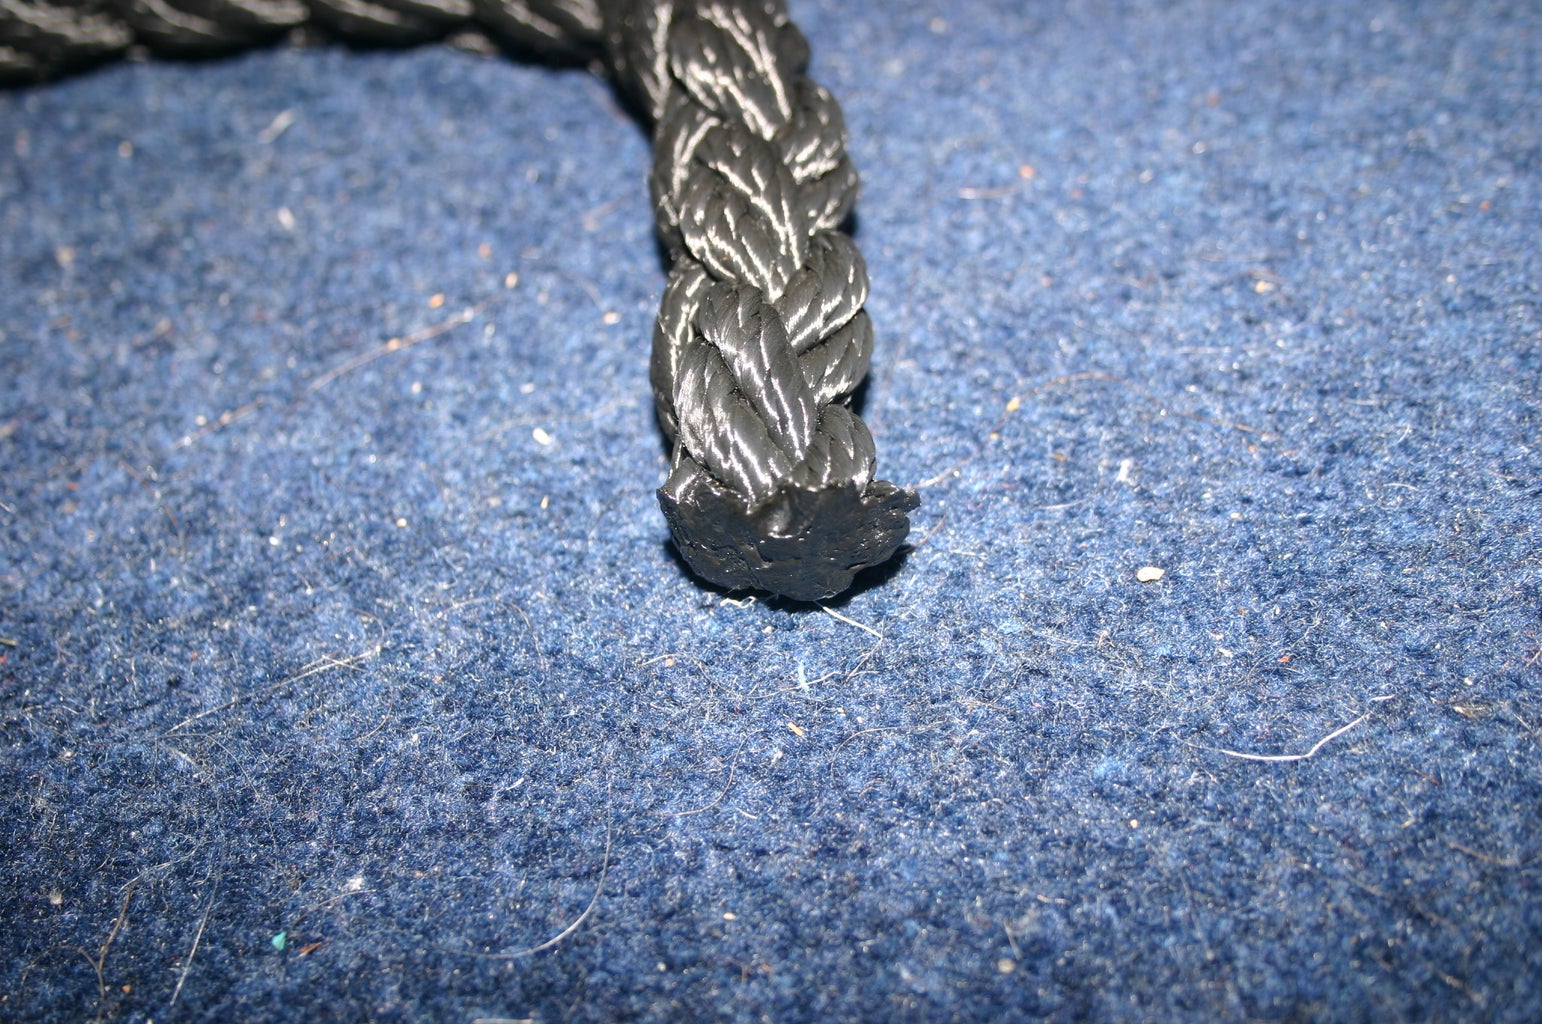


If your supplier did their job, then the end of your rope was cut with a hotknife and is neatly cauterised. If this isn't the case then you may need to cut the trailing ends off and cauterise it yourself with the lighter. After you have done so dip the end in the glass of water for a few seconds to set the plastic and to avoid giving yourself a nasty burn. If you are using natural rope (such as hemp or sisal) cauterisation will not be possible, but try to ensure you are starting with a clean end and tape it off before you begin.
The first thing we need to do is to measure the rope we are going to use. First use your hand to measure approximately three palmwidths from the end of your rope, this length is going to form the grip of the handle, later we will be splicing the working end through it.
Next, keeping this length separate, form a loop in the rope through which you can easily fit your hand. When you're satisfied with the width of the loop and the length of the grip, tie off the two pieces with one of the cable ties.
Step 2: Preparing to Splice


Next, measure the working end up beside the grip and cut it to the same length.
Working quickly, cauterise the end of each strand with the lighter. Take care to hold the end over the glass of water while doing so as if the plastic drips it can be quite painful. Also make sure to keep your fingers as far back from the end of the strand as possible.
Once the end has a smooth surface and is neatly bound, douse it in water for several seconds before continuing. Electrical tape can be used at this point to help hold the end together (optional).
Once all the ends are cauterised, separate the strands down to the cable tie at the beginning of the hand loop. Your working end is now ready for splicing.
Step 3: Start Splicing!


The process of splicing is much simpler than it looks and sounds, it's one of those things that when you actually go to do it makes more sense than any written instructions or 2D diagrams.
Strands of the unbound end of the rope are braided through the strands of the bound end of the rope until the splice reaches the desired length. In the case of twisted rope the unbound ends are braided across the grain of the rope. In the case of braided rope (as in this example) the unbound ends are braided with the grain, following the original braid. As this rope has been doubled, with each braid being made up of two strands, we will be using two strands from the loose end to follow each one.
-First, choose a strand of the bound end close to the cable tie you used to secure the two pieces together. I've chosen the strand on the bottom left, marked "A."
-Next, identify the first point after the cable tie where this passes under another strand, this has been marked "B."
-Using your kitchen skewer (or marlinspike), open up the braid, forming a hole. Be sure that the skewer passes cleanly between the strands and that it doesn't snag them as it passes through.
-Widen the hole with the biro, working it from side to side to enlarge the gap. If you are using a marlinspike, this may be thick enough to enlarge the hole on it's own.
-Take two strands from the loose end and work them through the hole one after the other. Re widening may be necessary after the first strand has been passed through. If necessary, poke the head of the strand through with your skewer or marlinspike.
-Tighten up the strands once this has been completed.
Since the rope we are working has been braided, we will work symetrically up the rope, moving to the strand on the opposite side from the one we have just spliced. If the rope were twisted, we would move to the next strand on the right or left.
-Identify the strand exactly opposite to the one we have just spliced
-Repeat the above steps to splice another two strands from the free end through.
-Having worked the top and the bottom of the rope, identify the two strands on the sides of the rope and splice them in the same manner.
We now have all four initial splices laid into the rope. It becomes a little easier to work out from here on in.
-Continue working each loose pair of strands, moving up the bound pair of strands they are following, one splice at a time. After each completed splice move on to the next loose pair.
-Once the splice is long enough to grip (plus a few inches) cable tie off the top. This bit probably took an hour or two, the worst is over :)
Step 4: Finishing Off


Finally, trim off the ends of the loose strands and comb them out a little to form a plume. You can leave the bound strands as they are until you're ready to attach it to a chain. Congratulations! You're done :)


