

Introduction: Making a Wood Block, Ready for Sculpting, From Different Species


Lately, I have been experimenting with different species of woods to see how a final piece would look by gluing different woods together before sculpting. If you do an image search on multilayered wood etc, you get a host of amazing stuff people have made - the bands of different wood species, with different colors and grain patterns can let you get really creative. So I thought I would share with you my process so far, in my own projects.
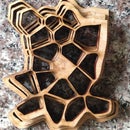
Firstly the images posted here are not even half done in terms of a finished product. But I found there can be a lot of work just to get to this point (actually, a whole long weekend's worth for two blocked out pieces), so this instructable will be showing how I came to this point, and what I need to have done to create a polished final look.
Essentially, the workflow is this;
- Decide on the size and general shape of the final piece, then, on the bandsaw, cut up each species of wood into slices, roughly to those dimensions.
- Sand each side to be glued flat.
- Stack the sanded pieces up and glue them.
- the rough block is ready to sculpt into the final form
Step 1: Cut It, Sand It, Wet It, Glue It

Now its time to sand each side that will contain glue totally flat. Just a quick rough sand will do. Actaully the coarser the sand paper on the sander is, the better the pieces will stick together, since rough sanding makes for the grains to be all jagged, with lots of air pockets. You can also see the grain of the wood change once sanded, so keep going until the whole surface has evidence of contact from the sander and thus, is flat.
Now I picked up a trick somewhere that if you wet the pieces to be glued, it helps with spreading the glue over the whole surface and also opens up the grain pores, which will end up with a tighter and stronger join. I just ran each piece briefly under the tap on high jet. This also gets rid of any dust particles left over, which makes for a clean well-bonded glue binding.
Before jumping in, I mad sure I have everything ready to go -
- a layer of cardboard was layer over the work area (so you don't glue anything to the tabletop!).
- a sponge in a cup of water.
- at least 2 G clamps (make sure you have clamps big enough for the project!)
When you apply and disperse the glue, its amazing how helpful the grain can be when it is wet. Here is a pic of several pieces I glued, stacked up to free up the workbench.
The clamp the whole project between 2 scrap wooden pieces, so as to not damage the piece. And make sure each side is glued really tight. The tighter you can get those clamps clamping, the nicer the end resulting seams will be when you are polishing.
Leave them for at leaf 24 hours.
Then take the clamps off - now time for rough cutting out the shapes!
Step 2: How to Sculpt Without a Chainsaw


Ever since those dorky films, chainsaws have gotten a bad rap. Its just not fair. Especially since, when handled correctly, they are harmless as butterflies...
we'll, maybe not, but there are other ways to sculpt wood - albeit, a LOT slower. Between the bandsaw and a good old fashioned mallet and chisel, it is possible to carve any shape or form.
The key is using the bandsaw to cut a heap of cuts following your design, and then using the chisel to easily remove the parts in between these cuts. see the image to get an idea of how to use this technique to rough out a whole shape.
Also, making finer cuts on the bandsaw can function as stops for grain direction. For example, if you want to protect the wood from splitting further than you want, when using the chisel, adding a small cut at the end will prevent the wood splitting further than that cut. Cute trick, hey?!
Step 3: Last Stage


lastly, between the bandsaw and sander, you can get the rough cut to a finer level. You can get quite creative with angles on the bandsaw, to get into the crevices of your piece. Usually, you have to raise the blade guard to accommodate maneuvering the wood around the blade. But it is crucial to go slow and not change the cutting angle once you begin a cut. Otherwise you will snap the blade and be totally shamed out by everyone else around you....
The 2 pieces shown are examples of this process, while the cylindrical one I roughed out ready to be used on the wood lathe. I'll post pics of it after it has been turned. The first piece I am still not happy with and will probably add more shape and a couple of drilled holes through the thing, to create variety - the more I work on this one, the more I am reminded of the Chinese Philosopher's Stone sculptures. Perhaps I will turn this into one....
Then the last stage to my 2 pieces is to apply the portable sander, then hand sand a finish. Yes, a lot of elbow grease here too....


